FAQ / Installation
Other FAQs in Installation
-
How do I download the plugins and authorize them with the keyfile?
- When you purchase a Valhalla plugin, the email you receive after the purchase includes a link to download the installer. Should you ever need to download it again, the installer files are in your User Account on the Valhalla site:
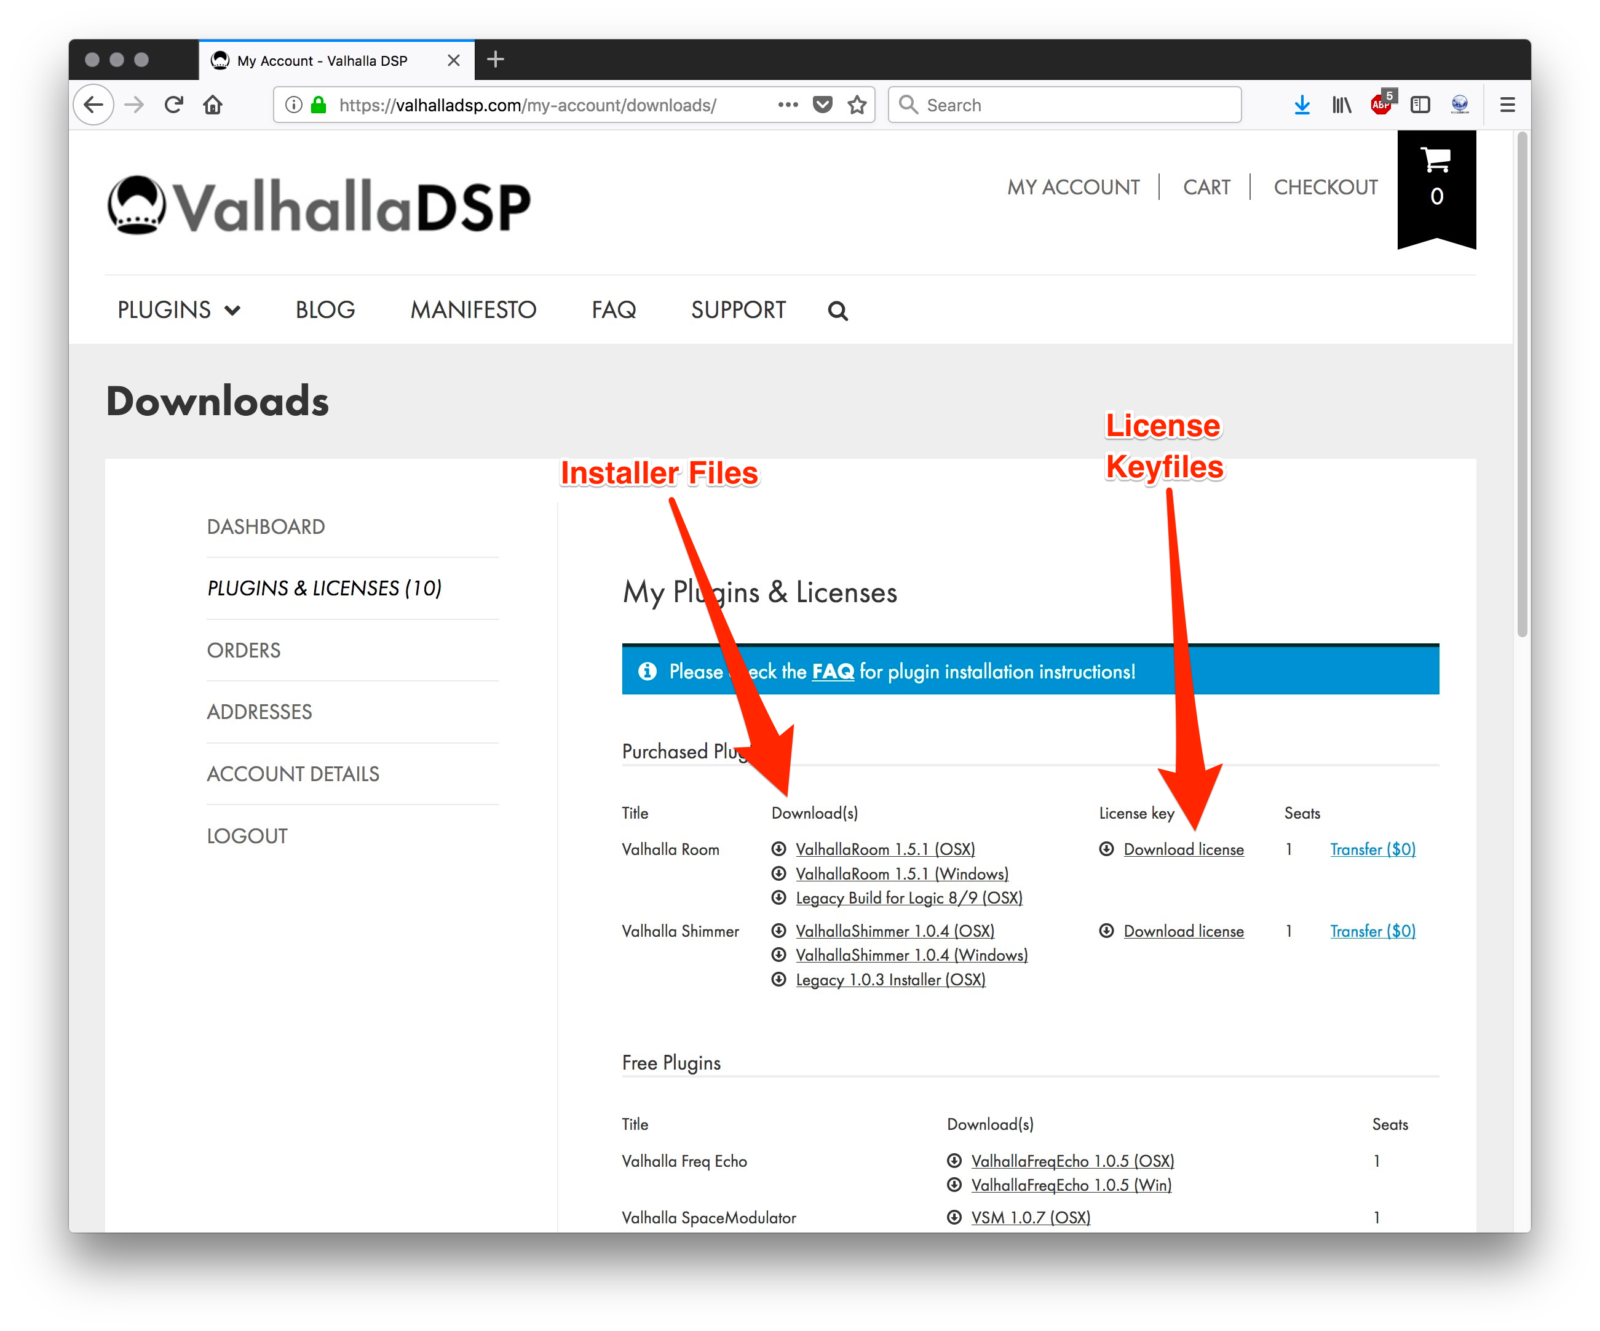
- Also in your User Account is the License keyfile (see the above image); this is used to authorize the plugin within your DAW. You need to SAVE this file to your computer; when you click the keyfile link to download it, your browser will save the .zip file that contains the keyfile. Once this is downloaded to your computer, double-click the .zip file to extract the keyfile. DO NOT try to open the extracted keyfile with any application, DO NOT double-click it expecting it to find an appropriate application with which to open it.
- Unzip the installer and run the Installer file for your plugin.
- On macOS, the plugins will automatically install into the system VST, Audio Units and AAX folders
- On Windows, you can choose whether to install 32-bit or 64-bit .dll files (or both) – pay attention to the VST installation directory as it may be different than the one your DAW is set to reference in its preferences.
- Now that you have installed your plugin, open your DAW and insert an instance of the plugin on a track; once you do this, you will see a message about finding your license to authorize the plugin:

- Navigate to the keyfile you have downloaded, select it and open it from the dialog box:
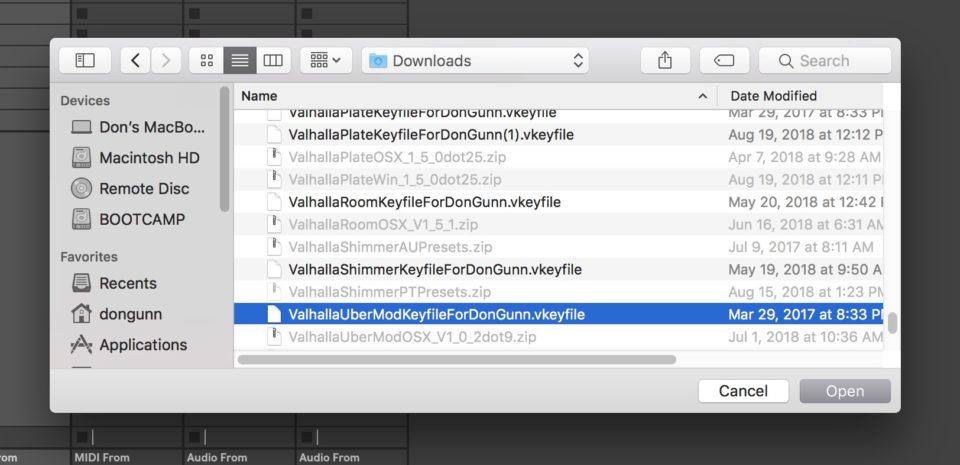
- Your plugin will now be authorized!

Permalink -
The plugin isn't showing up in Cubase 9! What do I do?
Cubase 9 will sometimes refuse to recognize a VST plugin if both the 32-bit and 64-bit versions are installed. In order to fix this, you can remove or delete the 32-bit VST plugins.
On the Mac, you will want to delete:
- Macintosh HD/Library/Audio/Plug-Ins/VST/ValhallaVintageVerb.vst
- Macintosh HD/Library/Audio/Plug-Ins/VST/ValhallaRoom.vst
- Macintosh HD/Library/Audio/Plug-Ins/VST/ValhallaShimmer.vst
- Macintosh HD/Library/Audio/Plug-Ins/VST/ValhallaUberMod.vst
- Macintosh HD/Library/Audio/Plug-Ins/VST/ValhallaFreqEcho.vst
Be sure to leave the files that have _x64 in their file names, as these are the 64-bit plugins.
On Windows, you will want to go into the directory where you keep your 32-bit VST files, and delete
- ValhallaVintageVerb.dll
- ValhallaRoom.dll
- ValhallaShimmer.dll
- ValhallaUberMod.dll
- ValhallaPlate.dll
- ValhallaFreqEcho.dll
The 64-bit versions have _x64 in their file names, so make sure to keep those.
Permalink -
Alrighty. I’ve just rescanned my Audio Units in Logic, but the plugin isn’t showing up. Are there any more weird, completely unintuitive steps I need to take in order to get my plugins up and running?
If you are using High Sierra (macOS 10.13) or Mojave (10.14), you should restart your computer after installing our plugins. Apple made some changes to High Sierra/Mojave that require a restart for some plugins to appear in DAWs (especially Logic…) after installation.
It sometimes takes more than one restart, too, so don’t get discouraged if it’s not found after the first one.
If that doesn’t work, this is where I lean on the expertise of Don Gunn, producer/mixer/drummer extraordinaire, and a long time user of Logic. Don writes:
If you are having issues with newly installed plug-ins showing up in
LogicX, it may be necessary to trash the AudioUnit cache and allow
LogicX to rescan your plug-ins when you restart the application. To do
this, follow these steps:1. You need to access the Library directory in your User account; Apple
has hidden this since OSX 10.7, so to show the User Library, hold the
“Option/Alt” key on your keyboard while clicking the “Go” menu in the
Finder menubar. You will see the Library toggle between visible and not
if you alternately press/let go of the Option key.2. Choose “Library”
3. A new Finder window will open with the User Library directory open.
4. Navigate to the following path: Caches/AudioUnitCache
5. In the AudioUnitCache folder is a file called
“com.apple.audiounits.cache”; you can trash this file or the entire
AudioUnitCache folder.6. Restart LogicX and the application will rescan all of your installed
AudioUnit plug-ins.Thanks, Don!
Permalink -
I’ve followed all of the above steps, but the plugins aren’t showing up for me in Logic and/or Mainstage. What now?
First of all, try rebooting your machine. OS 10.13/10.14 (High Sierra/Mojave) often requires a reboot to recognize the new plugins.
You may need to rescan your Audio Units in order to have Logic/Mainstage recognize that a new Audio Unit has been installed:
– Open up the Audio Unit Manager (in the menu bar, select Logic Pro->Preferences->Audio Unit Manager).
– Click “Reset and Rescan Selection” at the bottom of the Audio Unit Manager window to rescan the Audio Units.
Permalink -
The installation failed on OSX, with the message “Installation Failed.” Now what?
Here’s a few hints:
– Turn off Gatekeeper. The current Valhalla plugin installers aren’t “signed,” so Gatekeeper will flag them. Here’s a few links on how to disable Gatekeeper for the installation:
http://www.tekrevue.com/tip/turn-off-manage-mac-os-xs-gatekeeper/ (for OS 10.7 and 10.8)
http://www.cnet.com/news/how-to-bypass-gatekeeper-in-os-x-mavericks/ (for OS 10.9 and 10.10)– Try downloading the installer, right clicking on the .zip, and selecting “Open with Archive Utility.” Some older achiving programs, such as The Unarchiver, will balk at the installation scripts used in the Valhalla installers. The standard Archive Utility that is built into OSX seems to reliably work.
Permalink -
Help! My hard drive crashed! What do I do?
Sorry about that. Hard drive crashes suck! You should be able to download a new installer and your keyfiles from your Valhalla DSP user account.
Permalink -
I upgraded from Snow Leopard to Lion/Mountain Lion/Mavericks/Yosemite, and now your plugins aren’t working. Help!
This has happened a couple of times. Not all the time, but sometimes. If this happens, just use your .vkeyfile keyfile to reauthorize your plugins. You can download the keyfile and the latest installers from your Valhalla DSP user account.
Permalink -
Can I install the plugin on more than one computer? For example, can I put it on both a desktop and laptop machine?
You can install the plugin on as many computers as you own and personally use. None of my plugins “phone home” or rely on internet connectivity for protection, and are not locked to a specific machine ID. I strongly feel that customers should not be treated like potential criminals. Just be sure to remove the license from your computer when you sell that computer. In short, I trust you folks.
Permalink -
I have all my licenses on an iLok. Can I use an iLok to authorize the ValhallaDSP licenses?
Nope! I use PACE copy protection for my AAX plugins, because this is a requirement of AAX, but I don’t require iLok for any of my other plugin formats.
Permalink -
Do I need to uninstall the demo before installing the “full” version?
Nope! I would recommend running the full installer WITHOUT uninstalling the demo version. The “full” installer will overwrite the demo plugin, while preserving any presets and project settings that were created with the demo version.
Permalink -
Why can’t I unlock the demo version?
Copy protection stuff. It is a bit more annoying, but I figure that it is far less annoying than using challenge/response, a dongle, etc.
Permalink -
How do I unlock the demo version?
You can’t. The demo version is a dedicated, “hardwired” demo version, and can’t be unlocked. You need to install the “full” version from your user account, that you can download when you purchase the plugin.
Permalink -
My audio workstation machine isn’t hooked up to the Internet. Can I authorize/run the Valhalla plugins without a web connection?
Yes! As long as you have some way of moving the plugin installer and the .vkeyfile to your audio computer, you should be able to authorize and run the plugins. The Valhalla plugins don’t require an active Internet connection, and don’t “phone home” or send any information over the Internet during the authorization process, or at any time during their operation.
Permalink -
My older keyfiles have the suffix .xml. Will these work with the latest plugin updates?
Yes. I changed the name of the files from .xml to .vkeyfile, as a few computers will do weird things when downloading files with a .xml suffix. The files are essentially the same, and both the older .xml keyfiles and newere .vkeyfile keyfiles can be used to authorize the latest plugin versions.
Permalink -
What sort of copy protection do your plugins use?
I use an XML keyfile, which is posted to your user account as a .vkeyfile. No dongles, no challenge/response.
Permalink -
I just purchased the plugin, but haven’t received an email with the XML keyfile! When is this email going to be sent out?
See above. As of late December 2014, I no longer send out keyfiles manually (which could take up to 24 hours). Instead, your keyfiles and installer links are available in your user account immediately after completing your purchase.
Permalink -
Is there a video showing how to fix folder and disk permissions that happen for some OSX users when installing Valhalla plugins?
Yes! Click here for another great tutorial from Don Gunn.
Permalink -
Is there a video showing how to install and authorize the plugins?
Yes, courtesy of Don Gunn. Check it out!
Permalink


