Valhalla Supermassive: The Controls


ValhallaSupermassive has been designed to get a lot of sonic complexity with a relatively simple set of controls:
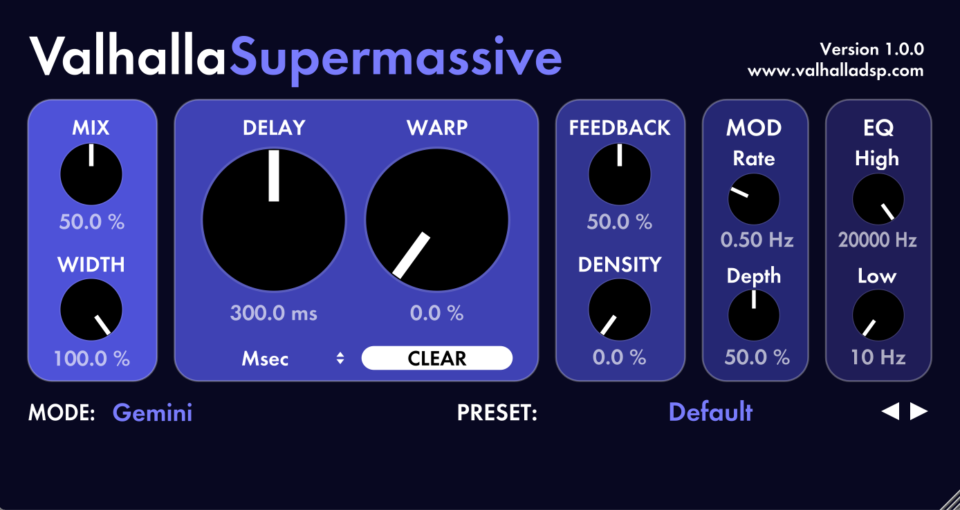
MODE:
This combo box selects the mode, or algorithm, being used. This is the most powerful Supermassive control, as the different algorithms have very different attack, sustain, and decay characteristics. For more details, head to the ValhallaSupermassive Modes blog post.
MIX:
Controls the wet/dry mix of Supermassive. 0% is a completely dry signal, 100% is only the reverb/delay signal, and values in between mix in different amounts of the reverb signal.
MIX LOCK:
Click on the MIX label above the control to lock/unlock the MIX control at the last value selected. This is useful when browsing through presets, or for using Supermassive on a send (when you want it set to 100% wet).
WIDTH:
Controls the width of the reverb/delay output of Supermassive. 100% is maximum width, 0% is mono, and values less than 0% will reverse the left and right outputs. Some of the Supermassive sounds will spin around your head from left to right; setting WIDTH to -100% will reverse this direction.
DELAY:
Controls the length of the longest delay line in the feedback delay network, in milliseconds. Depending on the MODE and the WARP setting, you may or may not hear audible echoes at this setting.
DELAY Sync:
This combo box allow you to choose whether the delay is set in milliseconds, or as a factor of the project’s tempo.
- You can select milliseconds, notes, dotted or triplets. The default is milliseconds.
- Click the “Msec” text under the Delay knob to bring up the Delay Sync combo box.
WARP:
Affects the lengths of the delays in the feedback delay network, relative to the DELAY setting. This can be used to transform a sound from simple echoes, to resonant echoes and smeared repeats, all the way to lush reverbs.
- WARP = 0% results in all delays being the length set by the DELAY parameter.
- With values of WARP greater than zero, the delays in the feedback delay network get more and more spread out (and shorter than the DELAY setting).
- WARP values between 5 and 15% result in stranger “harmonic delays” where the resonances shift downwards as the sound decays away.
- WARP settings between 20 and 50% result in “delay clusters” where the initial delay is smeared, and repeats gradually become more reverberant.
- WARP settings greater than 50% result in more reverberant sounds.
FEEDBACK:
Controls the amount of feedback around the delays in the feedback delay networks. Larger values will result in longer decays. For some of the MODES, the FEEDBACK setting will also affect the initial attack time of the sound (see the Modes blog post for more info).
DENSITY:
Controls the perceived number of echoes in the output.
- DENSITY works by changing how the various delays are mixed with each other.
- A DENSITY value of 0% means that the delays are in parallel and/or series, with no further mixing.
- DENSITY values greater than 0% will increase the mixing between delays, which increases echo density. This will also increase the crossfeed between the left and right delay outputs.
- At 100% DENSITY, all of the delays are fully mixed. This is recommended for more “conventional” reverbs.
MOD Rate:
Controls the rate of the delay length modulation, in Hertz. This controls a multi-phase sinusoidal oscillator, for lush chorusing and ensemble effects.
MOD Depth:
Controls the depth of the delay rate modulation. The depth also varies as a function of the MOD Rate, so you can have faster modulation without getting “out of tune.” A mod depth of 0% will result in a “drier” sound, and will also make some of the WARP artifacts more audible.
EQ High Cut:
controls the cutoff frequency of a -6 db/oct low pass filter that processes the output of the feedback delay networks. Useful in reducing the amount of high frequencies in the signal.
EQ Low Cut:
controls the cutoff frequency of a -6 db/oct high pass filter that processes the output of the feedback delay networks. Useful in reducing the amount of low frequencies in the signal.
Note that both the EQ filters affect the output only, and are not within the feedback loops of the algorithms.
PRESET:
when the name of the active preset is clicked, the Preset menu comes up. This allows you to select, copy, and save presets.
To access the presets, simply click the name of the active preset, to the right of the PRESET: text in the lower right side of the GUI (the plugin will display “Default” when first opened):

The Preset Menu will display when the current preset name is clicked:

To select a preset, simply mouse over the given preset name, and release the mouse button. Mouse over a given preset folder name (the ones with the triangle to the right) to view and select presets within that folder.
To save a preset, simply select “Save as…” from the menu. This will allow you to name your preset, and choose the folder to save the preset to, or to create a new folder for your preset.
If you wish to copy a preset from a forum or blog post, simply select the text with your mouse (including the < and > closing tags), and copy the text (Command+C on Mac, CTRL+C on Windows). Then, select the “Paste from Clipboard” option from the preset menu.
If you want to share a preset with someone, select the “Copy To Clipboard” option, then simply paste the text (Command+V on Mac, CTRL+V on Windows) into the document/email/forum where you want the preset to be.
Tooltips:
The Valhalla plugins are self-documenting. Move your mouse cursor over a control, and the bottom of the GUI will display text describing what that control does.

Damn, thanks for doing this, I’m super super excited to try it out!
Maybe it’s finally time to try out for an ambient project..
very nice plug in,very versatile and free!
Finally got to play around with this today and it t is so beautiful. Thank you so much Sean for your generosity. This adds a level of richness and lushness to my music my other reverbs just we’re not able to achieve
Brilliant.! Thanks for all your hard work and generosity; looking forward to official release…
One thing – you could include VST3 in the compatibility list of specs, at the bottom of the Product page… 😉
Thanks for calling that out – I changed that once the Beta went over to the “official” release.