Building complex reverbs using ValhallaÜberMod

The original ValhallaÜberMod concept had a fairly sparse Diffusion section, which was intended to smooth out feedback echos and add some density to chorus patches. Somewhere during the development process, the diffusion block was expanded into a much more powerful DIFF section, with each input channel being processed by a dense modulated diffusion block with variable size. The DIFF section proved useful in creating dense nonlinear reverbs, as well as lush ambient reverbs and decent plate simulations. The ÜberMod controls aren’t designed around creating reverbs, so I figured that any reverbs created with ÜberMod were a cool bonus with that plugin.

Flash forward to a few days ago, where I found myself experimenting with ÜberMod, mainly as a way of procrastinating before I get back to work on my next plugin. I started running multiple instances of ValhallaÜberMod in series and parallel, and using the sends of my DAW to control the routing and levels. To my surprise, I found that I was able to create some VERY complex and subtle reverbs using ÜberMod, by allocating different instances of the plugin for different stages of the reverb decay.

EXAMPLE 1: Medium Vocal Reverb, w/early reflections

The first example uses 3 instances of ÜberMod, running on 2 different sends. The first instance is running on its own send, and will cover the early reflections stage of a reverb:

<ValhallaUberMod pluginVersion=”1.0.1″ presetName=”RandomizedEarlyReflections” Mix=”1″ Depth=”1″ StereoWidth=”0.5″ Delay=”0.0476999991″ Feedback=”0″ Spread=”1″ Slope=”0.643999994″ Skew=”0.175999999″ Random=”1″ TapGain=”0.5″ Diffusion=”0.624000013″ DiffSize=”0.0163265299″ DiffModRate=”0.0490490496″ DiffModDepth=”0.5″ LowCut=”0.0351758786″ HighCut=”0.232160807″ SpatialXover=”0.145728648″ DetuneRate=”0.00900900923″ DetuneDepth=”0.851999998″ VibratoRate=”0.298245579″ VibratoDepth=”0″ OverMod=”0.0313131325″ DriveInGain=”0.375″ DriveOutGain=”0.75″ DriveNoiseGain=”0.333333343″ FeedbackRotate=”0.5″ SmoothingTime=”0.0990990996″ ColorMode=”1″ DelaySync=”0″ type=”0.333333343″ DiffEnable=”1″ Drive=”0″ DrivePrePost=”1″ Speed=”0″ InputPan=”0.125″/>

This preset uses the 16Tap mode, in conjunction with the DIFF section, to create a dense early ambience that abruptly cuts off after about 50 to 100 millseconds. The TAP Slope parameter is used to create the perception of a room with a short to medium decay, and the DELAY slider determines the point at which this decay is truncated. Some slow LFO modulation is used in conjunction with the MOD OverMod control to randomize the reflections.

The second instance of ÜberMod is running on a separate send, and provides the input diffusion of the late reverb tail:

<ValhallaUberMod pluginVersion=”1.0.1″ presetName=”InputDiffusion” Mix=”1″ Depth=”0.444000006″ StereoWidth=”0.5″ Delay=”0.00999999978″ Feedback=”0″ Spread=”0.5″ Slope=”0.5″ Skew=”0.5″ Random=”0″ TapGain=”0.5″ Diffusion=”0.703999996″ DiffSize=”0.0653061196″ DiffModRate=”0.0130130127″ DiffModDepth=”0.395999998″ LowCut=”0″ HighCut=”0.387939692″ SpatialXover=”0.145728648″ DetuneRate=”0.0370370373″ DetuneDepth=”0.5″ VibratoRate=”0.298245579″ VibratoDepth=”0″ OverMod=”0″ DriveInGain=”0.375″ DriveOutGain=”0.75″ DriveNoiseGain=”0.333333343″ FeedbackRotate=”1″ SmoothingTime=”0.0990990996″ ColorMode=”0″ DelaySync=”0″ type=”0.0416666679″ DiffEnable=”1″ Drive=”0″ DrivePrePost=”1″ Speed=”0″ InputPan=”0.125″/>

This preset uses the 2TapChorus mode, but most of the work is being done by the DIFF section. A fairly short DIFF size is used, with the idea being to turn impulsive sounds into a “puff” of diffuse energy. This will smooth out any reverb that this preset is placed in front of.

The third instance of ÜberMod is placed in series after the second instance (i.e. on the same send), and generates a reverb tail with a medium decay:

<ValhallaUberMod pluginVersion=”1.0.1″ presetName=”MediumLateReverb” Mix=”1″ Depth=”0.5″ StereoWidth=”0.5″ Delay=”0.00999999978″ Feedback=”0.612999976″ Spread=”0.5″ Slope=”0.5″ Skew=”0.5″ Random=”0″ TapGain=”0.5″ Diffusion=”0.748000026″ DiffSize=”0.240816325″ DiffModRate=”0.0290290285″ DiffModDepth=”0.5″ LowCut=”0.0954773873″ HighCut=”0.288442224″ SpatialXover=”0.145728648″ DetuneRate=”0.0490490496″ DetuneDepth=”0.5″ VibratoRate=”0.298245579″ VibratoDepth=”0″ OverMod=”0″ DriveInGain=”0.375″ DriveOutGain=”0.75″ DriveNoiseGain=”0.333333343″ FeedbackRotate=”1″ SmoothingTime=”0.0990990996″ ColorMode=”0″ DelaySync=”0″ type=”0.0416666679″ DiffEnable=”1″ Drive=”0″ DrivePrePost=”1″ Speed=”0″ InputPan=”0.125″/>

The above late reverb preset also uses the 2TapChorus mode, with most of the work being done by the DIFF section and the FEEDBACK control. The Diffusion is set to a fairly large size. The DIFF Size, in conjunction with the feedback and filtering, determines the length of the reverb decay. The WARP fBMix control is set to 100%, to create a figure-8 (ping-pong) feedback loop, as used in reverbs by Lexicon & Alesis.

Once you have the basic routing set up, experiment with the send levels being sent to the Early Reflections (instance 1) and the Late Reverb (instances 2 and 3). I have found that it sounds best with the Early Reflections set to a somewhat higher level than the Late Reverb.

EXAMPLE 2: Randomized Hall

ValhallaÜberMod is versatile enough that you can emulate many types of reverb structures, not just the Early Reflection / Late Reverb division of the more “scientific” reverbs. For example, Lexicon’s Random Hall is known for its high echo density, and the soft attack derived from the Shape and Spread controls. To emulate this soft attack using ÜberMod, we’ll use 2 instances of ÜberMod in series. The first is used to approximate the Shape/Spread section of Random Hall:

<ValhallaUberMod pluginVersion=”1.0.1″ presetName=”ShapeSpread” Mix=”1″ Depth=”0.444000006″ StereoWidth=”0.5″ Delay=”0.342900008″ Feedback=”0″ Spread=”1″ Slope=”0″ Skew=”1″ Random=”1″ TapGain=”0.5″ Diffusion=”0.791999996″ DiffSize=”0.134693876″ DiffModRate=”0.0130130127″ DiffModDepth=”0.395999998″ LowCut=”0″ HighCut=”0.975879371″ SpatialXover=”0.145728648″ DetuneRate=”0.0370370373″ DetuneDepth=”0.5″ VibratoRate=”0.298245579″ VibratoDepth=”0″ OverMod=”0″ DriveInGain=”0.375″ DriveOutGain=”0.75″ DriveNoiseGain=”0.333333343″ FeedbackRotate=”1″ SmoothingTime=”0.0990990996″ ColorMode=”0″ DelaySync=”0″ type=”0.375″ DiffEnable=”1″ Drive=”0″ DrivePrePost=”1″ Speed=”0″ InputPan=”0.125″/>

This preset uses the 32Tap mode, with a fair amount of Diffusion, and the TAP Slope set to -100%, to create a nonlinear reverb that fades in gradually over time.  The attack time is determined by the DELAY slider.
The ShapeSpread preset is used in series with a 2nd instance of ÜberMod on the same send, that adds a huge reverb tail to the slow attack:

<ValhallaUberMod pluginVersion=”1.0.1″ presetName=”BigLateReverb” Mix=”1″ Depth=”0.760999978″ StereoWidth=”0.5″ Delay=”0.00999999978″ Feedback=”0.768000007″ Spread=”0.5″ Slope=”0.5″ Skew=”0.5″ Random=”0″ TapGain=”0.5″ Diffusion=”0.843999982″ DiffSize=”0.448979586″ DiffModRate=”0.0730730742″ DiffModDepth=”0.495999992″ LowCut=”0.0502512567″ HighCut=”0.340703517″ SpatialXover=”0.145728648″ DetuneRate=”0.033033032″ DetuneDepth=”0.5″ VibratoRate=”0.298245579″ VibratoDepth=”0″ OverMod=”0″ DriveInGain=”0.375″ DriveOutGain=”0.75″ DriveNoiseGain=”0.333333343″ FeedbackRotate=”1″ SmoothingTime=”0.0990990996″ ColorMode=”0″ DelaySync=”0″ type=”0.0416666679″ DiffEnable=”1″ Drive=”0″ DrivePrePost=”1″ Speed=”1″ InputPan=”0.125″/>

This preset is very similar to the earlier late reverb preset, but with a much greater DIFF size setting. In addition, the WARP Speed is set to 1/2, which doubles the size of the diffusors, to create a HUGE reverb decay.

ROLL YOUR OWN SOUNDS

The above examples are just 2 quick demos of the complex reverb responses that can be generated with multiple instances of ValhallaÜberMod. For example, a longer gated reverb could be used in parallel with a reverb that incorporates DRIVE in the feedback loop, to create a reverb that starts off clean, then turns nasty after a certain amount of time.

ÜberMod is also useful in extending the capabilities of other reverb plugins. For example, the InputDiffusion or ShapeSpread examples from above can be used in series with ValhallaRoom, to create a super lush reverb that has more “standardized” reverb controls. The RandomizedEarlyReflections example can be added in parallel to ValhallaShimmer, to add early reflections to the modulated Shimmer late decay. Or combine ÜberMod with any other reverb plugin, algorithmic or convolution, as you see fit.  The low CPU consumption of ÜberMod makes it easy to use it in conjunction with other plugins.

It is worth noting that the same process can be used in the construction of all sorts of complicated sonic events, not just reverbs. ValhallaÜberMod excels at choruses, ensembles, multitap delays, echos, and so forth. By combining different settings of ÜberMod in series and parallel, all sorts of weird and wonderful sounds can emerge. I encourage people to use ÜberMod as a modular building block for creating all sorts of complex effects.
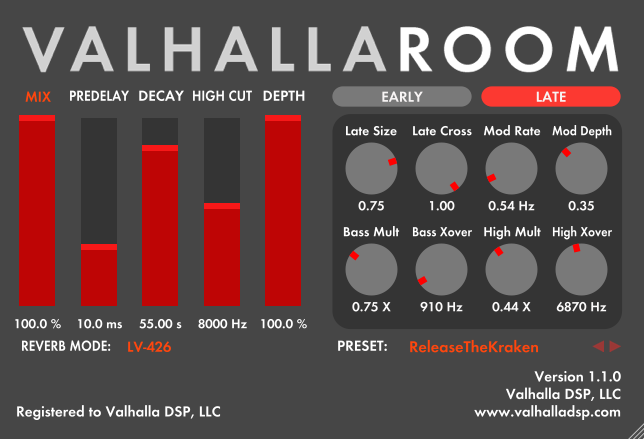

ValhallaRoom Updated to Version 1.1.0

ValhallaRoom has been updated to version 1.1.0.

The latest changes:

  • New reverb mode: LV-426.
    • In keeping with the Nostromo/Narcissus/Sulaco tradition, this is a deep dark space verb. It is kind of a cross between Nostromo and Narcissus, but with a far higher earlier echo density than either of those reverb. LV-426 has a slower attack than the other reverb modes, and a lush, diffuse random modulation that produces beautiful long decays.
    • The LATE LowMult/Xover and LATE HighMult/Xover filters have been moved to a location where they act as tone controls.
    • Values of LowMult less than 1.0 allow you to dial in reverbs with less low frequency energy.
    • The LowXover control can be used to adjust the crossover freq of the low cut/boost.
  • 64-bit VST for OSX. ValhallaRoom is now fully 32 and 64-bit compatible for both Windows and OSX.
  • Optimized CPU for Windows RTAS and VST32
  • Fixed mono->stereo bypass bug in RTAS
  • Window resizing bug fixed in Digital Performer

Update links have been sent to all ValhallaRoom customers, and new demo versions are available for testing at the ValhallaRoom page.

ValhallaUberMod: The Preset Menu

ValhallaÜberMod has a cross-platform preset format, allowing users to use the same presets for all plugin types (RTAS/VST/AU, for both OSX and Windows). The preset format is based around XML, which allows presets to be copied and pasted into emails, forums, or any other place that can accept text.

To access the presets, simply click the name of the active preset, to the right of the PRESET: text in the lower right side of the GUI (the plugin will display “Default” when first opened):

PresetButtonDefault

The Preset Menu will display when the current preset name is clicked:

ValhallaUberModPresetsMenu

To select a preset, simply mouse over the given preset name, and release the mouse button. Mouse over a given preset folder name (the ones with the triangle to the right) to view and select presets within that folder.

To save a preset, simply select “Save as…” from the menu. This will allow you to name your preset, and choose the folder to save the preset to, or to create a new folder for your preset.

If you wish to copy a preset from a forum or blog post, simply select the text with your mouse (including the < and > closing tags), and copy the text (Command+C on OSX, CTRL+C on Windows). Then, select the “Paste from Clipboard” option from the preset menu.

If you want to share a preset with someone, select the “Copy To Clipboard” option, then simply paste the text (Command+V on OSX, CTRL+V on Windows) into the document/email/forum where you want the preset to be.

Special thanks to Randy Jones of Madrona Labs for developing the original text-based preset code that I ported over to ValhallaRoom and ValhallaÜberMod.

What is ValhallaUberMod?

ValhallaÜberMod, at its heart, is a stereo modulated multitap delay line.

(Wha?  For those who like to know about the tech under the hood, read on!  For those who don’t, you can just skip this paragraph and read on to learn about all the mysterious and surprising things ValhallaÜberMod can do.) The signal is written into parallel delay lines (1 for left, 1 for right), and is read out by one or more delay taps. The taps can be moved back and forth in time, by low frequency oscillators or user controls, in order to produce pitch changes via the Doppler effect. The plugin also incorporates diffusion delays, soft saturation, low and high cut filters, and a variety of other controls to shape the delay tap amplitudes, spacing, tone and movement.

So, what can you do with a stereo modulated multitap delay line?

Chorus

ValhallaÜberMod contains elements inspired by the Roland Dimension choruses, but vastly expanded in order and with fully parametric controls. The classic “Dimension D” sound can be emulated, but ÜberMod can also emulate the multi-voice choruses previously limited to high end rack gear.

Ensembles

The modulation section of ÜberMod contains slow and fast LFOs, that can be mixed in together. In addition, some of the Modes are based around the specific modulation schemes of vintage string ensemble units, such as the 3-phase LFOs found in the Solina and Crumar Performer, and the dual triangle LFOs of the Roland VP330/RS505. This allows ÜberMod to dial in a variety of “classic” ensemble effects, as well as more realistic emulations of orchestral sounds.

Flanging

By using one of the multitap modes, and keeping the delays short and grouped closely together, ÜberMod can create huge flanging sounds, that incorporate the through-zero effects of tape flanging, while adding random motion and complexity to produce an effect that is remarkably similar to a jet flying overhead.

Delays

ÜberMod allows the user to sync the delays to the DAW tempo, as well as dialing in specific delay times in milliseconds.

Multitap Delays

With up to 32 taps, ÜberMod can create dense clusters of delays, rhythmic tapped delays, strongly pitched comb filtering effects, and all sorts of multitap sounds. The TAPS controls allow the user to shape the spacing and amplitude of the delay taps via intuitive high-level controls.

Ping-Pong Delays

The new WARP InputPan control (introduced in the 1.0.1 ÜberMod release) allows for any of the delay Modes to be turned into a ping pong mode. This goes well beyond the standard ping pong delays, and can produce ping ponging delay clusters, ping pong delays with strange rhythmic divisions, ping ponged multitap clusters, and tons of other effects that bounce back and forth between speakers.

Tape and BBD delay emulations

ValhallaÜberMod has a flexible overdrive section, including pre and post gain, as well as noise that can be mixed into the signal. The delay time changes can also be slewed, using the WARP Smoothing control, to produce the slow delay transitions and pitch changes that are typical of analog delays. By dialing in overdrive, noise, and feedback, and adjusting the flexible EQ section, the user can get low-bandwidth BBD emulations, wobbly tape delays, and long echos that degenerate into shrieking oscillation.

Diffuse delays

Many of the high-end Lexicon and Eventide rack units combined diffusion delays with longer delay lines, to soften the attacks of echos. ValhallaÜberMod has a flexible diffusion section, to create smeared echos, clusters of delays, and all sorts of diffuse effects.

Reverbs

The diffusion section in ÜberMod has variable size and modulation parameters, similar to ValhallaShimmer, but more optimized for generic delay effects. Crank up the diffusion size and turn up the feedback, and all sorts of reverb effects can be produced: short ambiences, large rooms, huge halls.

Nonlinear and reverse reverbs

Combine the diffusion section with a Mode that has a larger number of delay taps (8/16/32 taps) to generate short gated reverbs, “reverse” reverbs that fade in slowly over time, room reverbs with a truncated decay, etc.

“Glitch Shifting”

The triangle oscillators in ÜberMod were designed to create “detuned” choruses, without an obvious sense of pitch wobble. Crank up the OverMod control, however, and all sorts of unpredictable pitch shifted and reversed sounds can be produced. I call this “glitch shifting,” although I still feel dirty whenever I type that phrase.

Oscillations

Turn on the DRIVE, and crank up the feedback, and ÜberMod will start making sounds on its own. By adjusting the delay and modulation settings, all sorts of crazy burbling whirling machine noises can be generated.

Stereo Widening

Use short Diffusion settings to widen the stereo image. Add a bit of modulation to create stereo choruses. Crank up the DEPTH control to create super-stereo effects.

Chimeras

This is the term I use for sounds that combine aspects of several effects to create sounds that are new, weird, and in many cases defy easy categorization:

    • Reverbs with ensemble modulation
    • Ping-Pong Reverbs
    • Tape Reverbs, where the sound gets more distorted as it decays away
    • Sounds that don’t have names yet

Why UberMod exists

So, why create a single plugin that covers all of these sounds, instead of several plugins where each plugin is tailored to a specific application? I’m not exactly sure. In many ways, I feel that ValhallaÜberMod was a plugin that designed itself, instead of me creating something that did exactly what I wanted it to do.

At each stage during the development process, I uncovered new and exciting sounds that defied easy categorization. I decided to create a plugin that allowed for those sounds to be dialed in, as well as sounds that as yet remained undiscovered.

ValhallaÜberMod is “close to the metal.” There are a lot of controls, that have been grouped according to logical function. In some ways, ÜberMod is like a Swiss Army Knife for modulated delays, but this doesn’t really describe the chimera effects that are neither fish nor fowl.

The oddball possibilities are what I find most interesting about ÜberMod. It explores the spaces, the shared commonalities, that lie underneath the common modulated delay effects, while making room for other effects that don’t fit within the standardized categories.

I drank WAY TOO MUCH COFFEE designing ÜberMod, and I think that some of that over-caffeinated energy was captured within the plugin, in the context of a logical structure that allows the user to control the sanity/insanity ratio.

ValhallaUberMod: The History

I started developing ValhallaÜberMod in late May of 2011. The original name was ValhallaChorus, as my goal was to make a plugin that could generate the “detuned” choruses found in the Roland Dimension units, as well as the multi-delay LFO choruses found in the classic string ensemble keyboards. I had first modeled the Solina and ARP Omni ensembles in Csound back in 1999, and had implemented several chorus algorithms in the past decade, so I figured that ValhallaChorus would be easy to implement. This proved to be not entirely correct.

The basic chorus algorithm only took a week or so to put together. Just for fun, I decided to extend the maximum delay time, from the 20 milliseconds commonly found in choruses, up to 1000 milliseconds. This is where things started getting interesting. I was getting a lot of sounds that were not quite choruses, not quite delays. So I started expanding on this direction.

I had created a 6-tap delay mode to emulate the “supersaw” of 1990’s Roland digital synths, and found that spreading the taps out in time could reduce some of the flanging artifacts, but also created interesting sounds in its own right. I ended up implementing a number of multitap modes, from 2 taps (1 per output channel) up to 32 taps. I decided to put some high-level controls to shape the tap amplitudes and delays, and after I finally figured out the math, a bunch of cool sounds emerged, from delay clusters to reverse reverb.

One of the formative sounds of my youth was the diffuse chorusing of the Lexicon 224XL found in my university’s recording studio. I implemented diffusion into the algorithm, based on the fixed allpass network used in the chorus/echo algorithm of my PCM70. The single “Diffusion” control I was using created some nice smeared echos and choruses, but I decided to experiment with larger diffusion networks, that had controls over the size and modulation (I had previously done a lot of work in this area with ValhallaShimmer). A few days of work later, and I had a very powerful diffusion network, that could add echo density to choruses and delays, but could also be used to make multitap delays sound more reverberant, and could be used in conjunction with feedback to create powerful reverbs in its own right.

The basic modulation of the chorus modes was derived from the Dimension choruses, but extended to arbitrary numbers of modulated taps. One of the cool features of the Dimension D is how the delays are filtered and mixed together to get a chorus that has a wide stereo image, while preserving the bass content in the signal. The Dimension D does this in a fixed way – the mix levels are preset by the Mode buttons. I thought about this, and one summer afternoon, pacing around in a circle outside, I figured out how to create similar effects, but in a fully variable manner. The idea is to rotate the low and high frequencies separately, with the rotation of the low frequencies being limited to a maximum of 90 degrees, while the higher frequencies can be rotated up to 180 degrees. This allowed me to dial in the “super-stereo” Dimensional choruses, as well as “true stereo” delay and multitap effects.

Somewhere along the way, the GUI came together. The concept was a continuation of the UX concepts used in ValhallaRoom: sliders for the “high level” controls, and knobs accessed by tab buttons for the “tweakier” controls. The actual GUI kept changing, as I added and deleted different tab sections, depending on what controls I incorporated into the algorithm, but the basic layout remained the same.

I made a mistake during the development process, that ended up being a big influence on the direction of the plugin. I decided to change the displayed values so that they worked with percentages, so that the parameters would go from 0% to 100%, instead of 0.0 to 1.0. I changed the slider values, but forgot to divide the results by 100 to get the proper modulation depth. The result was a horribly overmodulated sound, that had so much pitch shift that the signal actually started going backwards. Instead of fixing the bug, I put in a control (MOD OverMod) that allowed the user to dial in this sort of “glitch shifting” if desired.

From this point onwards, I decided to embrace the weird. Normally, creating a plugin is all about saying No.  You limit the possibilities, and make the “good” decisions about what parameters are included.  For better or worse, I didn’t do that with the new plugin. In ValhallaRoom, I tried to make a powerful plugin with as few controls as needed to get the desired sounds. With the new plugin, I let my mind roam where it may. All sorts of sounds that I never would have expected were emerging from the plugin, and I felt like I was along for the ride. I decided to say Yes. Or, more accurately, Why Not.

The first beta testers suggested that distortion in the feedback path would be useful for tape delays. I balked at first, as I had intended for ValhallaChorus to be a modulation effect, but then I decided, “why not?” So I put some overdrive in there – and then spent the better part of a month tracking down bugs in the overdrive. I ended up ripping out my original overdrive algorithm, and implemented something far better than what I had first used, but MAN, that was frustrating. I allowed the user to dial in the gains and noise levels, to create deliberately dirty sounds. More Noise Please.

At some point, it became clear that this plugin was far exceeding the bounds of anything that should be called “ValhallaChorus.” The name eluded me, until my wife suggested ÜberMod on an early fall walk. The name looked really cool written in Futura DemiBold.

The final days of ÜberMod development stretched out into several weeks, and then several months. There were a lot of features that produced useful sounds, and I wanted to open up the possibilities of the plugins, but organizing the parameters proved difficult. I realized that the time needed to finish up a plugin goes up as some power of the number of parameters. It may not be proportional to the square of the number of parameters, but it ain’t linear.  It turns out there are good reasons to say No, instead of Why Not. But the sounds kept moving me forward.

Eventually, the parameters were fixed, the plugin was tested, and bugs were fixed. On December 15th, 2011, ValhallaÜberMod was released for OSX and Windows.

After the release, I gathered feedback from users. Many users asked how to implement ping pong delays. I thought about adding a few dedicated ping pong modes, but decided to take a chance and add a new parameter, WARP InputPan, that would allow any of the existing Modes to be ping ponged. This seemed risky, as adding parameters to a plugin post-release could potentially wreak havoc with existing DAW projects, but it turned out that almost all DAWs were able to handle the new parameter without issue. After a particularly long beta testing period, the 1.0.1 update of ValhallaÜberMod was released on March 1, 2012.

ValhallaUberMod: The WARP Parameters

When I was working on ValhallaÜberMod, one of the goals was to come up with a list of parameters that could be placed into logical categories. Most of the parameters fell into line – all the modulation parameters fit into MOD, the overdrive parameters fit into DRIVE, and so on. A few of the parameters just wouldn’t fit into the other categories. I decided to create the WARP tab for these misfit parameters, as they all shared the characteristics of warping the sound. That, and “WARP” looked cooler in the button text than “MISC.”

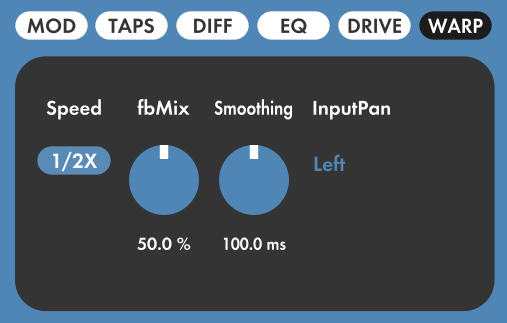
ValhallaUberModWARPTab

The WARP Parameters:

  • WARP Speed: Controls the recording/playback speed of the internal buffer in ÜberMod. This also controls the internal sampling rate of ÜberMod.
    • When WARP Speed is 1X, the delay will play back at the normal sampling rate, and the longest output delay will correspond to the setting of the DELAY slider.
    • When WARP Speed is 1/2X, the delay will play back at 1/2 the sampling rate, and the longest output delay will correspond to 2X the setting of the DELAY slider.
    • Changing the speed will also change the playback rate of any sounds currently in the delay buffer. For example, if the delay is 1 second, and the WARP Speed is changed from 1X to 1/2X, the sound will drop in pitch by an octave, which will last for 2 seconds before things go back to the original pitch.
    • Setting WARP Speed to 1/2X will result in a “darker” sound than 1X Speed, as all frequencies above 1/4 the sampling rate will be filtered out.
  • WARP fbMix: Controls the routing of the feedback paths between left and right delays. By changing the fbMix control, ÜberMod can be smoothly varied from two mono delays, to cross-coupled delays, to a “figure-8” loop that is useful for reverbs and ping pong delays.
    • When WARP fbMix is set to 0%, the left delay output feeds back into the left delay input, and the right delay output feeds back into the right delay input. This is essentially using ÜberMod as two mono delay lines in parallel.
    • Setting WARP fbMix to settings greater than 0% will cause some of output of the left delay line to be mixed into the right delay line input, and vice versa.
    • A WARP fbMix of 50% results in equal amounts of the left and right delay outputs to be sent to the left and right delay inputs.
    • Setting WARP fbMix to 100% results in the left delay output being routed exclusively to the right delay iput, and vice versa. This will create ping pong echos if the WARP InputPan control is set to Left or Right.
  • WARP Smoothing controls the smoothing time of the entire plugin, in milliseconds. Changes to the delay tap positions (that occur when adjusting DELAY, or altering the TAPS controls), and changes to the modulation depths, will be “slewed” or smoothed out, in order to avoid clicks. The Smoothing control allows the time constant for the slewing to be adjusted.
    • A WARP Smoothing setting of 10-50 msec should be enough to avoid clicks, while still having fast transitions between the old and new delay tap settings. Around 50 msec, you can get a chirping sound that is pretty cool.
    • WARP Smoothing settings >100 msec will result in longer slewing times for delay transitions, similar to what is found in tape and BBD echoes.
  • WARP InputPan: Controls how the input signal is sent to the delay lines. This control was added to ValhallaÜberMod, and is intended to allow for various ping-pong and reversed stereo effects.
    • The default setting of WARP InputPan is Stereo. The left input is sent to the left delay, and the right input is sent to the right delay.
    • When WARP InputPan is set to ReverseStereo, the left input is sent to the right delay, and the right input is sent to the left delay. This can create a wider stereo image.
    • Setting WARP InputPan to Mono results in the left and right inputs being summed together before being sent to the left and right delay inputs. This can be useful for stronger flanging effects, as the left and right delays will contain the same signal (creating stronger reinforcement/cancellations of harmonics).
    • With WARP InputPan set to Left, the left and right inputs will be summed, and then sent to the left delay input only. This is useful for creating ping pong effects that start from the left (be sure to set WARP fbMix to 100% to create proper ping ponging).
    • With WARP InputPan set to Right, the left and right inputs will be summed, and then sent to the right delay input only. This is useful for creating ping pong effects that start from the right (be sure to set WARP fbMix to 100% to create proper ping ponging).

ValhallaUberMod: The DRIVE Parameters

The original idea behind ValhallaÜberMod was to create a powerful chorus/multitap delay plugin, that stayed “pristine” at all feedback settings. Fortunately, my early beta testers convinced me that I needed to put some filth into ÜberMod, and so the DRIVE section was born.

The goal of the DRIVE section is to allow the user to dial in the amount of overdrive and noise they want, from subtle colorations to high amounts of grit, and to be able to switch the drive off as needed to return to the original “pristine” algorithms. The DRIVE section uses a highly optimized soft saturation algorithm, which is oversampled to reduce aliasing.

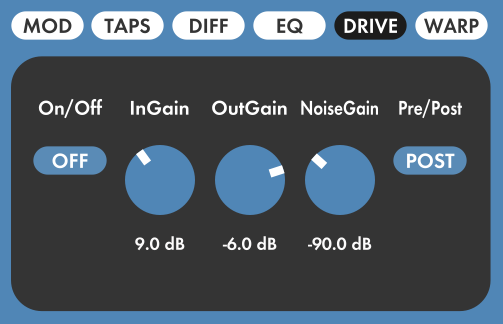
ValhallaUberModDriveSection

The DRIVE Controls:

  • DRIVE On/Off: Selects whether the DRIVE is enabled or disabled. When the DRIVE is Off, the calculations are bypassed, reducing the CPU load.
  • DRIVE InGain: The input gain for the overdrive section, in dB. Higher values result in more distortion
  • DRIVE OutGain: The output gain for the overdrive section, in dB.
    • By setting DRIVE OutGain to be the opposite (i.e. same numeric value, but with opposite sign) of the input gain, the feedback gain for low level signals will be the same. This means that the FEEDBACK slider will work in the same way.
    • If the DRIVE OutGain is set higher than the opposite of the input gain (i.e. InGain = 12 dB, OutGain = -6 dB), then the feedback gain for low level signals will be higher, and the feedback signal becomes more likely to break into oscillation.
  • DRIVE NoiseGain: Controls the gain of noise that is added to the signal, post-saturation. This is useful for emulating worn tape echos, or BBD delays. Turn the DRIVE NoiseGain all the way down if you want a less noisy delay.
  • DRIVE Pre/Post: Controls whether the overdrive happens before the outputs are taken (Pre) or after the outputs are taken (Post).
    • If DRIVE Pre/Post is set to POST, the first delay repeats that reach the outputs will be clean. The overdrive will only be heard on the feedback signal.

ValhallaÜberMod Updated to Version 1.0.1

I am happy to announce that ValhallaÜberMod has been updated to Version 1.0.1.

The changes:

  • New control, WARP InputPan. This allows the user to reverse the stereo image, sum to mono, or send to the left or right input only. The InputPan control can be used with WARP fbMix to create standard ping pong delays, as well as ping ponged multitap, ping-pong reverbs, tape delays that oscillate back and forth, and so on.
  • New factory preset groups: DoubleTracking, PingPong, StereoEnhancers
  • Fixed bug with 32-bit VST, where incorrect MODE names were displayed for some settings
  • Fixed mono->stereo bypass bug in RTAS

Emails with links to the updated installers have been sent out to all ValhallaÜberMod customers. If you are an ÜberMod user and haven’t received your links yet, send me an email and I will get the links out to you ASAP.

ValhallaUberMod: The EQ Parameters

The EQ section in ValhallaÜberMod has a few straightforward parameters, as well as a few that require deeper explanation. By adjusting the parameters, the user can create bright, clean echos, as well as dark, tape-esque decays. The EQ section is inside the feedback loop of ValhallaÜberMod, so any changes to the EQ will be multiplied by each feedback iteration.

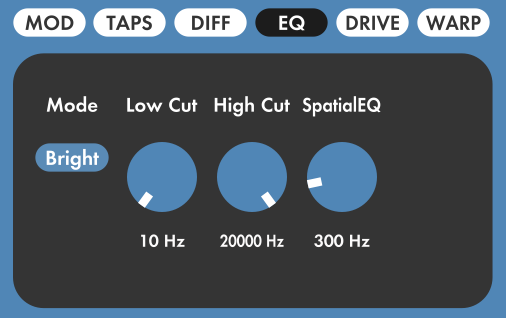
ValhallaUberModEQ

The EQ controls:

  • EQ Mode: controls the overall “color” of the EQ section, and of ÜberMod as a whole. The choices are Bright and Dark, and are fairly self explanatory. It is worth noting that the EQ Mode control has a far more dramatic effect when the DIFF section is enabled.
  • EQ Low Cut: controls the cutoff frequency of a -6 db/oct high pass filter. Useful in reducing the amount of low frequencies in the signal.
    • An “analog” echo will have this set to a fairly high frequency (150 Hz or more), such that the feedback signal “thins out” as it decays.
    • Cutting the low frequencies out of a chorus can be useful in creating a clearer sound.
  • EQ High Cut: controls the cutoff frequency of a -6 db/oct low pass filter. Useful in reducing the amount of high frequencies in the signal.
    • Setting EQ High Cut above 10 KHz is useful for “digital” delays and modulation effects, as well as any type of effect that benefits from extended high frequency response (such as flanging).
    • An EQ High Cut setting around 10 KHz is useful for emulating the high frequency response of BBD-based chorus and ensemble units.
    • For emulating tape echos and BBD echos, set EQ High Cut to a fairly low frequency (3KHz or lower).
  • EQ SpatialEQ controls the cutoff frequency of the crossover used in the “crosstalk” mixer controlled by the WIDTH slider. When WIDTH exceeds 100%, the output of one delay channel is inverted in phase and mixed in with the output of the opposite delay channel, to create a wider “pseudostereo” effect. This phase inversion can result in a loss of bass frequencies, so the EQ SpatialEQ is used to control a crossover that determines at what frequency the inverted mixing occurs.
    • The SpatialEQ algorithm was inspired by the complex filtering found in the Dimension D chorus, but has been extended to work with greater numbers of delay taps. A lot of research went into developing an algorithm that would have unity gain for all settings of WIDTH.
    • By setting EQ SpatialEQ to 150 Hz or higher, the bass frequencies of the delayed signal will be maintained for all settings of WIDTH. Adjust this by ear to suit the input signal, or just set this to 300 to 400 Hz to ensure that the bass energy doesn’t get cancelled out.
    • Setting EQ SpatialEQ to a lower frequency can result in cancellations of the bass frequencies. This can be useful for producing hollow flanging sounds, such as those heard on the “Axis: Bold as Love” album.

ValhallaUberMod: The DIFF Parameters

The initial concept behind ValhallaÜberMod was to create a chorus algorithm that took the “balanced” modulation of the Roland Dimension units, and combined this with the multitap complexity of the choruses found in high end rackmount units, such as the Lexicon 224 & PCM70. Many of the rackmount chorus algorithms used series allpass delays to add echo density to the choruses, in a process commonly referred to as diffusion. I originally had a single Diffusion control in ÜberMod, but a bit of exploration revealed that adding parameters to the diffusion section vastly expanded UberMod’s sonic power. The DIFF parameters are used to control the diffusion section in ÜberMod.

ValhallaUberMod DIFF Controls

The diffusion section in ÜberMod is inside of the feedback loop, so the echo density will build with each repeat when FEEDBACK is greater than 0%. This can be used to create delays that get more “smeared” with each repeat, as well as full-on reverbs. The allpass delays within the Diffusion section are true stereo, and are designed to maintain a balanced yet wide spatial image. Modulation is used to reduce the metallic coloration in the Diffusion section, and can create some pretty stunning chorus effects in and of itself, as well as being useful for lush reverbs.

The DIFF controls:

  • DIFF On/Off turns the diffusion section on and off. When the diffusion section is turned off, the CPU consumption of ÜberMod is lower. This can cause a pop and other strange glitches when audio is running through the signal, so I wouldn’t recommend automating this parameter. Of course, if you like those glitches, go ahead and automate the On/Off control. Who am I to judge?
  • DIFF Diffusion adjusts the echo density and buildup of the Diffusion section.
    • A DIFF Diffusion setting of 0% turns the diffusion section into a stereo delay line, with the delay length determined by DIFF Size.
    • Diffusion settings higher than 0% result in increasing echo density.
    • The echo time/energy profile changes as Diffusion is adjusted, with some settings between 40% and 80% causing the sound to fade in slightly.
    • The highest settings of Diffusion result in a faster fade in, and a more exponential decay. The highest Diffusion settings can also create metallic coloration, depending on the other DIFF settings and the input material. Backing off slightly on the Diffusion control, or increasing DIFF Size, will usually reduce the coloration.
  • DIFF Size controls the overall length of the delays in the DIFF section.
    • With Diffusion at 0%, the DIFF Size setting corresponds to an additional delay added to the feedback loop. Keep this in mind when creating rhythmic delays.
    • At Diffusion settings higher than 0%, the DIFF Size no longer corresponds to an exact delay, but rather is used to scale the duration of the cluster of delays generated by the diffusion section. Higher DIFF Size settings result in longer clusters of delays and a longer decay from the Diffusion section.
  • DIFF ModRate controls the average rate of the modulation in the Diffusion section.
    • The Diffusion modulation is randomized, with each allpass delay having its own independent modulator, so the overall modulation is very complex.
  • DIFF ModDepth controls the depth of the modulation in the Diffusion section.
    • Note that the perceived modulation depth increases with ModRate, so the ModRate and ModDepth controls should be adjusted in tandem.