The Inspiration for PhaserDDL

I have loved phase shifters, or “phasers,” for much longer than I have known what a phase shifter was. In the late 70s, phasers were everywhere, and could be heard on most of the popular hits of the day. As a little science nerd, I loved the 1980 show “Cosmos,” which prominently featured tracks by Jean-Michel Jarre that made heavy use of an Electro-Harmonix Small Stone phaser:

In my early 20s, I was a grungy long haired guitarist obsessed with loud bands, fuzz boxes, and weird sounds. I picked up my first phase shifter in 1993, the late 70s Maestro Phaser, and fell in love with that sound again. A few months later, I found a Mutron Phasor II for $12 at a garage sale. Ever since then, I’ve been picking up hardware phasers as I find them, and have a pretty decent collection at this point.

In the late 90s, I took a year-long computer music course at the University of Washington. I loved being able to explore new sounds and the canon of computer music techniques, but was also excited about taking my love of analog circuitry and extending those concepts into the digital world. By the summer of 1999, I had learned enough about DSP to create a CSound ugen, phaser1, that implemented “classic” phase shifters, as well as up to 4,999 stages of phase shifting. I managed to get a pretty decent Jarre sound out of my Pentium II, as long as I didn’t mind waiting a while for the sound to render:

Flash forward to the summer of 2020. ValhallaSupermassive had just been released, and I was in the middle of a 3 month process of updating all the Valhalla plugins for Big Sur. At some point in July, I said “I need a break,” and found myself playing more music on synthesizers. I wasn’t all that happy with the plugin phase shifting options that I owned, so decided to roll my own phaser that was tailored to the sounds that I wanted to hear!

I spent about a week coding up a basic framework, and another week analyzing some of the hardware phasers I owned, plotting out their modulation trajectory and how they responded to rate changes. A few of the cool things I found:

  • My favorite phasors (Maestro Phasor, Mutron Phasor II, Schultes Compact Phaser ‘A’, MXR Phase 100) all reduce their modulation depth as the rate was increased, so things never get too wobbly at fast modulation rates. The Maestro has a cool trick in its Bob Moog-designed LFO that reduces the modulation depth at higher mod rates. The other phasers listed above use photo cells for their voltage controlled resistors, and the slew times of the photo cells results in a “natural” reduction of mod rate at higher mod depths.
  • The modulation “trajectories” of the phasers are all over the map. Some are linear, some closer to exponential, and one of them is “hyper-triangular.”
  • Many of the phasors have somewhat limited modulation depths. This ends up making the specific modulation trajectory kind of a moot point.
  • The exponential modulation trajectories sound really nice. Not as “quirky” as some of the vintage phasers. Just more generically useful.

A few weeks ago, I was playing around with some Eurorack modules with voltage controlled wave shaping. I asked myself, “How would those sound implemented in ValhallaDelay, driven by the LFO?” Turns out they sounded HORRIBLE. At least the way I coded them. Going back to the Eurorack patches that inspired me, I got a cool sound out of a wave folder, which sounded a lot like a phase shifter. LIGHTBULB OVER HEAD TIME!!!

I went back to my phaser work from the previous summer, re-coded it as a standalone DSP block, and worked out how a phase shifter could be embedded within the feedback loop of a delay while still being stable. A standard phaser in a delay feedback loop will “blow up” when the feedback gets too high. A few hours of experimentation resulted in a highly optimized variable order phase shifting network, with an exponential sweep, that was stable in a feedback loop with feedback gains up to 100%. I set up the modulation depth to vary as an inverse function of modulation rate. The results sounded GREAT to my ears!

Once the phaser was working in ValhallaDelay, it was time to map different parameters to the existing controls. Mod Rate and Mod Depth were easy, as these parameters are already implemented in the GUI. The order of the phasers could be mapped to the ERA control (Past = 4 stages, Present = 6 stages, Future = 12 stages). I changed the label of the Age control to Res in the new phaser mode, and mapped the internal phaser feedback to that control. The Style control adjusted the modulation phase between left and right channels, as well as all the existing delay options for each delay style.

Now that everything was working, what to name the new mode? Well, it combined phase shifting with delay lines. And one of my favorite phase shifting sounds was the Ensoniq phaser that Daft Punk used all over their 2001 album, Discovery:

The Daft Punk phase shifter sound used the Phaser-DDL algorithm in the Ensoniq DP/4, which combined a stereo 12-stage phaser with a strange ping pong delay configuration. The particular Ensoniq delay arrangement didn’t make sense to me, but Phaser-DDL is a nice, descriptive name. So I dropped the hyphen, and the new delay mode was christened PhaserDDL! I didn’t go to any particular lengths to replicate whatever Ensoniq was doing in the early 90s – I can’t even find the power adaptor for my DP/2, so it hasn’t been turned on in several years. But that Daft Punk phaser sound is pretty great, so I did my best to dial in something similar for the 12-stage (Future) mode.

After 40+ years of loving the sound of phasers, and 20+ years of playing with phase shifting algorithms in the digital realm, it feels good to finally release a phase shifting algorithm to the public. I’ve really enjoyed playing with the combination of phase shifting, delays and diffusion, and hope that the PhaserDDL inspires your own creative journeys!

Want the weekly Creative blog posts delivered to your inbox every Tuesday? Sign up for the Creative Practice newsletter!
ValhallaDelay Updated to 2.1.0. Two new modes: Quartz and PhaserDDL!

We are happy to announce the latest update to ValhallaDelay. The 2.1.0 update adds two new delay modes:

Quartz is a delay mode as transparent as its namesake. The Quartz mode takes the filtering out of the feedback loop, and incorporates a nearly colorless limiter, so your repeats can be as bright and shiny as you want them to be. Perfect for looping, clean echoes, bright flanging, and all sorts of pristine sounds.

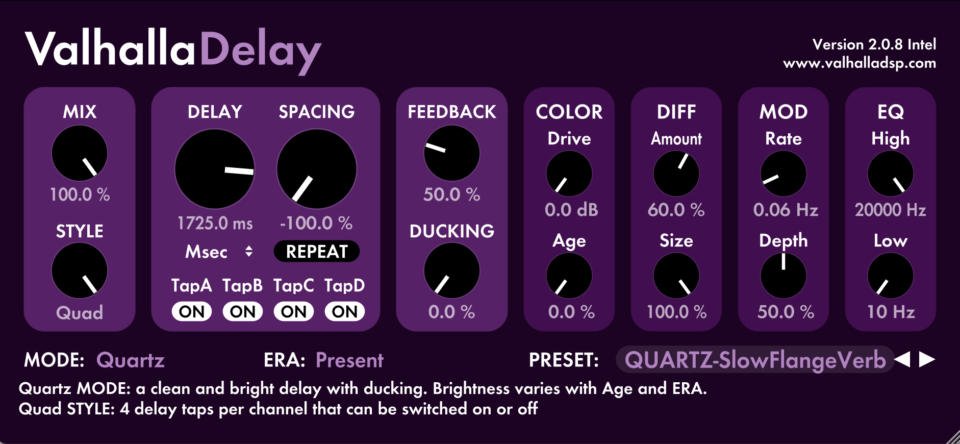
PhaserDDL incorporates a digital delay with a 4/6/12 stage phase shifter on the outputs. The phase shifters are in the feedback loops, which results in psychedelic echoes with long delays. Turn the delay time and delay feedback down to zero, and PhaserDDL is a great stand-alone phaser. The Age knob is swapped out for a Res knob, to control the phase resonance. 

  • Single: same modulation for left and right channels 
  • Dual: quadrature modulation (0 degrees in left, 90 degrees in right)
  • Ratio: antiphase modulation (0 degrees in left, 180 degrees in right)
  • PingPong: antiphase modulation (0 degrees in left, 180 degrees in right)
  • Quad: 4 separate phase shifters, each running at a different rate, and each with antiphase modulation (0 degrees in left, 180 degrees in right). Select two or more Taps for a lush combination of phase shifting, or all 4 for a dense phase shifted stew.

In addition, the 2.1.0 update fixes an issue that affected project recall when using the VST3 in Studio One and FL Studio. In certain situations, the delay times would reset to 300 msec when opening a saved project.

The 2.1.0 update of ValhallaDelay is available to demo and purchase today. If you already own ValhallaDelay, the FREE update can be found by logging into your user account. We’re really excited about this new update, and we hope you enjoy it!

Creativity Through Generation Loss

One of my recurring sources of frustration during my own creative process is my inability to successfully copy someone else’s technique that I admire. I’ll hear a song I like, think “I’m gonna do something like THAT!” And then I try and utterly fail to capture that idea.

In some ways, this can be viewed as a form of generation loss. The concept of generation loss is simple: with each copy, some information is lost, or the quality goes down. Think about an old school analog photocopier: if you make a copy of something, then make a copy of THAT, and repeat the process a bunch of times, the results will be a weird blurry shape that is only vaguely related to the original source.

Instead of viewing this as a failure, I’m starting to view these unsuccessful attempts at copying as a success. That thing I was trying to emulate? It already exists. That person did it already, and there is no more perfect of expression of that thing’s “thingness” than that thing itself. By copying something and getting it wrong, I have a much better chance of starting to create something that expresses my own ideas. My own perspective on the essence of a particular piece of music is going to be filtered by my own experience, aesthetics and skills.

An example of this in action: I really love the track “La Sveglia” by Alessandro Cortini:

There are so many things I love about this piece:

  • It uses a Roland MC-202 as its sole sound source. I LOVE the MC-202, and the closely related SH-101. Such a simple architecture, but everything out of those synths sounds good to me – pretty much impossible to make them sound bad!
  • It uses delay pedals and pitch shifting. I’m a huge fan of those (surprise surprise).
  • It is minimal, yet fills out the sonic range.

The thing is, the actual notes that Cortini is using are ones that I wouldn’t come up with on my own. They are great notes. There’s also a slight asymmetry to the piece, that might be by design, or might be the result of the particular step sequencer in the MC-202.

When listening to the Cortini piece, I’m reminded of John Fahey’s guitar playing. I was a guitarist well before I started playing synths, and I love how Fahey was able to use fingerpicking to articulate melodies while also maintaining a steady bass line. Most of Fahey’s fingerpicking follows a standard root->octave->root->fifth alternating pattern, but on occasion he would tune the bottom two strings of his guitar to the same note to maintain a more steady pedal bass:

An acoustic guitar is a polyphonic instrument, while an MC-202 is a monophonic instrument. By using delays and pitch shifters, a monophonic synth can be transformed into a pseudo-polyphonic track. The Cortini track alternates between a root base note and higher melody notes, and the delays will allow the root base notes to keep ringing out while the melody notes are being played. The results aren’t identical to fingerpicking, but in my mind there are some strong similarities between the approaches.

For my La Sveglia influenced track, I used the Intellijel Atlantis, a semi-modular synth that was strongly influenced by the SH-101. I created a sequence of 128 notes in Ableton Live, and drew all the notes in (this is where the SH-101 and MC-202 step sequencers would have come in handy). I added a few instances of ValhallaDelay on sends for echo, reverb and pitch shifting, and rendered a few takes where I played the Atlantis filter cutoff in conjunction with the ValhallaDelay sends. The result is something that is clearly inspired by the Cortini song, but is filtered through my own tastes and (lack of) skills to end up its own thing!

Your Current Inspirations

In my last blog post, I talked about the albums that had first inspired me to pick up an instrument and start playing music. This week, I’m interested in what people are listening to right NOW. What songs, albums and artists are you finding inspirational in 2021?

My current album of obsession is a Trojan dub compilation that came out a few years ago, that I picked up a few weeks back:

I have a 3 CD Trojan dub compilation, but it is somewhere in a storage crate. This new compilation is BLOWING ME AWAY. In the past, I’ve focused on the tape echo in dub tracks, but this compilation brings the spring reverb to the forefront. The first track, “A Ruffer Version” by Johnny Clarke and The Aggrovators, shows how a spring reverb, in the hands of a talented dub mixer, is a physical instrument in its own right. Sounds are sent to the spring tank, the results are filtered with a swept EQ, and the tank itself is shaken and hit to create rhythmic explosions. The tape echo is glorious as well – you can hear the tape speed lag at the very beginning of the track.

Track 2, “Simple Dub” by The Upsetters, features fuzz guitar and deep phase shifting. ARE YOU KIDDING ME???!?!?! I’ll listen to pretty much anything with fuzz and phasing, but this is just a sublime track.

I could go on and on, but the whole album is this good. Highly recommended.

My other big inspiration this week is the late 70s output of the band Suicide. I’ve always loved the song “Cheree,” and just stumbled across the 12″ version of this song, backed with a track I’ve never heard before:

What I find fascinating about this 1978 Suicide track is that it uses the same technology that was being used in late 70s dub (phase shifting, tape echo, spring reverb), but with VERY different end results. I’m a big fan of distorted organs, old school drum machines, that whole repetitive drone thing. Stereolab was clearly a fan as well – their track “Tempter” is essentially a remake of “Cheree” with a key change and different lyrics. I also LOVE LOVE LOVE this Stereolab track!

So what songs/albums/artists are getting you through 2021? What are you finding inspirational for your own music, or just plain old inspirational? Let us know in the comments below – we are always looking for new music!

Your First Inspirations

As a young kid, I was an indifferent musician at best. I took a few piano lessons. Nothing came of them. We learned ukulele in school. I wasn’t any good. I played trumpet in our school wind ensemble. I was OK, until I got braces that shredded the inside of my lips when I played. It wasn’t a big deal. I saw people playing synthesizers on TV, and was fascinated by them, but there was no way that my parents were going to buy me a synthesizer in the 70s or 80s. My mom had a cheap nylon string guitar, but I wasn’t interested in it. I didn’t care all that much about music, and didn’t care about playing a musical instrument.

Then came Led Zeppelin.

I turned 14 years old, and my dad bought me Led Zeppelin IV, aka Zoso:

Led Zeppelin IV, inner sleeve (with spooky mirror effect added)

Something about getting that 4th Led Zep album made me look at that cheap nylon string guitar and say “yup.” I can’t remember any deeper thought about it, just this certainty that I needed to start learning guitar RIGHT NOW. Some switch flipped inside my brain.

The first song I made any progress in learning was “In My Time Of Dying” from Physical Graffiti. I had no idea how those sounds were made, so I did something that I figured was clearly wrong: I tuned the strings on the guitar until they sounded like a chord, and then used the back of a hairbrush to slide up and down the neck. Turns out that’s pretty much how the song was played, although Jimmy Page used a metal bottleneck versus a hairbrush.

For many years thereafter, I was a guitar obsessive. I played 8 hours a day, until my fingertips were callused – it CHANGED MY HANDS. I’d carry a guitar with me EVERYWHERE. I got an electric guitar after awhile, and a 12-string acoustic several years later. I went to college and studied anthropology, but guitar was my primary interest.

My childhood interest in synths remained something left in childhood. Until around 1992, when I discovered Brian Eno. The way that Eno used his Synthi AKS in the 1970s for both synthesis and processing of external instruments put the idea of “synthesizer” on my mental back burner again. I became obsessed with the first 3 Eno albums, as well as David Bowie’s Low and Heroes, but Another Green World was the album that really made me think about synthesizers again.

I may have had synthesizers on the brain in the early 90s, but the artist that pushed me over into creating electronic music was Aphex Twin. I heard “Acrid Avid Jam” on the radio in early 1995, and that switch in my brain flipped again. I quickly became OBSESSED with Aphex Twin, buying as many of his albums as I could find in Portland and Seattle. “Digeridoo” and “Ventolin” were particular favorites of mine, but the track that probably had the biggest impact on my synth playing and aesthetic (and future interest in creating reverb algorithms) was this track off “I Care Because You Do”:

In the early fall of 1995, I bought my first synth, the beloved Roland SH-101. An ARP Axxe and Juno-60 soon followed. A few years later, I was taking an intensive year-long computer music course at the University of Washington. A year after that, I was in the Bay Area, working at a small company that specialized in physical modeling and analog synthesis emulation. I had started as I meant to go on.

This week’s creative prompt: What song/album/video/artist inspired you to pick up your instrument and start creating music? Can you remember what flipped the switch in your brain, and sent you down your own creative path? Let us know in the comments!

Technique during times of low inspiration

I’m not in a super creative space right now. When I sit down in front of my computer and synths, the music isn’t exactly flowing out of me. When I pick up a guitar, the question that comes to mind is “why?”

So, how can I keep my creative process moving forward when I’m just not feeling it? Work on my TECHNIQUE! There are all sorts of skills that I can improve that don’t require me to be “feeling it.” By working on techniques that I know need improvement, I will be better equipped when inspiration strikes in the future.

One of the musical areas I have always felt weak with is drum programming. When I first became obsessed with electronic music, I fell in love with drums that sounded like they were being tossed down a flight of stairs, exploding all over the place:

Flash forward a few decades: I’m very comfortable with synths and ambience (and coding that ambience from scratch), but those drums still mystify me. A few weeks ago, during a dry creative spot, I decided to tackle these drum techniques, by sending myself to “Amen School.” I downloaded the Amen break, added it to a Live audio track, and started working on learning the cut and paste techniques that had been developed with this break in drum ‘n’ bass music in the 1990s. I’m making some good progress, and getting to listen to some amazing early jungle music in the process.

I’ve also found that inspiration can often strike in areas other than the things I want to be working on. I’d love to have the inspiration flowing for electronic music right now, but it just isn’t. Yet I’m having a flood of ideas for audio algorithms. Since, like, that’s my job, I’ve been spending more time in front of a compiler. I may not be churning out the good tunes, but sometimes spending a few hours reading through early 1970s patents can be satisfying.

Gain Staging: Why It’s Important

Let’s talk about a technique that falls into the “not fun/unsexy” category of audio, but is absolutely a subject to know and tame before deciding you want to break things – gain staging. We get a number of support tickets asking why Valhalla plugins suddenly stop outputting audio, and the first thing we ask the customer is, “What is the level of the signal entering the plugin?” We have implemented safety limiters inside the plugins so if the input level exceeds +12dBFS (that’s 12 decibels OVER digital 0, which is where your converters are clipping), the output of the plugin immediately shuts off and the audio slowly fades back in when the signal drops below that level. This is designed to protect your speakers and ears, but is also a warning that things may be getting a bit out of control with the gain staging of your project.

Back in Ye Olde Analogue Days™, recording gear was designed with an optimal operating level, and while manufacturers had their own standards for settings, these all fell within a certain range where interfacing pieces of equipment from various companies all worked perfectly well when these operating levels were adhered to; the concept of gain staging was all about maintaining correct levels when chaining various pieces of gear from one to another. At its simplest, this might have been a microphone plugged into a preamp followed by an equalizer, then a compressor, and ultimately the tape machine. The output of the tape machine was patched to the mixing console which had a number of additional gain stages – line input, EQ, maybe a built-in compressor on the channel strips, the internal groups or buses, and the final mix output which may have it’s own compressor, and then finally on to the mix down recorder. That simple scenario for a single microphone might be subject to a dozen gain stages at the most basic level; each of those stages introduces the possibility of distortion or saturation when driven incorrectly (we’ll get to that as a creative tool later, but for now we’re trying to not break things…). With proper levels between the stages in the audio chain, you were treated to a truly fantastic sound.

At this point, you’re probably saying, “Stuff it, old man! We have internal 32-bit floating point levels in our DAWs with over 1000dB of theoretical dynamic range! I don’t need to know or care about proper levels any more – HAHA!” Well, yes and no. First of all, everything audio in your computer has to become analog at some point whether it’s the digital-to-analog converter on the built-in headphone jack, or the output of your audio interface that is connected to your monitor speakers (another digital-to-analog converter, or DAC). These converters have a finite maximum level at which they can operate and pass audio before they clip and distort – think of a bucket that you are filling with water from a hose; once you reach the top of the bucket, the water doesn’t miraculously continue filling it, it begins cascading over the sides and making your wife very mad that you’re getting the floor all wet (this has never happened to me…). That’s digital 0 – you have filled up all the bits the converter can handle and what’s coursing down the sides of our “audio bucket” is distortion.

Another reason why the levels and gain staging within our computer projects is important is that many plugin manufacturers design their products to have an optimal operating level, just like in the Olde Days; if 0dBFS is the maximum they expect their plugin to see, they will design the processes within to be optimized at an operating level of somewhere in the range between -24dB and -16dB; this provides for plenty of headroom within the plugin processing, and can even let it saturate, if the plugin is designed to do so, as the operating level within the plugin approaches 0dBFS. All well and good on that single plugin, but what happens when you follow it with another and you push that to within its theoretical maximum internal operating level? And then another? We’re now at 40dB above 0, so you’re now pulling your master fader in your DAW down close to the bottom of its range because your headphones are clipping. Time to throw a peak limiter on the output bus to catch everything over 0dB and levels be damned! Sure that will absolutely work, but everything in front of that limiter is being pummeled to the very last bit of its poor little audio life. Will it work? Absolutely. Whole genres of music have sprung up around this massively smashed sound (hell, the music industry as a whole and the mastering loudness wars were all about this to an extent) – I’m not passing a value judgement here, just explaining a best-practice scenario.

Let’s say your mix is going along this way, heads are bobbing, but you need a touch of reverb added to the mix bus for a touch of overall ambience; you insert a VintageVerb just before the peak limiter and your mix shuts off. “WTF?!??!?!” This is when we get a support email. Our internal safety limiters are there to make you stop and think about what is happening before our plugin (and prevent your speakers or eardrums from exploding), and that you’re probably over-cooking things by a fair amount. Time to look at your gain staging and adjust.

I’m the last person to tell you not to saturate or distort something; I live for that and love the sound of gear pushed to, or over, its limit – it’s exciting and a little dangerous. I’m also a drummer, so my judgement in general is entirely suspect, but when I’m mixing (my day job), my master fader is parked at analog 0dB (which is +4dBu, or -18dBFS digital, still giving me headroom if I did want to push it around a bit). If I want to hear the mix louder, I turn up my monitors, not the master fader. This ensures that I have a fixed place to maintain a proper output level that I’m not fighting against all the time.

The great benefit to practicing good gain staging is that your final audio will actually sound better! Even if you want to compress/distort/slam a number of your individual tracks for effect, maintaining more overall transient information will give your mix far more impact than what happens when you shave off all the peaks by clipping the signal. You can always apply a peak limiter as the last insert of your mix bus if you really want to crush the whole mix (but I would highly recommend against that…), but even then it will sound better if there is more non-clipped program information coming into it.

I don’t want this to sound like “Old Man Yells at Clouds” or that I’m saying you must operate this way when working on your music, I just think it’s helpful to have a little knowledge about the WHY – these things aren’t designed arbitrarily and operating levels weren’t conceived just to slap a number on a piece of gear. Having this tiny bit of extra knowledge might help you make better sounding music!

Best Practices

I’m not a patient guy. When I sit down to make music, I want stuff to happen NOW. I don’t want to think about what I’m doing – I have to overthink things all the time during the jobby job parts of my job. I want to just sit in front of the computer and some synths, and just let it FLOW, man! Just pure creation!

The results, not surprisingly, are often shoddy as heck. Things are out of sync, there’s clipping in the mix, I’ve recorded with effects that I’d rather change, that sort of thing. It turns out that spending a few extra seconds or minutes to do things right from the get go makes a lot of difference.

This brings us to this week’s prompt: Best Practices. This could also be called “breaking bad habits, forging good habits.” We live in a subjective world, where in many cases there is no single canonical “correct” way of doing things. But we are also working with tools that are often better used in the way that they were designed to be used.

A simple example: I have a lime squeezer that I love. For the first few months that I owned it, I used it the same way I would use other citrus juicers, with the cut side up. This way, the cut side of the lime comes into contact with the part that is “squeezing” it:

One day, I flipped the lime over, so that the cut side was facing downwards. I got so much more juice out of that lime!

So, what are the best practices when working on music? Here’s a few suggestions that Don and I have learned over the past few decades:

  • Use External Instrument plugins in your DAW for hardware synths, versus simple audio inserts. In Ableton Live, I used to just record everything on an audio track, without using an external instrument plugin. It turns out that spending a few extra seconds to set up an external instrument on a track helps with managing latency, so that I can add software instruments & drums in the future while keeping everything in sync. Plus, I can record MIDI on the external instrument track, so I can quantize things and record a better quality performance of the synth on a second pass.
  • Record to a metronome track when appropriate. Obviously, if you are playing with a live band in the studio, you can ignore this. But if you are tracking by yourself, your job is going to be easier if you have a steady tempo source you can line things up with. I’ve found that even “beatless” ambient music is sometimes easier if I record things to a click track. The pulse of the ambient music may not be easily perceived in the final mix, but having a click track allows me to add more tracks in the future and have them line up in time, rather than relying on “feel” that I may not be feeling for more than a brief moment in time.
  • Use sends versus inserts. Don Gunn has written a great blog post on this, but a quick summary of why sends are awesome: more CPU efficient, better management of effects levels, helps glue the virtual space together, allows for additional tone shaping of the effects (i.e. add EQ/compression/distortion to your reverb!). It takes a little more time to set up sends, but once you are in the habit of doing so, it will really improve your workflow.
  • Gain staging. Modern DAWs usually use 64-bit double precision floating point processing for their internal summing, so the gain of internal signals doesn’t matter that much from a pure mathematical standpoint. However, most DAWs will clip your output to 0 dB when you are mixing, since your output convertors can’t handle higher signal levels. Plus, most plugins were designed around the concept of signals being well below 0 dB, as this is the common convention used in mixing. The Valhalla plugins have output limiters for safety, in case things go unstable with a corrupt DAW project (it happens from time to time), so the output will be muted if things exceed +12 dB RMS. All this is to say, that you probably shouldn’t be sending +20 dB signals around in your DAW. It might make a cool sound, but the gear wasn’t designed to work that way.

Beginner’s Mind

In the beginner’s mind, there are many possibilities, but in the expert there are few.
– Shunryu Suzuki, “Zen Mind, Beginner’s Mind,” (a book I haven’t actually read, but need to sit down and read one of these days)

When I was young, I was totally comfortable with being a beginner at new things. Because I didn’t know ANYTHING. It was all new. Flash forward several decades, and there are a few things I know how to do really well. Mainly involving digital signal processing. I’m happy I am an “expert” at some things, but this makes it so much harder to be a beginner at new things. The temptation is strong to just forge ahead with a false sense of authority, pretend that I know what I am doing, and get some stuff done.

As uncomfortable as being a beginner is to me today, there are a lot of benefits to be gained from allowing myself to be a beginner when working on new creative practices. Acknowledging that maybe I don’t know how to do something new, gives me permission to take the time and focus on learning all the possibilities of this new thing.

In the last few months, I have rekindled my interest in modular synthesis. I’ve put together a smaller modular setup for a hypothetical desert island residency, that incorporates Maths by Make Noise.

I’ve owned Maths since 2012, and I knew that it was a powerful module, but I never clicked with it before. I realized that I never allowed myself to be a beginner with Maths, and just made it do things that I could quickly understand, versus taking a deeper dive into how it works. So I decided to sit myself down, take the time, and really figure out what I could do with Maths. The steps I took:

Reading. Maths has an excellent manual, with many cool example patches. I re-read the manual several times and patched up every example as I went along. I also found a useful overview of how Maths works on Zeroes and Ones.

Watching. I tend to avoid video tutorials, as I probably have undiagnosed ADHD I find myself losing patience with the pace of videos. This time around, I decided to embrace the whole “beginner’s mind” aspect of things and watched several videos from beginning to end, stopping them from time to time to patch up an idea that caught my fancy. A few of my favorite Maths tutorials:

Experimenting. Once I’d read the manual and viewed a few tutorials, I started patching up as many ideas as I could think of with Maths. At the time, Maths was basically the only module in my modular apart from the Intellijel Atlantis, so I had to use Maths for almost all modulation purposes. There was a fair amount of intellectualizing going on behind the scenes, but there was also a lot of “what happens when I plug this into that?” My favorite discovery was running pink noise into Channel 1 of Maths, and adjusting the rise and fall times to get a modulation source that sounded like bubbles!

Theory. Ok, this is the DSP developer in me talking: I like to know how things are working under the hood. Maths is essentially a voltage-controlled slew module with a few extra functions and is a spiritual descendent of the Buchla 257, Buchla 281, and Serge Dual Universal Slope Generator modules. I found a great theoretical analysis of the Serge voltage-controlled slew module on Tim Stinchcombe’s site, and am currently reading it and re-reading it until it starts to make sense.

So this week’s creative prompt: Choose something you want to learn more about, and let yourself be a beginner! Read about the subject, watch tutorials, experiment, practice, all that stuff. Don’t worry about being proficient right away – focus on the possibilities that will arise if you approach the subject with humility.

A Clean, Well-Lighted Space…

With all due respect and credit to Hemingway for my paraphrased title, there’s not much I find more important about the space in which I spend all day, every day (also known as my studio, “The Office”), than having an organized and ergonomic layout of equipment. Foregoing the subject of room acoustics, which could take up an entire book on its own, I think having a smart layout of the gear one needs to do their job, including the furniture in which it is located, is paramount to not letting the gear get in the way of doing the job. Having everything to hand, feeling you are always at a comfortable position on a good chair, and taking away the mystery/confusion of wanting to have a certain piece of gear plugged in for an inspired moment helps remove the barriers to creation.

20 years ago…

This is all fresh and current for me because just a few weeks ago, I upgraded my studio from a pair of Output Sidecars as well as one of their Platform desks, to an Argosy Design V90 desk. I bought the Output gear shortly after it was released, and while it was built well and would possibly serve a composer or someone whose work is based around a piano-style keyboard just perfectly, most of my hired work is as a mix engineer and I use a pair of Avid S1 control surfaces to interface with Pro Tools Ultimate; I found that there wasn’t really a comfortable way to have those controllers placed on the main surface of the Platform while also having my computer keyboard, trackball, and volume controller available in the correct positions simultaneously. I also felt that much of my studio space (a single room in a building behind my house) was being occupied by the furniture needed to house my preamps and compressors, rather than leaving more space for performers or other musical gear (definitely more the latter than the former during the Age of Covid™…).

Where I started this year…

As a producer and engineer, much of my initial work with bands and artists starts out at large, commercial studios where I’m used to having a sizable analog console with a patchbay on one end of the whole console frame, and then outboard processing either to the side of the console, or in a separate “producer’s desk” behind my place-of-normal-activity at the console. I was hoping to bring a bit more of that kind of workflow into my studio, with most of the gear I need 90% of the time directly in front of me. The Argosy comes with two 10U racks angled into the main surface to either side of the center section, as well as 3U per side behind the main racks (handy for things like power strips). This meant being able to move all of my outboard equipment from two standalone pieces of furniture that flanked my main workspace into the same monolithic structure that also contained the control surfaces, my display, computer keyboard and trackball.

After the days of building the console and rewiring everything in my studio, sitting down at the new desk for the first time was the “moment of truth” – would all of the effort (and expense…) have been worth it? Luckily, I’m happy to report that the answer is a resounding, “YES!” I’ve worked in dozens of studios over the years and had a number of my own setups that have ranged from the at-the-time-ubiquitous IKEA Jerker, to a custom welded, hyper-minimalist desk for nothing more than my computer keyboard, display and monitor controller. All have felt like stop-gap measures until I figured out what I next had in mind and started the process all over again – not the most efficient of methods! I’ve now been working on the Argosy system for a few weeks and it has been brilliant; I’m still feeling comfortable at the end of a 12 hour day (neck/shoulder pain ain’t fun!), every piece of gear is in a logical, organized position, and the whole desk is large enough that I have to get my butt out of my seat to patch things via the patchbay or adjust gear in the uppermost rack spaces. It’s easy to forget that having to do this and change position once in a while (or more) is a really good thing for one’s body (walking the dog/feeding the squirrels is also good…)!

Where I wound up

So, what’s the conclusion here? People’s home studios/writing areas have always felt like a constant work-in-progress; gear comes and goes, things get put away, or brought out from being away and left where they lie, only to be forgotten again for months. I think it’s worth taking stock from time to time of the whole system – ergonomics, equipment and furniture – to figure out if everything is being used and set up to its maximum potential; given my recent experience and the success of the final outcome, I highly recommend trying it for yourself.