ValhallaRoom: An Overview

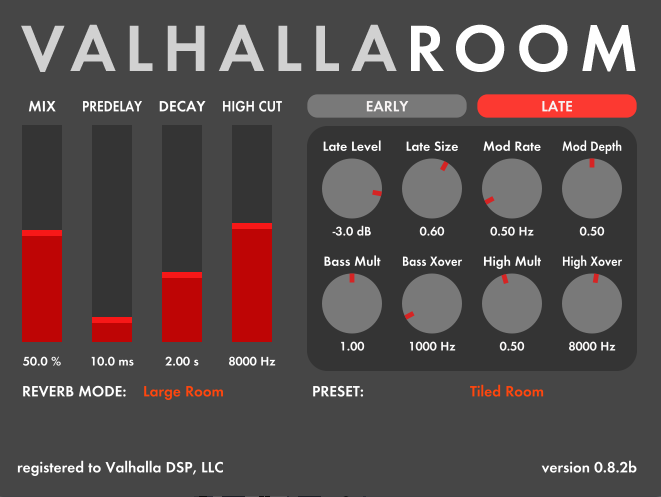
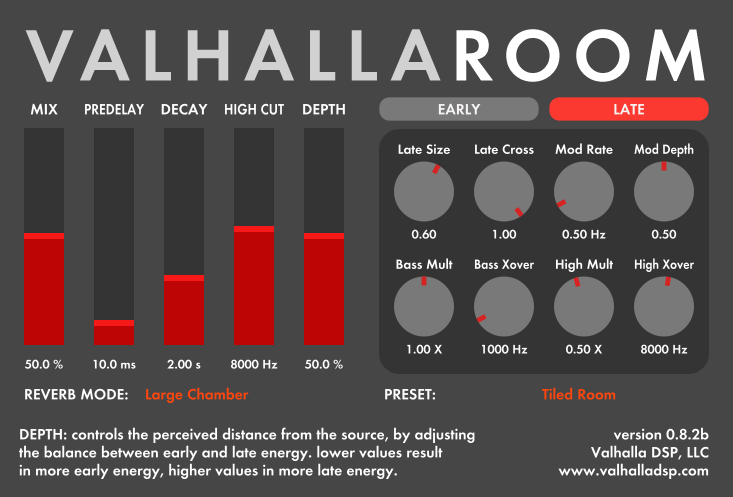
Now that ValhallaRoom has been released for OSX and Windows, I want to put up a few blog posts that go over the features of the reverb, how to dial in the sound you want, tips and tricks, and so forth. To start things off, let’s take a look at the GUI, and go over the different ValhallaRoom sections:

  • At the top is the plugin title, “VALHALLAROOM.” This is where my love of typography comes to the fore. Futura Demibold, displayed as prominently as I can get away with. From a design standpoint, the title is used to balance out the large blank area at the bottom of the plugin (this blank area’s purpose explained below).
  • To the bottom left of the title are five vertical sliders. These sliders (Mix, Predelay, Decay, High Cut, Depth) are the controls that have the most immediately dramatic results on the sound, and will probably be the most heavily used.
  • The buttons below and to the right of the title are used to select whether the Early Reverb or Late Reverb section is being edited. Red means that the given section is being edited, gray means it isn’t.
  • Below the Early/Late buttons are the knobs for controlling the Early/Late reverberation parameters. These parameters tend to be “tweakier” than the larger slides to the red, which is why the user selects from different views as needed.
  • In the area below the sliders is the Reverb Mode selector. This selects between one of four reverberation algorithms, each of which has a distinctive sound.
  • In the area below the Early/Late knobs is the Preset section. The currently active preset shows up as a red title against the charcoal background. Click on the red word to bring up the preset menu, where you can browse, load and save presets, copy the current plugin state to the clipboard, and paste data from the clipboard into the plugin (which is a great way of exchanging presets via email or forums).
  • The black area at the bottom of the plugin window is where the tooltips are displayed. Mouse over a slider, knob, button, etc., and a tooltip will show up in this section, with a brief explanation of what that control is used for. The bottom right displays the current version number, as well as any relevant suffixes (b for beta, d for demo, PPC for PowerPC Macs). The company name and URL are also displayed, just in case you forget.

The idea behind the GUI was to organize the controls in a logical manner, such that their size and display status was an accurate representation of their relative importance. The GUI is also proudly 2D, with the controls being more of an abstraction of knobs and sliders than an ersatz depiction of hardware that doesn’t exist. Futura Demibold was chosen as the font, as it is specified as the control panel font in the NASA usability guidelines, and because it just looks cool. The tooltips area is an effort to incorporate documentation as a design element, in keeping with the minimalist/Swiss School influences.

ValhallaRoom Released for OSX

ValhallaRoom has just been released for OSX, in the most popular plugin flavors – 32 and 64-bit Audio Units, 32-bit VST, and RTAS. The price is $50 US. You can demo/purchase the plugin at

http://www.valhalladsp.com/valhallaroom

Special thanks go out to my lovely wife, Kristin, for her design work on the GUI, and especially for her amazing new website design. You should go to http://www.valhalladsp.com and bathe in all of its majesty.

Upcoming Plugin: ValhallaRoom

Things have been pretty quiet for the past few months here at The Halls of Valhalla. I’ve been hard at work on my new plugin: ValhallaRoom.

I’ll be talking about this new plugin in length over the next few weeks. A quick summary of what it does:

  • ValhallaRoom features several original reverberation algorithms, designed to produce tight and subtle room sounds, as well as larger hall sounds and huge ambiances
  • Unique Early reverb section allows user to dial in subtle and short bursts of early reverberation energy, as well as gated reverbs up to 1 second in length.
  • The Late section produces natural reverb decays ranging from 0.1 seconds to 100 seconds. The decay can be controlled in 3 adjustable frequency bands.
  • Both Early and Late reverb sections have adjustable modulation, to produce sounds ranging from lush chorusing, to subtle and natural long decays.
  • ValhallaRoom is true stereo. The Early and Late reverb sections are both stereo-in, stereo-out.

The goal of ValhallaRoom is to be a useful “workhorse” reverb, for subtle drum rooms that can be felt more than heard, lush halls, dense plates, and big ambient decays. The algorithm designs have been influenced by some of the “classic” room simulation boxes, as well as state of the art modern theory.

ValhallaRoom will be released in the next few weeks. Price will be $50 US. I’ll post progress reports to the blog.

Minimalist Friday

I’m in hardcore coding and GUI mode right now, working on finishing up my next plugin. So I haven’t had time to write my usual riveting blog posts about how the Central Limit Theorem relates to backward reverbs and the like. Dry your tears, my disappointed readers.

In lieu of any DSP science, here’s a few minimalist music videos. The first is “Clapping Music” by Steve Reich, generated entirely from footage of Angie Dickinson slapping the hell out of Lee Marvin (thanks to Todd Elliott for the tip):

Next up is the German band Trio, who were famous for “Da Da Da,” and, uh, that’s about it. From the looks of this video, they were obviously thinking really hard about how to be as dumb as possible. Which is truly one of my favorite things that any artist can do (see: Iggy Pop/Stooges, Ramones).

Not nearly as minimal, but still awesome, is the Jesus Lizard covering Trio’s “Sunday You Need Love”:

David Yow kinda mangles the lyrics to the song, but at least he finishes it without passing out. When I saw The Jesus Lizard perform the song around the same timeframe, Yow was so drunk that about halfway through the song he just dropped the mike to his side and stared off into space. Brilliant.


Reverbs: Diffusion, allpass delays, and metallic artifacts

One of the most common controls found in reverberation algorithms is the Diffusion control. This is usually described as increasing the echo density, either the initial echo density (for Lexicon algorithms) or the rate at which echo density builds over time. The manual for the Lexicon LXP-15 has a somewhat typical description of the Diffusion parameter:

Diffusion: Controls the degree to which initial echo density increases over time. High settings of Diffusion result in high initial buildup of echo density; low settings cause low initial buildup. Echo density is affected by Size — smaller spaces will sound denser. To enhance percussion, use high settings of Diffusion. For clearer and more natural vocals, mixes and piano music, use low or moderate Diffusion settings.

If you read a lot of manuals for reverb products, you will often see similar descriptions of the Diffusion control, as well as the recommendation to use lower settings of Diffusion for clearer vocals. But why is this? A real room or hall tends to start with very high levels of diffusion, due to the objects typically found in the space – chairs, furniture, intricate wall patterns, etc. It would seem that a given echo density should be a characteristic of the space, not of the signal being sent into that space.

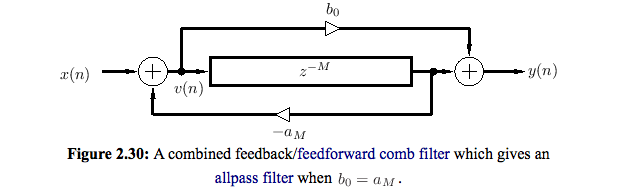
The answer lies in the signal processing tricks used to generate the initial high echo density. Manfred Schroeder, in his seminal 1962 AES paper “Natural Sounding Artificial Reverberation,” discusses using very short feedback delay lines in series to increase the echo density. Schroeder developed a very clever feedback/feedforward trick, such that the resulting delay line has a “flat” frequency response. The resulting delay unit is referred to as an allpass delay:

In the late 1970’s, James Moorer published an optimized version of the allpass delay, which used less multiplies, and is more commonly used today:
The earliest commercial digital reverbs, such as the EMT-250 and Lexicon 224, made use of several series allpasses at the inputs of the reverberation algorithms to increase the echo density. Lexicon was the first company to allow the user to directly control the coefficients of the input allpasses, and labeled this the “Diffusion” control.  The practice quickly spread through the audio industry.

EDIT: Chuck Zwicky, in a comment to this post, points out that the Diffusion parameter wasn’t originally present in the Lexicon 224, but was introduced with the Version 4.0 software. He also points out that most of the successful early reverberators up to 1984 did not have adjustable diffusion. The Eventide SP2016 had adjustable diffusion for some of their reverb algorithms, but this would have been around the 1984 to 1985 time frame.

The problem with generating echo density through series allpass delays stems from the definition of “allpass.” An allpass system will pass all frequencies with equal amplitude, over time. There is no guarantee when a given frequency will make its way out of the allpass delay. In practice, allpass delays don’t sound flat. Much like comb filters, a short impulsive sound sent through an allpass delay will result in a “ringing” sound, where only certain frequencies are resonating. Run an impulsive signal through several short allpass delays in series, and the result is a metallic decaying sound.

For percussive instruments, the metallic coloration might be an acceptable tradeoff, versus the “chattering” sound that occurs when the initial echo density is too low. Plus, snare drums have a metallic coloration in their own right, so a bit more coloration is OK. For vocals, the coloration produced by short allpass delays can be very unpleasant. Even though vocals are usually perceived as a “smooth” or continuous signal, the actual waveform produced by the glottis is very pulse-like, and can cause short series allpasses to ring out. This is especially audible on male vocals.

Some of the possible solutions to the issues with series allpasses:

  • Embrace the metallic coloration, use a bunch of series allpasses, and call the resulting algorithm a plate reverb. This is a fairly common approach, with most of the “plate” algorithms having very little to do with a physical plate, so much as having a lot of initial echo density and a somewhat metallic sound.
  • Use fewer series allpasses at the input. This works in eliminating coloration, but can result in a lower initial echo density. Many “hall” algorithms use this trick.
  • Use a larger number of series allpasses, with the idea being that the larger number of resonances will end up smearing out the metallic sound. This works, but a side effect of cascading a larger number of series allpasses is that the attack time can be extended to the point where the sound seems to “fade in.” This is a great sound if you like it, but doesn’t work for small room simulation.
  • Modulate the delay lengths within the allpasses. For longer allpasses, this helps reduce coloration. For the short allpasses used in the input diffusion section, this ends up producing too audible of a chorusing sound, or a sound similar to water sloshing around in a metal pan.
  • Reduce the coefficients of the allpass delays. This will reduce coloration, but will also reduce the echo density.

This is where the Diffusion control comes in. Instead of being a compromise solution that works OK for all signals and not great for any signal, it allows the user to adjust the algorithm to suit the input signal. It places the burden of balancing echo density and coloration on the end user, instead of on the algorithm designer. By knowing how the Diffusion control works, the end user can make their reverbs work better for them.

Is this an ideal solution? Probably not. But in the limited hardware processors of the late 1970’s, or the low-CPU plugins of today, it can be a reasonably effective solution.

EDIT #2: ValhallaRoom uses some clever signal processing tricks to avoid the issues associated with series allpass delays described above. A high level explanation of the Early Reverb section of ValhallaRoom can be found here. Even though ValhallaRoom has a Diffusion control, it is not being used to control allpass coefficients – the Early Reverb has no allpasses in it.

EDIT#3: ValhallaShimmer is built around a large number of cascaded, modulated allpass delays, and the artifacts that are generated by such a structure (see this blog post for more details). In addition, many of the “classic” digital reverbs relied heavily on series allpasses, so it isn’t to say that they produce a sound that is unusable – just that this sound isn’t necessarily reflective of what is found in a “real” acoustic space.
Happy New Year

Just a quick note of thanks to all of the readers of this blog, and all the people who supported Valhalla DSP during 2010. I love doing this work, and am thankful for everyone who bought ValhallaShimmer. I look forward to creating new tools for you in 2011. Have a safe and happy New Year!

As a token of my appreciation, I humbly submit my nomination for the Rick Roll of 2011. Thanks to some anonymous KVR poster for polluting my brain.

The Reverb Beard

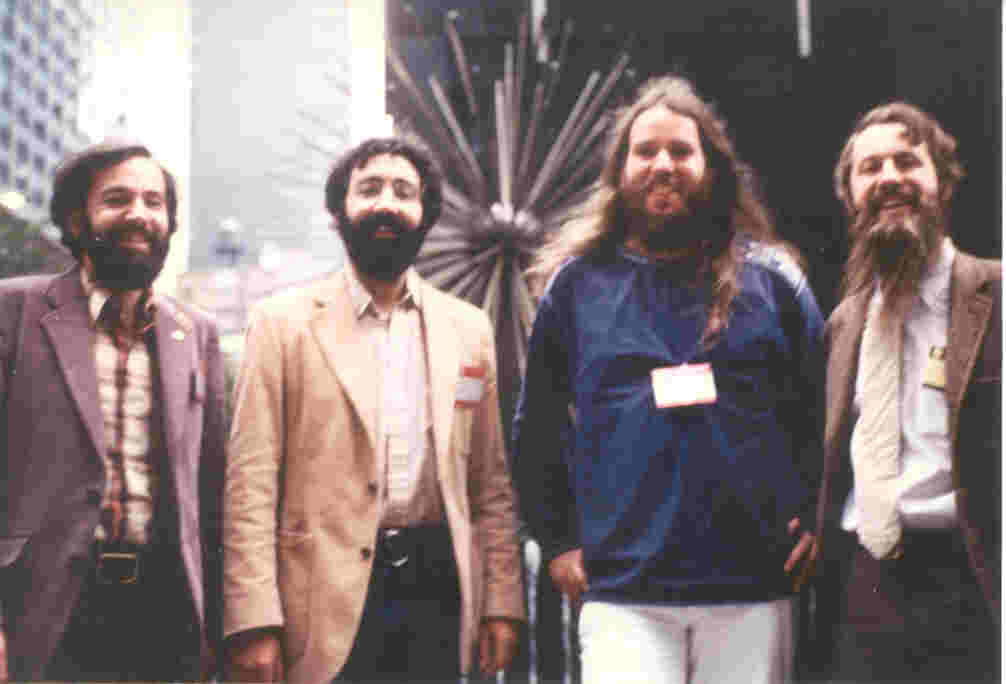
Something that I find rather curious, is that many of the reverb pioneers sported some seriously impressive beards. Christopher Moore has posted a few beard-heavy pictures on his website (http://www.sevenwoodsaudio.com). Here’s my favorite:

From left to right, you have Christopher Moore (Ursa Major reverbs, AKG ADR 68K), Anthony Agnello (Eventide, Princeton Digital), Wolfgang Schwarz (or Wolfgang Buchleitner, not sure of the name, but the Quantec guy) and David Grieisinger (designer of the Lexicon reverb algorithms). An amazing amount of reverb knowledge in one place, and rocking beards that rival ZZ Top, assuming that you put the 4 beards together to form one super beard like some sort of beard Voltron.

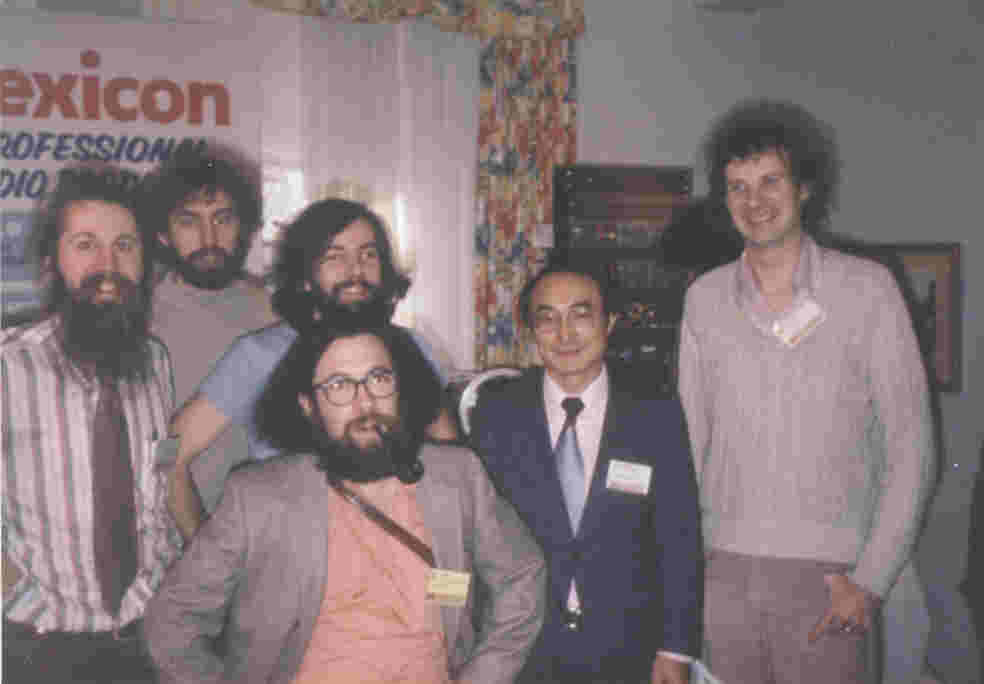
Another picture tosses in Barry Blesser (EMT-250), sporting a scholarly pipe and an even more scholarly beard:

Nowadays, I use the term “Reverb Beard” (or “Reverbskägg” in Swedish) to refer to people that develop reverberation algorithms, or to describe the state of people in the middle of the design process for reverb algorithms. Feel free to use this meme.

Note: I’ve tried to grow the reverb beard before, but it either comes out red, which makes me look like Kris Kringle in “Santa Claus is Coming To Town,” or greyish-red, which makes me look and feel old. So the “reverb beard” is more of a mental state.

EDIT: Chris Randall and Adam Schabtach, of Audio Damage fame, both pointed out to me that the mighty beards of the reverb pioneers were first mentioned on the Music Thing blog in 2004:

http://musicthing.blogspot.com/2004/12/beards-and-music-technology-pioneers.html

EDIT, January 2016: I am now sporting the reddish-grey hipster beard as described above. WHO AM I TO DENY MY DESTINY

ValhallaShimmer Tips and Tricks: Chorus

ValhallaShimmer was primarily designed as a reverberator. However, it can also get some cool chorus sounds. The Chorus preset is a good place to start. Some general tips:

  • Set Size as low as possible. This will keep the reverberant quality to a minimum
  • Use one of the smaller reverbMode settings. The Chorus preset uses smallStereo, but mediumStereo can be used for a more diffuse, washy chorus.
  • Set Diffusion up around halfway to start with, and go from there. Too high of a Diffusion setting will result in more of a small room sound, but this might be what you are looking for.
  • modDepth should be set to about 0.5 for starters, and modRate should be adjusted to taste.
  • Note that higher settings of Diffusion result in more pitch change for given settings of modRate/modDepth, so you may want to turn down Diffusion and/or modDepth if things get out of hand.
  • The bright colorMode will result in a full-bandwidth chorus signal, while the dark colorMode will be closer to the older BBD based choruses.
  • Use highCut to control the overall brightness.
  • lowCut can be used to shave away the low frequencies, which can add clarity to a chorused signal.
  • Feedback should be left at 0 for standard chorusing. Turning it up with the above settings will result in a very metallic sound, which, again, might be exactly what you are looking for.