We are happy to announce the ValhallaVintageVerb 4.0.0 update. The big news: we’ve added two new reverb modes, Chamber1979 and Hall1984!
Elements Of The Past
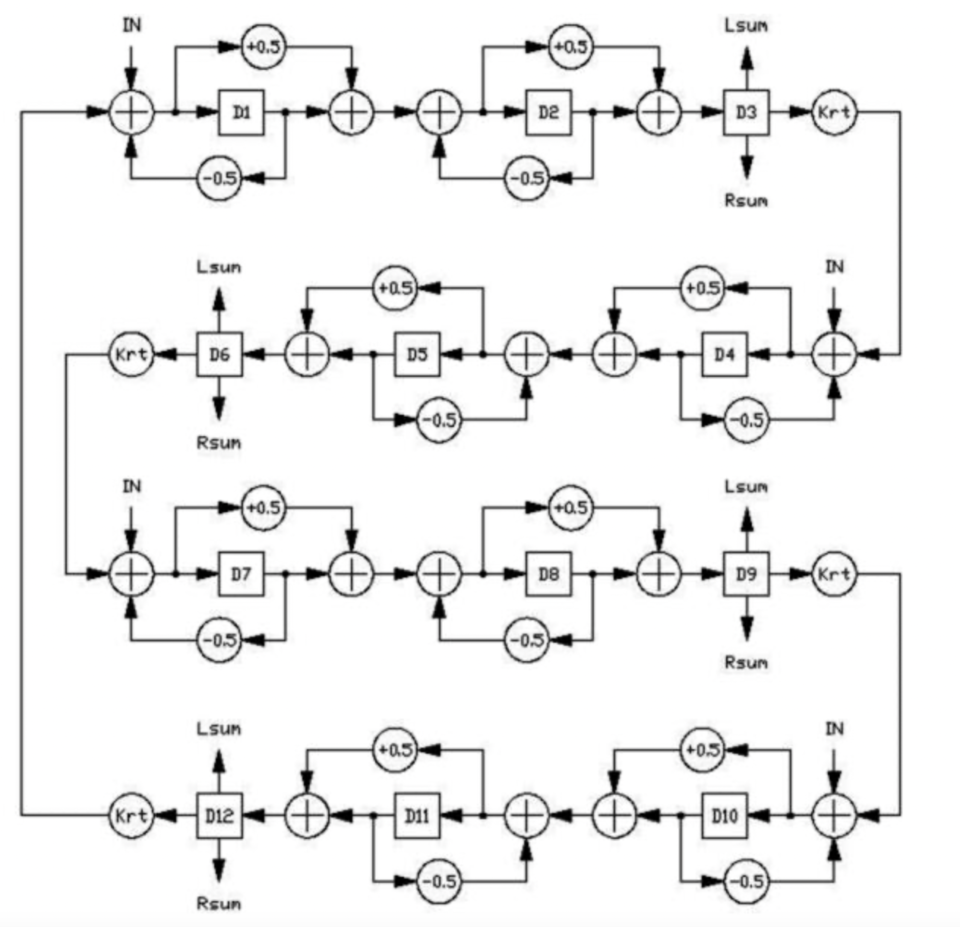
Chamber1979 is inspired by the Chamber algorithm in a renowned digital reverb from the late 1970s. I’ve been messing around with this algorithm for over a decade, but it wasn’t sounding good to my ears. I figured I’d give it one more try, and found that it had its charms, but with a few faults. The original hardware algorithm had some seasick modulation that I didn’t like. In addition, my realization of the algorithm couldn’t get short decay times. It always sounded really long, even with Decay set to minimum. The algorithm also sounded kinda metallic to me. Lastly, the overall tonality and filtering of my algorithm didn’t precisely line up with the 70s hardware.
Elements Of The Future
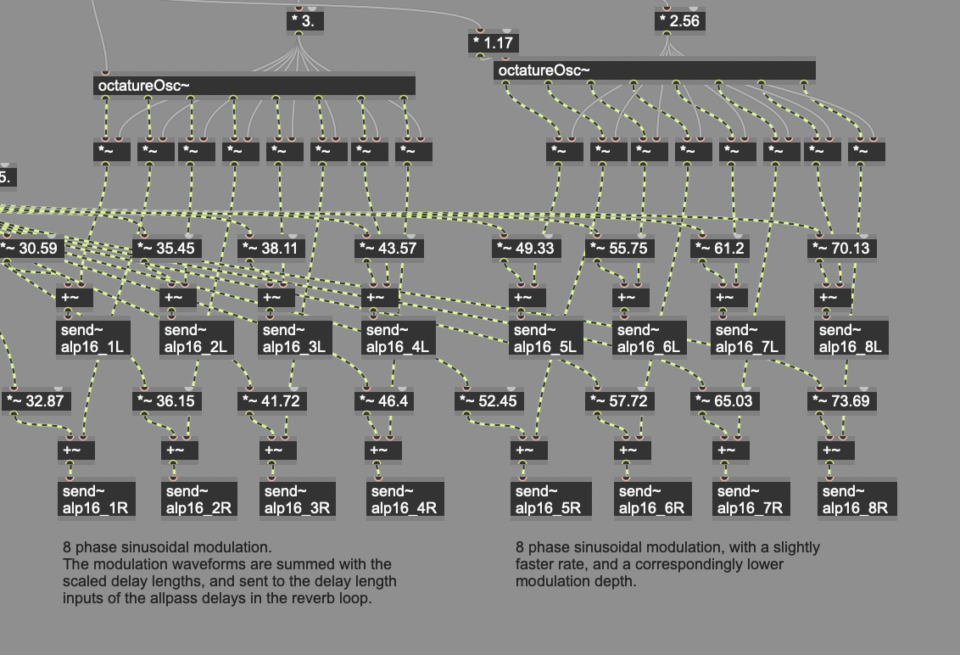
In order to fix the issues with the Chamber algorithm, I decided to draw upon some modern reverb theory. The seasick modulation issue was something I had fixed in ValhallaRoom back in 2011, so I applied similar techniques to the Chamber algorithm. The results were much lusher, with less random pitch shifts than the original. Fixing the decay time issues and metallic sound required a bit more science. I ended up going to publications by Jean-Marc Jot (including his early 90s PhD thesis), and applying some of his reverb decay techniques to the Chamber algorithm. I had never tried these techniques with nested allpass reverb algorithms, and I don’t know if anyone else has tried them, but they WORKED. The Chamber algorithm was now able to get short decay times, and sounded much less metallic. I decided to call my version Chamber1979, as a proper “retro futurism” homage to that era.
I also revisited the schematics of the 70s hardware, and saw a strange analog circuit I had overlooked in the past – a fixed filter labeled the “aperture filter.” This filter was apparently used to make up for some of the darkness added by the sampling process. A few hours of RC equations in Excel and some late night coding, and I had the aperture filter working! This ends up adding some unexpected brightness to the reverb sound, even at low sampling rates. Chamber1979 uses this aperture filter in the 70s and 80s colors, with the appropriate cutoff for each era, and helps create a more “hardware” sound.
Revisiting The Concert Hall
After seeing how well these newer techniques worked with the Chamber algorithm, I decided to try them with the venerable Concert Hall algorithm. The results made me really happy. The new Concert Hall algorithm retained the open sound and spaciousness of the older algorithm, but with a less metallic sound, and far greater control over the reverb time. The new hall algorithm worked well for short room sounds, as well as big halls, cathedrals, and giant synth reverbs. I changed the modulation to be more distributed within the network, while retaining the coloration of the original algorithm. I also added the aperture filter in the 70s and 80s modes. I’m really happy with the results – things sound closer to the original hardware, but with some improvements to the lower decay times.
The new reverb mode is called Hall1984, to pay tribute to my favorite reverb hardware from the early 1980s. Don’t let the “1984” in the name fool you – Hall1984 is perfect for dark 70s digital halls, brighter 80s halls, and crystal clear modern reverbs.
QResque Presets For That Early 80s Room Simulator Sound
I’ve also revisited the Palace reverb mode, and created some presets that more closely emulate a famous early 80s digital room simulator. In order to more closely match the hardware, the Early Diffusion is set to 50%, the Late Diffusion to 0%, and the Attack to 100%. This replicates the “reverb from the back of the hall” sound, which pushes the reverb back behind the sound source. I’ve found that these settings in the Palace algorithm can be used for small rooms, plates, reverb chambers, halls, and huge cathedrals. The new QResque presets can be found in the Palace preset folder.
VintageVerb Is Like A Vintage Wine. It Keeps Improving With Age.
ValhallaVintageVerb was first released in December 2012, with eight reverb modes. We have continually updated VintageVerb since that time, adding fourteen new reverb modes, new GUI color schemes, new plugin formats, and compatibility for M1/M2/M3 Macs. 2023 has seen the introduction of three new reverb modes: Palace in January, and Chamber1979 and Hall1984 today, for a grand total of 22 reverb modes! I feel like these new reverb algorithms are the best ones yet in ValhallaVintageVerb. These new modes combine vintage sonics with modern updates, with the results being highly flexible reverbs that work for all styles of music.
FREE update for all Valhalla VintageVerb owners!
If you already own ValhallaVintageVerb the update is in your user account, so log in and grab the latest installer. If you don’t own Valhalla VintageVerb, feel free to grab the demo from the Demo and Downloads page, and check out Chamber1979, Hall1984, and the other 20 reverb algorithms that are unique to ValhallaVintageVerb. We hope you enjoy the ValhallaVintageVerb update, and thank you for your support!
After lots of experiments with different solutions, we finally have a merch shop we can stand behind. Check it out here: https://valhalladspmerch.com/
For this first run, we’re starting with silkscreened t-shirts and sweatshirts with the Valhalla logo, Vintage Verb, Freq Echo and Space Mod logo t-shirts, and an embroidered baseball hat. All of our t-shirts and sweatshirts are silkscreened by hand, so they will hold up after repeated washings. We LOVE the fabric and feel of this gear!
As this is our first foray into the physical world, we’d love your feedback on selection, quality and fulfillment experience. After your merch arrives, please let us know what you think here: https://www.surveymonkey.com/r/ValhallaMerch.
Also, please note, we’re not set up for international shipping yet, so Valhalla merch is only available for people with a US address at this time. But let us know if you’re interested and outside the US, and we can figure something out.
And as always, thank you for your continued support!
We are happy to announce the release of ValhallaSupermassive 3.0.0, featuring two new reverb/delay modes, Leo And Virgo. These modes share neighboring Zodiac symbols, but that’s about all they have in common. Leo is the biggest, lushest, densest mode in Supermassive, while Virgo is the smallest, grainiest, most spare reverb mode in the plugin.
Leo: The Most Massive Reverb In Supermassive
The new Leo mode is the most super massive-est of all the Supermassive modes. It has a very slow attack, a long to VERY long decay that is controlled by both Density and Feedback, and a high echo density, with balanced modulation. Leo interleaves the high and low EQ filters throughout the reverb network, which means that the reverb decay can be dark, shrill, bass heavy, whisper light, or just perfectly balanced. I find Leo is ideal for big synthesizer sounds, as well as realistic cathedral sounds and other long reverbs.
Virgo: Sparse Reverb, or Complex Delay?
Virgo is the smallest and sparsest mode in Supermassive. It has a fast attack, and basically sounds and behaves like a stereo delay until the Density control is turned up. With higher Density settings, it still sounds like a grainy delay, that kinda sorta turns into a reverb. Virgo is great for pointillistic echoes, spring-ish reverb sounds, and other sparse effects that create more space around your sounds.. While Leo produces a lush wash of sound, Virgo allows you to hear the space between the echos.
Plenty O’Presets
The LATE 2023 preset folder is chock full of presets that show off the Leo and Virgo modes. We highly recommend using these presets as the jumping point for your own explorations.
Supermassive Keeps Getting Better And Better
ValhallaSupermassive was launched in May 2020, and was originally intended as a home for reverb algorithms that didn’t fit into the standard categories. Supermassive 1.0.0 had 8 reverb/delay modes, and every update has added a few more modes. Version 3.0.0 has twenty unique modes, covering a huge variety of reverbs, echoes, and just weird effects.
The last few updates of Supermassive have seen the introduction of increasingly musical algorithms. As I’ve spent more time with the “weirdo” algorithms of the first few Supermassive revisions, I’ve learned how to tame them: adding more filtering, increasing the baseline echo density, balancing the modulation, creating a more open sound. The last two revisions introduced my favorite Supermassive algorithms: Aquarius and Pisces for “echoverbs,” and Scorpio and Libra for multipurpose “generalist” reverbs that sound good on everything. The new Leo and Virgo modes in Supermassive 3.0.0 carry on with the improvements of the last few revisions, and extend them to huge and tiny reverbs.
I’ve loved working on Supermassive over the past few years. Since Supermassive is a free plugin, I don’t feel the pressure to make things perfect that I do with the paid plugins. With less pressure, I’m able to experiment with new things, and try out ideas that might be too weird otherwise. All that being said, the last few rounds of Supermassive research have resulted in algorithms that refine some of the original concepts, and just make them better.
Supermassive 3.0.0: It’s FREE!
As always, Valhalla Supermassive is a FREE plugin, available for both Windows and Intel/ARM Macs. Just head on over to the Supermassive page, or go over to our new Demos & Downloads page and grab all of our free plugins, as well as demos for the commercial ones.
We hope you enjoy the ValhallaSupermassive 3.0.0 update and thanks for your support!
We have just released the 2.0.0 update to ValhallaRoom. The big new features of this update: Two new controls, Space and Lo Cut!
Space: Make Your Reverb Spacier
The Space control controls the amount of feedback around the predelay and early reflections. By turning up the Space control, you can dial in diffuse and modulated echoes, early reflections with a more realistic short decay, metallic early resonances, realistic small spaces, and lush modulated reverbs that are markedly different than what ValhallaRoom could do in the past.
The Space parameter can be found under the Early tab.
With the default Space setting of 0%, there is no feedback, and the plugin behaves as it always used to.
As the Space parameter is turned up, higher amounts of the output of the early reflections are routed back into the input of the predelays.
Space starts to really become audible at 25% or so; 50% results in a shorter exponential decay relative to the Early Size; and values greater than 60% turn the early reflections into a reverb in their own right.
Turning up the Early Size will increase the overall decay at a given Space setting. In general, you will want an Early Size of 200 msec or more for “early reflection reverbs.”
Longer Predelay lengths will produce repeating echoes as Space is turned up.
The relative lengths between the Predelay and Early Size make a huge impact on the sound. By adjusting the length ratios, you can get barely diffuse echoes, very diffuse echoes that turn to reverb after a few repeats, or full-on reverbs. Experimentation encouraged!
The Lo Cut and Hi Cut filters are in the Space feedback path, so you can use these to create echos or reverbs that get duller or brighter over time.
Space values greater than 0% will result in the Space decay feeding into the late reverb, as the predelay for the late reverb is in the feedback path.
The 2.0.0 Room update ships with a bunch of Space presets to help get you started on your curiosity voyage, as well as a preset (SpaceScratchpad) that is a great starting point for learning how the Space control works.
Lo Cut: Get Those Pesky Low Frequencies Outta There
The Low Cut control (abbreviated as Lo Cut in the GUI) can be used to cut out some of the low frequency content in the reverb output. This will result in a less bass-heavy sound, that can be easier to integrate into a modern mix.
The Lo Cut slider can be found on the left side of the GUI, next to the Hi Cut slider.
When the Lo Cut slider is set to 0 Hz, it is effectively out of the circuit, and the sound is identical to previous versions of ValhallaRoom.
As the Lo Cut frequency is increased, the low frequencies will gradually be reduced in the output signal.
From a technical perspective, the Lo Cut slider controls a stereo low shelving filter. As the Lo Cut frequency is increased, the cutoff of the filter is raised, and the low shelving gain is reduced from 0 dB. The gain reduction happens very gradually, to ensure the smoothest behavior when adjusting Lo Cut.
Our recommendation is to adjust Lo Cut to taste, to suit the needs of your mix. Classical music will probably work better with Lo Cut set closer to 0 Hz, while vocals often sound clearer with Lo Cut set to a few hundred Hertz.
ValhallaRoom: Making Things Sound Roomier Since 2011
We first released ValhallaRoom in 2011. Since the initial release, we’ve tripled the number of algorithms, added a resizable GUI, created a new Electric Blue GUI color option, added a bunch of new plugin formats (VST3, AAX), ported the code to Apple Silicon, and kept the plugin compatible with the latest macOS changes.
We’re excited to expand on the core functionality of ValhallaRoom with the new Space and Lo Cut controls. Backwards compatibility is a huge deal for us at Valhalla, so we have implemented the new parameters in such a way as to ensure that your old DAW projects that used ValhallaRoom will behave and sound the same after installing the 2.0.0 update.
The 2.0.0 Update is a FREE Update For All ValhallaRoom Owners
If you already own ValhallaRoom the update is in your user account, so log in and grab the latest installer. If you don’t own Valhalla Room, feel free to grab the demo from the Demo and Downloads page, and check out the new Space and Lo Cut controls. We hope you enjoy the ValhallaRoom update!
It’s that time of year, when the rain returns, the leaves start to turn color, and Apple releases a new operating system. We’ve been testing the Valhalla plugins with the macOS Sonoma betas and release candidate for the past few weeks, and are happy to announce that all of the Valhalla plugins install, authorize and run in Sonoma with no issues!
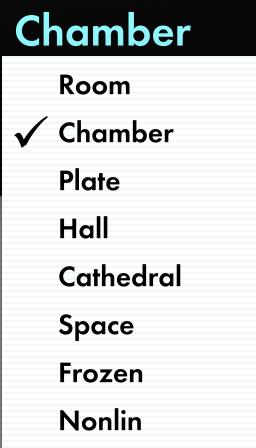
One of the main features of the Valhalla plugins is the MODE control. The Mode control is located in the lower left corner of the GUI, and will bring up a popup menu when clicked, with a list of the available modes. Each “mode” is a distinct algorithm, with different sonic characteristics. In many ways, the Mode control is the highest level control in the Valhalla plugins, as it allows for a quick switch between diverse sounding & behaving algorithms.
Valhalla VintageVerb currently has 20 unique reverb modes. The plugin originally launched with 8 modes in December 2012, and has been updated with new modes when inspiration strikes (for me, that is, as the algorithm developer). A quick list:
Concert Hall. Based on the hall algorithms of the late 1970s and early 1980s. Huge spatial image, echo density that can be adjusted from very sparse to very dense, and lush chorusing modulation.
Bright Hall. Similar to the Concert Hall algorithm, but with a brighter initial sound, and deeper and lusher modulation.
Plate. Inspired by early 1980s plate algorithms. Highly diffuse, bright initial sound, high echo density, lush chorused modulation.
Room. Emulates the sound of early 1980s room algorithms. Medium diffusion/early echo density, somewhat darker sound, chorused modulation.
Chamber. A transparent and dense algorithm. Highly diffuse, high echo density, less coloration than Plate/Room algorithms, chorused modulation.
Random Space. This generates DEEP and WIDE reverbs, with a slow attack, and more diffusion than the late 1980s algorithms that inspired it. The modulation uses internal delay randomization, to reduce metallic artifacts without the pitch change that can occur in the algorithms with chorused modulation.
Chorus Space. Same as Random Space, but with the delay randomization replaced with lush chorused modulation.
Ambience. Combines time varying randomized early reflections with a full-featured reverb tail, with the balance between early and late reverb controlled by the Attack knob. Useful for adding “air” to drums, vocals, and any place where a reverb should be felt but not heard.
Sanctuary (added 2013). Inspired by a classic German digital reverberator from the 1970s. Discrete early reflections, a dense late reverb that rapidly builds in echo density, lush detuned modulation. Sanctuary incorporates the bit reduction and floating-point gain control used in the A/D and D/A convertors of the early digital hardware.
Dirty Hall (added in 2014). A fresh look at the Concert Hall algorithm, with the goal being to emulate the strange fixed point and convertor artifacts of early 80s reverb hardware. Lusher and denser than the Concert Hall algorithm, with loads of warmth and grit on tap, for a roughly hewn beauty. Plug in your analog synth and send yourself into retro sci-fi heaven.
Dirty Plate (added in 2014). All the warm and gritty artifacts of Dirty Hall, applied to an old-school digital plate algorithm. High echo density, wide stereo image, and just the right amount of metallic sheen. Drums come alive when sent through Dirty Plate.
Smooth Plate (added in 2014). The complete opposite of Dirty Plate. Smooth decay at all settings, from short to near-eternal. Lush chorusing, with none of the metal found in Dirty Plate. The most transparent and naturalistic reverb in ValhallaVintageVerb. Crank up the Size parameter, and float off into space!
Smooth Room (added in 2014). A smooth and transparent room reverb, in the Smooth Plate style. Useful for emulating the Room/Hall algorithms of late 1980s hardware, as well as getting clear reverberation with low amounts of coloration.
Smooth Random (added in 2014). A random room/hall algorithm, with transparent decays that can be adjusted from tiny to huge. Randomized delay modulation, similar to Random Space, but with a much tighter initial attack and smoother decay. A good “jack of all trades” reverb algorithm.
Nonlin (added 2014). Gated, reverse, and nonlinear reverbs are all on tap here. Use Size to control the duration of the reverb, and Attack to smoothly interpolate between a truncated reverb, a “flat” gated decay, and huge reverse reverbs. Lush chorusing modulation on tap, for your shoegazing needs.
Chaotic Hall (added in 2017). A chaotic take on the Concert Hall algorithm, with modulation and saturation artifacts inspired by classic tape echoes. Lush and warm, with subtle wow and flutter chorusing that adds depth without making your reverb seasick.
Chaotic Chamber (added 2017) Smooth and chaotic at the same time. A relatively “dimensionless” reverb algorithm, that adds depth to your sound. Wow and flutter modulation, subtle tape saturation. Use this algorithm on pretty much any input, and it will sound good.
Chaotic Neutral(added 2019). Combines chaotic modulation with a fairly “colorless” algorithm architecture, for a reverb that sounds like the input – just with reverb!
Cathedral(added 2021). An updated version of an FV-1 algorithm created by Sean Costello in 2014, Cathedral is BIG yet clear, for long, open reverb decays with ensemble modulation and a realistic rolloff of high frequencies.
Palace (added 2023). Loosely inspired by a classic “room simulator” algorithm from the 1980s, but updated to allow higher echo density and lush modulation. Palace is perfect for room reverbs of all sizes, ranging from small drum rooms through concert halls and all the way up to giant cathedrals. The Palace algorithm sounds more realistic and open than the other room algorithms in VintageVerb, while still retaining old school digital charm.
People have asked what the best reverb modes are to use for a particular situation. While we’re fond of all the VVV modes, here’s a few starting points:
The Dirty modes (Dirty Hall / Dirty Plate) are the ones that are most faithful to late 70s / early 80s digital hardware reverbs. When designing these modes, Don Gunn and I spent a lot of time listening to and emulating the artifacts of a Lexicon 224XL and AMS RMX-16: floating point convertor quantization, steep lowpass antialiasing filters, fixed point quantization of the audio signal, and fixed point quantization of the modulation signals (the 224XL sounds like an old modem with high amounts of modulation). The Dirty modes are the best reverb modes for adding depth and character to synthesizer sounds.
The Smooth modes are a modern update of the “classic” Lexicon reverb algorithms. A great deal of attention was spent on having realistic & unobtrusive filtering, as well as shaping the reverb output taps for a natural exponential decay. The Smooth modes are the best reverb algorithms for “expensive” sounding vocals and realistic rooms.
The Chaotic modes were an offshoot of the work I was doing on the tape modes in ValhallaDelay, and feature “chaotic” modulation waveforms that are close to the wow and flutter found in worn-out tape loops. The saturation in these modes is based on the complex pre-emphasis / nonlinearity / de-emphasis that is heard in tape decks. I feel that the Chaotic modes are the best reverb algorithms for longer synth verbs that still sit well in the mix.
The new Palace mode is a great choice for any situation where you want to add “room” sound. Use a small Size setting in the Palace mode for drums, or use a huge Size for big vocal and synth reverbs.
December 2022 marked the 10th anniversary of the launch of our most popular plugin, ValhallaVintageVerb. To celebrate the occasion, we are happy to introduce the latest reverb mode in VintageVerb: Palace!
Palace: A Really Fancy Room
As the name suggests, the Palace reverb mode is essentially a big, fancy room algorithm. The Palace mode can sound more realistic than the other room and chamber algorithms in VintageVerb, while still retaining “vintage digital” characteristics. By adjusting the Size, Attack, Early and Late Diffusion, the Palace algorithm can simulate rooms ranging from small studios and chambers, to concert halls, all the way up to cathedrals and the grandest memorial architecture.
Palace Reverb Mode: Vintage Inspirations, Modern Expansions
The Palace reverb mode is loosely inspired by a digital “room simulator” hardware reverb from the 1980s. We’ve taken a lot of liberties with the algorithm, and added a bunch of things not possible in the original hardware, with higher echo density and lush modulation being some of the highlights. The goal was to retain the “open” realistic reverb decay, while allowing the user to dial in a more modern reverb sound if desired.
Palace Enhanced Parameter Set
VintageVerb has more parameters than your typical early 1980s hardware reverberator, so we have expanded the Palace algorithm to fit the VVV parameter set, while keeping room to dial in the sparser sounds heard in the original:
The Early Diffusion parameter in Palace controls both the level and density of the early reflections in the reverb decay. An Early Diff value of 40% corresponds to the early 80s hardware, while higher values map to the higher echo density of the late 80s revisions.
Late Diffusion allows the Palace algorithm to achieve both higher echo densities than the 80s hardware, as well as reducing the perceived pre-delay. Set Late Diffusion to 0% to obtain that authentic “reflection off the back of the concert hall” sound from the 1980s hardware. Higher Late Diffusion values will smooth things out. I like to keep this at 50% or lower for the smoothest sound with the least coloration.
Attack allows for control over the volume of the early reflections (in combination with the Early Diffusion parameter). In general, keeping Attack at 0% is recommended for emulating the 1980s room simulator. Higher values of Attack will reduce the early reflections volume, which may be useful when Early Diffusion is set to higher values.
The 1980s room simulator hardware didn’t have modulated delays. But Palace does! It turns out that modulating the delays in these types of algorithms results in a lush decay that is perfect for vocals, synths, and all sorts of beautiful ambient sounds! Turn up the Mod Depth to get a balanced chorused modulation. Or, leave Mod Depth at 0% for a realistic large hall / cathedral sound where the echoes tumble after each other and bounce all around the space.
The Size control in Palace is critical for dialing in the ideal space. Smaller Size values can get VERY small, perfect for tight drum rooms. Larger sizes are better for more open vocal reverbs. The largest Size values are perfect for halls and cathedrals.
The COLOR control is perfect for dialing in the era of the original hardware. Setting COLOR to 70s results in an 8 kHz bandwidth, 80s to 15 kHz, and NOW to full bandwidth. The overall tonality is much brighter than most of the other VintageVerb algorithms at the same color settings, in order to match the 80s hardware.
Suggested Uses for the Palace Mode: EVERYTHING
We have found the Palace mode to be useful on just about every sound we can throw at it! Clear sounding vocal reverbs, realistic drum rooms, lush synth verbs, huge realistic halls and cathedrals…Palace has it covered.
Palace Preset Folder: A Perfect Starting Point
We’ve provide a bunch of new presets in the Palace folder that showcase what the Palace reverb mode can do. Feel free to use these as is, or as a starting point for your own sonic explorations! Many of the presets have the date in their name of the hardware they are loosely based on (i.e. 1982, 1987), as well as our own 2022 expansions.
Valhalla VintageVerb: 10 Years Of Updates
When ValhallaVintageVerb was released on December 18th, 2012, it shipped with 8 reverb algorithms. Over the past 10 years, we have constantly updated VintageVerb. We’ve added new plugin formats (AAX, VST3), kept up to date with OS X and macOS changes, and ported the plugin to the new Apple Silicon format. We’ve also added 12 additional reverb algorithms to VintageVerb over the years, with the Cathedral algorithm being added in November 2021. The Palace algorithm continues a tradition of adding value to the Valhalla plugins over time.
Palace Mode is a FREE update for all Valhalla VintageVerb owners!
If you already own ValhallaVintageVerb the update is in your user account, so log in and grab the latest installer. If you don’t own Valhalla VintageVerb, feel free to grab the demo from the Demo and Downloads page, and check out Palace and the other 19 reverb algorithms that are unique to ValhallaVintageVerb. We hope you enjoy the ValhallaVintageVerb update!
We are happy to announce the release of the ValhallaDelay 2.5.0 update. The big news: the introduction of the RichPitch mode!
ValhallaDelay: RichPitch Mode
The RichPitch mode combines a pitch-shifted delay signal with a lush, detuned delay signal. The pitch-shifted and detuned signals share the same overall delay time. The PITCH Shift knob controls the pitch shift in semitones, while the PITCH Detune affects both the pitch-shifted and detuned signals.
The Age control in most other ValhallaDelay modes has been replaced in RichPitch by the PitchMix control. PitchMix, as its name suggests, controls the mix of pitch-shifted and detuned signals. With PitchMix at 0%, only the detuned signal comes through. A PitchMix value of 100% results in only pitch-shifted signals in the output. PitchMix at 50% creates an equal mix of detuned and pitch-shifted signals. You get the idea.
PitchMix: Simple Yet Powerful
It turns out that having a mix between detuned and pitch-shifted signals makes RichPitch a MUCH more powerful mode than the previous pitch-shifting modes in ValhallaDelay. The Pitch, RevPitch and PitchDuck modes always have only the pitch-shifted signal in the output and feedback loop. This can be an awesome sound, but not exactly a subtle sound.
The PitchMix control in RichPitch allows you to dial in delays with subtle harmonic overtones, reverbs with equal amounts of the original signal and pitch-shifted signals, full on crazy pitch-shifting, and everything in between. The PitchMix control is also interactive with the Feedback control. By turning up Feedback and turning down PitchMix, you can create an echo that slowly builds in pitch-shifting intensity over time, while still retaining the original pitch of your input signal.
PitchMix + Diffusion = New Shimmer Reverbs
By turning up the DIFF Amount control in RichPitch, and adjusting the PitchMix control to taste, you can create shimmer reverbs in the RichPitch mode that are different from the other ValhallaDelay modes. These new shimmer reverbs are also very different in nature than ValhallaShimmer, which tends to lean towards “huge and epic” at all times. The RichPitch shimmers can be epic, but can also be subtle or more strident, depending on the PitchMix setting.
High diffusion amounts, plus longer delays, no feedback, and PitchMix set to taste, can be used for purely “feedforward” shimmer sounds. These reverbs have a fixed amount of pitch-shifting compared to the input signal, and the amount of pitch-shifting doesn’t change over the decay time.
Diffusion, shorter delays, higher feedback values, and PitchMix set to taste, can be used for more “classic” shimmer sounds, where you can have as little or as much pitch-shifting as desired. The pitch-shifted signal will continue to build and shift upward as feedback is increased, so a small value of PitchMix can go a long way.
New SHIMMER Presets folder
The ValhallaDelay 2.5.0 installer ships with a folder full of SHIMMER presets, which can serve as a basis for your explorations of RichPitch, or can be used as is. Most of the presets showcase the more subtle side of the RichPitch shimmer reverbs, although “subtle” is probably an inaccurate term for any shimmer reverb!
Hear RichPitch in action
We’ve cooked up a few quick examples, so you can hear what RichPitch is all about.
The first example is a simple repeating sequence from the Moog Grandmother, run through RichPitch set up as a dotted eighth note echo:
At the beginning, PitchMix is set to 0%. As the track progresses, PitchMix is turned up, bringing an octave up signal into the mix. PitchMix is gradually turned up to 100%, and then back down for a more subtle octave overtone. The feedback is turned up near the end of the track, which shows how a subtle amount of PitchMix can be made stronger with feedback.
The second example is based around a Korg MS-20, doing its best imitation of a didgeridoo. First, let’s hear the didgeridoo sound with a convention reverb, using the new Libra mode in ValhallaSupermassive:
Now let’s hear the same track, but with RichPitch being used for a shimmer reverb. Diff Amount is set to a high level, with a fair amount of feedback, and PitchMix at 0%, for a reverb with no pitch-shifting. As the track progresses, I’m turning up PitchMix, to bring an octave up overtone into the sound.
Wanna here more? Download the demo and check it out for yourself!
Updates for Ventura, OS X 10.11 / 10.12, M1 & M2 Macs
We’ve also added some generic “make things better” updates for ValhallaDelay, to enhance compatibility with Ventura as well as a few older macOS versions (more details can be found in this blog post). The ValhallaDelay 2.5.0 installer has now been built for both Intel and Apple Silicon machines (M1 & M2), so no need to install Rosetta 2 to run the installer!
RichPitch Mode is a FREE update for ValhallaDelay Owners!
If you already own ValhallaDelay, the update is in your user account, so log in and grab the latest installer. If you don’t own Valhalla, feel free to grab the demo from the Demo and Downloads page, and check out RichPitch and the other 14 delay algorithms that are unique to ValhallaDelay. We hope you enjoy the ValhallaDelay update, and thanks for your support!
This month marks the 2.5 year anniversary of ValhallaSupermassive. To celebrate the occasion, we’re releasing the 2.5.0 update, with two new reverb / delay Modes: Scorpio and Libra.
ValhallaSupermassive Mode: Scorpio
The Scorpio mode is similar to the Gemini mode in many ways: fast attack, rapid build of echo density, more of a “conventional” reverb. The feedback path in Scorpio is very different than Gemini with lower DENSITY settings, and can sound like a complex ping-pong delay. The Low EQ and High EQ filters in Scorpio are included within the feedback paths, versus outside the feedback path like in the Gemini mode.
These are seemingly subtle changes, but they make a HUGE sonic difference. The complex feedback path in Scorpio creates a lot of stereo width, as well as a more “open” frequency response. By incorporating the High EQ filters into the feedback paths, the Scorpio mode can create far more realistic reverb sounds, where the high frequencies decay away over time. The Low EQ filters can be used to take out a little bit of the low frequencies for a less boomy reverb decay, or can shave off a lot of the low end for a reverb that gets thinner sounding as it decays away.
ValhallaSupermassive Mode: Libra
The Libra mode in ValhallaSupermassive has a somewhat slower attack than Scorpio, and can sound like a delay at 4X the displayed DELAY length when WARP and DENSITY are both at zero. Turn up the WARP control, and Libra quickly transforms into a very lush reverb, with balanced modulation. The DENSITY control will start to bring in shorter recirculating delays, and is very useful in smoothing out the reverb attack and decay. Every delay within the Libra mode is filtered by Low EQ and High EQ filters within the feedback paths.
The upshot of all of the above: the Libra mode is the best mode in ValhallaSupermassive for lush modulated reverbs with a natural decay. The Low EQ is useful for filtering as much low frequency content as you do or don’t need. The High EQ creates organic high frequency damping. The balanced modulation results in smooth sounding chorusing.
Best Uses for Scorpio and Libra: EVERYTHING
There are lots of weird and wonderful echo / reverb modes in ValhallaSupermassive. With Scorpio and Libra, the goal was much simpler: make modes that sound good on everything. The Scorpio mode takes the utility of Gemini, and extends it with precise shaping of the low and high frequencies. The Libra mode extends the high and low frequency shaping into a lusher and denser reverb space. These are perfect reverbs for synths, guitars, vocals, what have you. Scorpio is well suited for shorter / smaller spaces than Libra, due to its inherent shorter initial delay. Libra is a perfect candidate for big halls and ambient music.
Hear the Libra Mode in action
In this track, I’m using the Libra mode for reverb. ValhallaDelay is being used for tape echo and backwards pitch shifting. The mighty Take 5 from Sequential is being used for the synth tracks.
New LATE 2022 Preset folder that features Scorpio and Libra Modes
We’ve included a bunch of presets that use the Scorpio and Libra modes in the LATE 2022 preset folder. You can use them as is, or as a starting point for your own curiosity journey into Supermassive!
ValhallaSupermassive: Now With 18 Original Reverb / Delay Algorithms!
ValhallaSupermassive was originally released on May 19th, 2020, with 8 original echo / reverb modes. Since that time, we have added 10 additional modes, for a total of 18 as of today. We added 4 modes added in 2021 (Cirrus Major, Cirrus Minor, Cassiopeia and Orion) that tended towards the weird and experimental. In contrast, the 4 modes we have added in 2022 (Scorpio and Libra, plus Aquarius and Pisces in May 2022) have extended Supermassive into more practical and eminently useable directions. We feel that these last 4 algorithms stand with any algorithms we’ve released in any Valhalla plugin, free or paid.
How To Get ValhallaSupermassive Scorpio and Libra
As always, ValhallaSupermassive is a FREE plugin, available for both Windows and Intel/ARM Macs. Just head on over to the Supermassive page and follow the links! Or go over to our new Demos & Downloads page and grab all of our free plugins, as well as demos for the commercial ones.
We hope you enjoy the ValhallaSupermassive 2.5.0 update and thanks for your support!
Good news! We’ve just updated all the paid Valhalla plugins for Ventura compatibility. If you are running Ventura, simply log into your user account and download the latest installers. These updates will run on OS X 10.9 through 10.15, as well as Big Sur, Monterey, and Ventura. The free plugins run fine on Ventura as is.
OS X 10.11 / 10.12 Bug Fix
The plugins have also been updated to address a mysterious issue that OS 10.11 / 10.12 users began running into. For some strange reason, plugging an iPhone or iPad into a computer could trigger a system update and crash the DAWs. We figured out this issue was caused by something called MobileDevices.framework. Why would this ever affect plugins, and why would Apple introduce this change without telling anyone? Unclear. Anyway, we’ve rebuilt the plugins to get around this issue.
Updated Installers
We’ve also updated the installers to remove the dependency on Rosetta 2. The plugins have been native M1/M2 since January 2021, and now the installers are native to M1/M2 as well!
Windows users: no changes to the Windows plugins. They just continue to work well with no weirdness.
Valhalla DSP: Keeping A Good Thing Going Since 2010™
Each of the Modes in a Valhalla plugin is a unique algorithm with a discrete configuration of delays, filters, modulators, etc. The Mode parameter is the most powerful parameter in any Valhalla plugin, as it switches between different algorithms with very different sonic characteristics.
Valhalla Plugins are algorithm containers
All the Valhalla plugins are built around a diverse suite of original algorithms. We view our plugins as algorithm containers with empty slots for future updates because I constantly get new mode ideas.
Sometimes these new algorithms are designed to meet a specific need of our customers. Sometimes I create new modes for my own musical projects. And sometimes, I get obsessed with a new idea that won’t leave me alone until I try it out. I’m not saying that adding all these new algorithms is, like, cool, or an indication of a healthy personality. It’s just what happens, and I’ve learned to roll with it.
Adding a new algorithm to an existing plugin “container” is much easier for me than creating a new plugin. Each plugin essentially becomes a theme. The vintage algorithms go in VintageVerb, delays go in ValhallaDelay, the weird ones go in Supermassive, and so on.
This also means our newer plugin containers get updated with fresh new algorithms for years after their initial launch. Since these updates are free for customers, you’re on a mysterious ride with us once you buy a Valhalla plugin. What’s coming next? Who knows!
How many algorithms are in a Valhalla plugin?
I started this practice with ValhallaRoom in 2011 by shipping it with 4 algorithms and 8 empty slots. It was filled up to maximum capacity by 2015. All of our plugins since ValhallaRoom have 24 algorithm slots, as we realized we needed bigger containers.
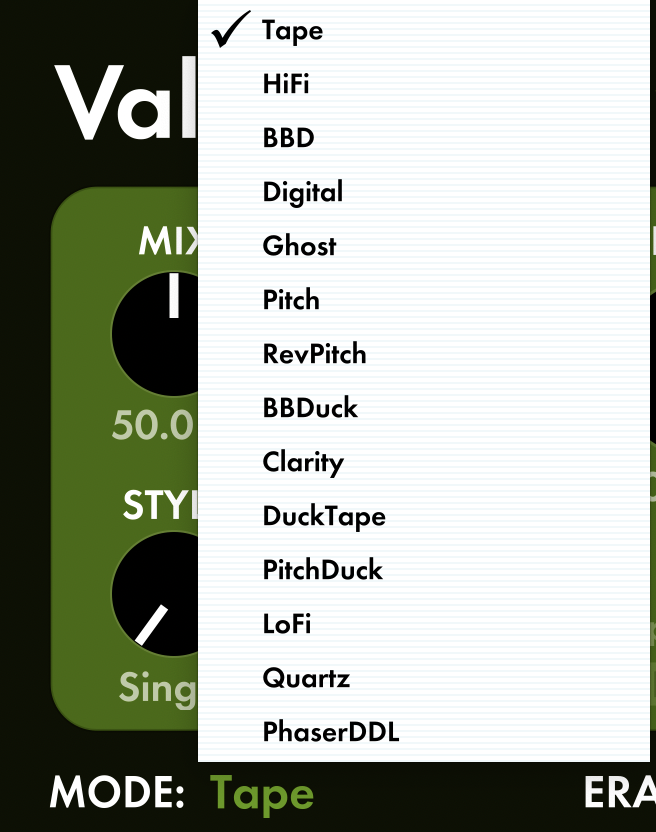
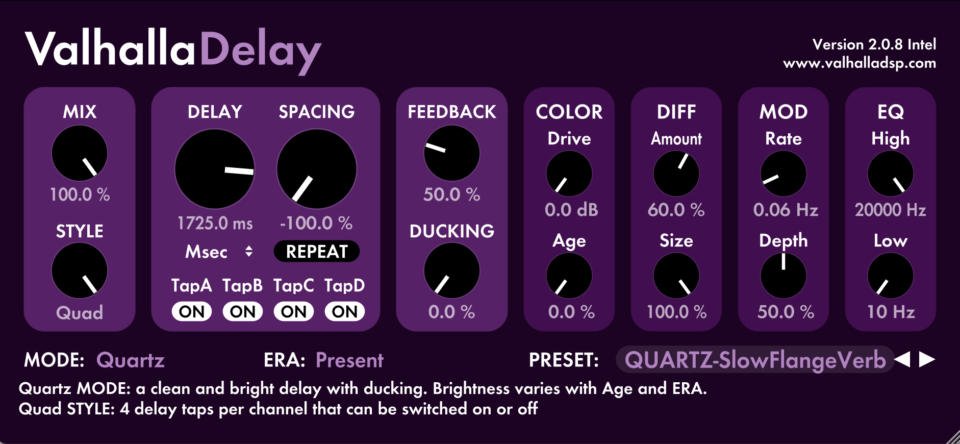
We launched ValhallaDelay with 7 original algorithms in 2019 (Tape, Hi Fidelity, Bucket Brigade, Digital, Ghost, Pitch, and Reverse Pitch.) Over the last three years, I’ve added 7 additional algorithm modes (BBD Duck, Clarity, DuckTape, PitchDuck, LoFi, Quartz, Phaser DDL) as free updates for all ValhallaDelay customers.
ValhallaVintageVerb has a similar trajectory. We launched in 2012 with 8 algorithms and have added 11 additional algorithms to it over the last ten years.
Even our free plugins get new algorithms. ValhallaSupermassivelaunched in 2020 with 8 algorithms, and I’ve added 8 more over the last two years.
For more info, you can check our detailed lists of modes and other features on our product pages.
Why do I need so many algorithms in my plugin?
Switching between different algorithms allows you to get more radical sonic changes than you’ll find from changing the reverb time, scaling the delay lengths, adjusting filter coefficients, or other tweaks.
One algorithm might be more appropriate for a realistic room, while another sounds better for a big synth hall or a “bloom” reverb that fades in over time.
VintageVerb was inspired by the digital reverb hardware of the 70s and 80s. These hardware units offered a wide variety of reverbs: rooms, halls, plates, nonlin, etc. Each of the “old school” algorithms in VintageVerb is best suited for a particular purpose . An expansive hall algorithm doesn’t sound great as a tight drum plate, and just changing the size and decay parameters won’t transform one algorithm into the other. The Mode control can rapidly switch between these different algorithms, so you can dial in your desired reverb quickly.
We find the best way to figure out which mode (or plugin) is best for your project is to play around, experiment, and go with what makes you happiest.
How do I switch between algorithm modes in a Valhalla plugin?
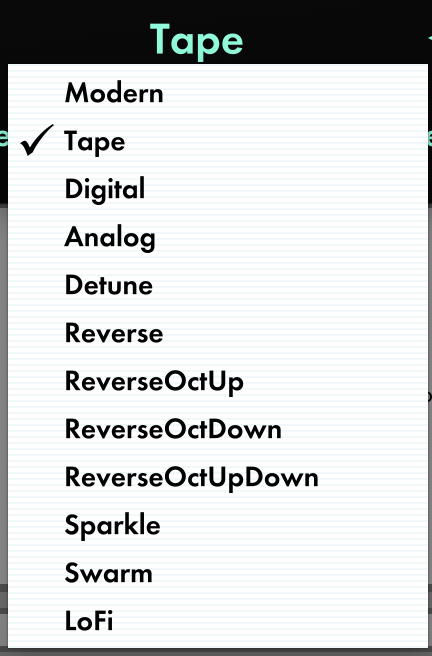
The Mode parameter is usually displayed in the lower left of the GUI:
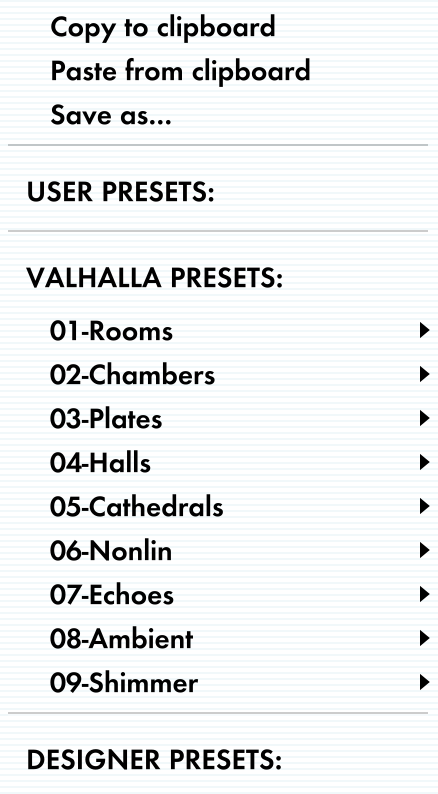
Click on the name of the active MODE (in this case “Tape”) and it will bring up a list of the available modes for the plugin:
What happens when I switch algorithm Modes?
From a technical perspective, the Mode switch is used to select the render function. We’re not switching around variables within a single code block but calling in a different code block when the Mode is changed. This approach allows me to program more efficiently and hardwire things under the hood.
In some cases, the render function changes not just with the Mode switch, but also with other parameters such as Color, Era, and Style. For example, the Color control in VintageVerb switches between different render functions for the 70s/80s/NOW options.
Valhalla plugin Modes are easy to use!
Do you have to know all this technical stuff to use the Valhalla plugins? Not at all. We aim to streamline the complexity of these algorithms, render functions, and static variables to create plugins that sound great and are easy to use no matter what you do.
Valhalla DSP: We Think About This Stuff All Day So That You Don’t Have To™
ValhallaSupermassive is 2 years old, and to mark the occasion, we’re releasing the 2.0.0 Supermassive update with two new reverb modes, Aquarius and Pisces.
Aquarius and Pisces are both modified feedback delay networks in a topology I’m calling “EchoVerb.” These algorithms have a strong audible echo, which directly corresponds to the displayed Delay time. By modifying WARP, FEEDBACK, and DENSITY, Aquarius and Pisces can be used for standard delays, delays with reverb mixed in, reverb with a strong pre-delay, or weird and wild echo sounds.
Valhalla Supermassive Reverb Mode: Aquarius
The Aquarius mode is similar to the earlier Capricorn mode, in that it has 8 delays in the feedback delay network. The main change is that Aquarius only has two delays in the output signal: one for the left channel, one for the right channel. The left and right output delay lengths are the same, regardless of the WARP setting. This results in a very audible echo/delay in the signal, especially with low settings of DENSITY. As the DENSITY control is turned up, the other delays in the feedback delay network have more of their outputs sent into the global feedback path, which results in a more reverberant sound – or in more comb filtering with low settings of WARP. When WARP is at 0% and the modulation DEPTH is at 0%, turning up DENSITY will result in weird cancellations in the echo signal, that can create interesting polyrhythms and panning.
Valhalla Supermassive Reverb Mode: Pisces
The Pisces mode is essentially a denser version of the Aquarius mode, and can be viewed as a modified Gemini mode with only two output delays (one for the left channel, one for the right). As the DENSITY control is turned up, the outputs of the other delays in the feedback delay network are mixed into the global feedback path. Since there are more delays in the Pisces mode, the reverb will build up density and lushness more quickly than the Aquarius mode.
A Few Tips and Tricks For the New Modes
I feel like these two new reverb modes, Aquarius and Pisces, are the most generically useful modes in Supermassive. Weird sounds are definitely on tap, but these modes specialize in reverberant echoes – i.e. echoes with some reverb mixed in there. Switch the delay time to tempo sync, and the new modes are perfect for adding rhythmic delays to your music, with as much or as little reverb as you want. The DENSITY control allows you to adjust how long it takes to turn the echoes into reverb, which is perfect for keeping your sounds defined in your mix!
Aquarius Echo/Reverb: set WARP to 60% or higher, DENSITY between 40% and 70%, and FEEDBACK for the desired amount of echo feedback. The higher the Density setting, the quicker the sound will transform from an echo to a reverb.
Pisces Echo/Reverb: set WARP to 60% or higher, DENSITY between 30% and 60%, and FEEDBACK for the desired amount of echo feedback. The Pisces mode has a higher inherent echo density than the Aquarius mode, hence the lower DENSITY values.
Aquarius/Pisces Reverb w/ pre-delay: Set WARP to 60% or higher, DENSITY to 100%, and FEEDBACK to the desired reverb length.
Panning/tremolo echoes: Set WARP to 0%, FEEDBACK to the desired echo repeat duration, MOD DEPTH to 0%, and use DENSITY to vary the panning/tremolo rate.
The 2.0.0 Supermassive update installs a new preset folder, SPRING 2022. These presets showcase the above tips and tricks for the new modes and should serve as a useful place for future experimentation.
Sound Examples
In this piece, I’m using the Aquarius mode to add a 1/4 note echoVerb to an ARP 2600M line, with Pisces used for a dotted 8th delay during the second half of the piece (Triangulum is used for looping):
Here’s an example of the weirder side of the Aquarius and Pisces modes, adding rhythmic panning echos to the MS20 melody and ARP 2600 percussion:
How To Get ValhallaSupermassive Aquarius and Pisces
As always, ValhallaSupermassive is a FREE plugin, available for both Windows and Intel/ARM Macs. Just head on over to the Supermassive page, or go over to our new Demos & Downloads page and grab all of our free plugins, as well as demos for the commercial ones.
We hope you enjoy the ValhallaSupermassive 2.0.0 update and thanks for your support!
We are happy to announce the release of the Valhalla VintageVerb™ 2.2.0 update. The biggest update to VintageVerb? The new reverb mode, Cathedral!
Valhalla Vintage Verb: Cathedral Mode
Inspired by the FV-1
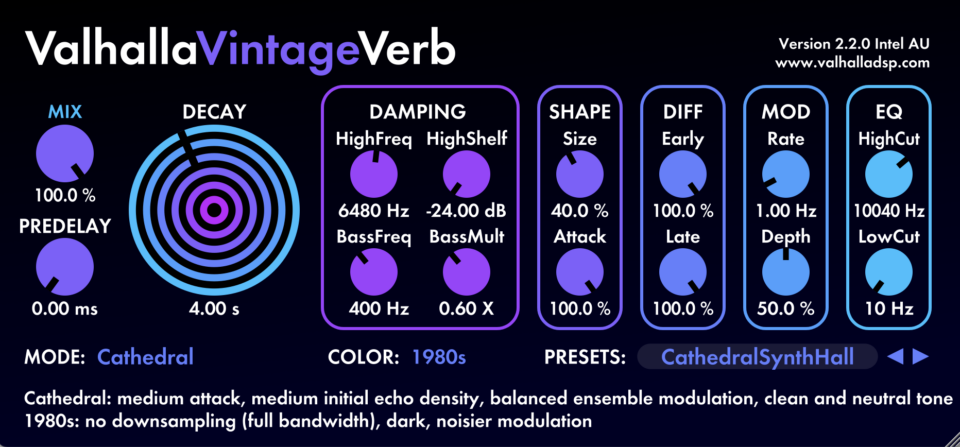
The Cathedral mode is based on an algorithm I developed for theSpin Semiconductor FV-1 in 2014. The FV-1 is a fun little DSP, but it is severely limited in delay memory, and is optimized to work with specific reverb architectures. Cathedral was my favorite algorithm I developed for that chip, with a big diffuse sound and ensemble style modulation.
Bringing Cathedral into VintageVerb meant I could use a lot more delay memory, for a bigger more expansive attack and decay, as well as a more open and transparent sound. The original FV-1 algorithm corresponds to a Size setting of 50%, while sizes greater than 50% will get closer to a real-world cathedral. The VintageVerb version of Cathedral also has a much more comprehensive Damping section, which allows for high frequencies to smoothly decay away as found in large acoustic spaces. We’ve retained the ensemble modulation, with the Rate and Depth controls allowing the user to dial in the perfect amount of lush chorusing.
Best for Huge Synth Verbs, Vocals and Acoustic Instruments
The Cathedral algorithm is perfect for huge synth verbs, but is also well suited for vocals and acoustic instruments. Set the Size to a lower value, and Cathedral can create some convincing drum rooms. In this example, I’m using Cathedral on synth for a big reverb, as well as a shorter drum reverb:
We’ve also modified the information text in the upper right corner of the plugin, so that the user can tell at a glance the version number, the type of plugin running in the DAW (VST/VST3/AAX/AU), and Intel versus ARM when running on a Mac.
Cathedral Mode is FREE for Vintage Verb Owners!
If you already own VintageVerb, the update is in your user account, so log in and grab the latest installer. If you don’t own VintageVerb, feel free to grab the demo from our new Demo and Downloads page, and check out Cathedral and the other 18 reverb algorithms that are unique to VintageVerb. We hope you enjoy the VintageVerb update, and thanks for your support!
We have just released the 1.5.0 update to our FREE reverb/delay plugin, ValhallaSupermassive:
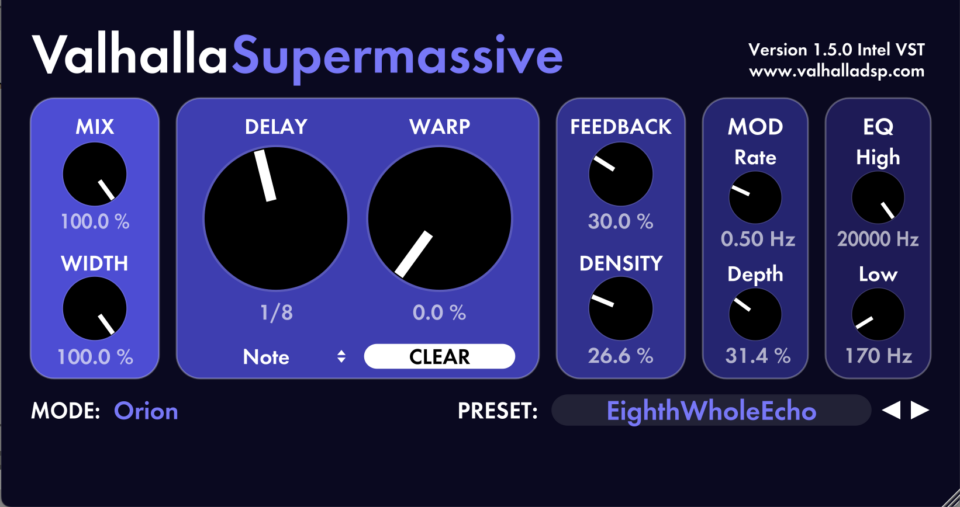
The 1.5.0 update to Supermassive adds two new reverb modes, Orion and Cassiopeia. These are WEIRD reverb algorithms, based on some advanced extensions of Michael Gerzon’s feedback delay network theory. Both Orion and Cassiopeia can sound quite sparse at the beginning of their decay, but can quickly build in echo density with non-zero settings of the Density control. The Density control also has a lot of influence on the reverb decay, with high density settings resulting in very long decays regardless of the Feedback setting.
Cassiopeia is the “smaller” of the two algorithms. In general, you will get shorter decays and echo patterns when using Cassiopeia, compared to Orion. One of my favorite settings is to set Warp to 0%, and use Density and Feedback to get echos that have a noticeable pulse on every 4th repeat. In this piece, I’m using 2 instances of Cassiopeia, once for a reverb that starts sparse and gets denser, and another for the pulsing repetitive echo:
Orion is “twice as big” as Cassiopeia under the hood, but this results in much longer reverbs and echoes than Orion, due to some laws of reverb physics that are a mystery even to me. Set Orion to the same settings as listed above for Cassiopeia, and you can get a mysterious echo that has a noticeable pulse on every 8th repeat. Turn up the Warp and Density values, and you will get truly massive modulated reverbs that can last for upwards of several minutes. Here’s an example of a single Orion instance used to get a long modulated looping echo:
Orion and Cassiopeia are definitely not conventional reverbs. These are weird, tricky reverb & delay algorithms, and we’re offering them to you in the spirit of exploration! In order to help guide you on your curiosity voyage, we’ve created a number of presets under the LATE 2021 preset folder that showcase some of the applications of Cassiopeia and Orion.
We’ve also expanded the “info” section in the upper right corner of the Supermassive GUI. This allows you to tell at a glance what version number you are running, the plugin format (VST/VST3/AAX/AU), and whether you are running it on an Intel or ARM Mac (the Windows version just assumes Intel/AMD).
As always, ValhallaSupermassive is a FREE plugin, available for both Windows and Intel/ARM Macs. Just head on over to the Supermassive page, or go over to our new Demos & Downloads page and grab all of our free plugins, as well as demos for the commercial ones. We hope you enjoy the ValhallaSupermassive updates, and thanks for your support!
My obsessive interest in audio DSP started in the late 1980s. Back then, “the Internet” was something that I had barely heard of and had never used. If I wanted to learn about something, I read about it in a book, or went to a library and looked up the information in a journal. During the late 90s, my backpack was stuffed full of heavy computer music and DSP books, that I would obsessively pore over, trying to force my brain to comprehend the strange symbols and equations contained therein.
Nowadays, the web is full of amazing resources for learning audio DSP, and you don’t have to go to a library to read an article in a bound journal or microfiche. I still love books, though, and have held on to the best ones I’ve found over the years, while still seeking out new ones as they become available.
Best Books for Reverb Design
As far as recommending books for people getting started in reverb design, I’m steering clear of compilation volumes like “Foundations of Computer Music” and “The Music Machine.” These were invaluable to me in the 90s and 2000s, but nowadays you canfind these papers online. I’m also staying away from generic DSP textbooks and sticking with books that are highly focused on musical and audio DSP with applications to reverb design. So this is a shortlist, compared to what I own, but I feel it’s a good starting point.
This list needs to start at the beginning: Max Mathews, the pioneer of using computers to create music. This book is mainly an overview of the Music V language, but also serves as an introduction to the idea of unit generators for processing audio. The explanation of how Music V generated low-frequency noise is one I still turn to today.
The Chamberlin book is probably most famous nowadays for the “Chamberlin filter,” an early digital realization of the state variable filter, which was used in lots of early digital synths and plugins. Chamberlin goes into reverb design, but the algorithms tend to be fairly simple extensions of Schroeder’s work. What makes Musical Applications of Microprocessors invaluable today is the discussions about how digital hardware and software worked in the early days when computers were rare and digital audio interfaces were even rarer. Chamberlin’s discussions of “floating point converters,” for example, were very useful to me when I was working on some updates for VintageVerb back in 2013, to dial in the particular artifacts I was hearing in early 80s digital hardware.
Dodge & Jerse is a classic introductory textbook to the principles of computer music. The 2nd edition was required for my computer music classes at the University of Washington in 1998-9, and I read that book from cover to cover. I had bought the 1st edition back in 1988, but it wasn’t until the late 90s that I understood what was going on. This book has a great introduction to digital delay lines, as well as “old school” digital reverberation (I talk more about Schroeder/Moorer algorithms here). I still have to go to the 2nd edition to find the equation for calculating the feedback gain for a comb filterto get a particular RT60. I’d recommend BOTH editions – the 2nd one is more up-to-date, but the 1st one has useful FORTRAN code for all sorts of unit generators.
This was the most expensive book I have ever bought – I think I paid $175 for it in the early 2000s. Is it worth the cost? Well, it has a chapter by Bill Gardner, “Reverberation Algorithms,” which is hands down the best summary of reverb topologies I have ever read. The Gardner paper covers everything published about reverbs to that point: the Schroeder algorithms and building blocks, James Moorer’s improvements, FIR for early reflections, FDN reverbs, and allpass loops. There are other great chapters in the book, but I’ve turned time and time again to the Gardner chapter. Well worth seeking out.
OK, this book isn’t really specific to reverb algorithms, but I consider it one of the best books in the computer music and digital audio space. Curtis Roads wrote or edited many computer music volumes in my library, including the awesome – and super heavy – Computer Music Tutorialfrom 1996. Microsound covers granular synthesis as a whole, from its historical roots to the modern work of Roads and others, and is an invaluable book for anyone who wants to extend reverberation into more granular directions (hint: ValhallaShimmercombines classic algorithmic reverbs with granular pitch shifting). Many of the books on my shelves were purchased for specific chapters written by Curtis Roads on granular synthesis, and most of these chapters were incorporated into Microsound.
Barry Blesser is a legend in the reverb community, having designed the algorithms for the first commercial digital reverberator, the EMT-250, and many algorithms for Lexicon. So to have a book-length reflection on reverberation and spatial audio from him is an amazing gift. Chapter 6, “Scientific Perspectives on Spatial Acoustics” is a standout, as it goes into details about the nitty gritty of artificial reverberators, but the whole book is worth reading.
The DAFX book stems from the DAFX conferences that have been held every year since 1998, but it isn’t simply a reprint of a selection of the conference papers. Instead, it is a comprehensive volume that covers all aspects of digital audio effects, with chapters on filters and delays, modulators, spatial audio, and all sorts of advanced topics. I have found the filter design chapter to be incredibly useful, with “Zölzer shelving filters” making their way into my DSP library. Not a cheap book, but definitely worth the price. Be sure to grab the 2nd edition, as it has a lot of added information that wasn’t in the 1st edition.
If I were to recommend one book on this list to get started, this would be the one (with the DAFX book a close second). Pirkle’s book ties in with an extensive online code base and framework, which fleshes out the concepts into working code. The 2nd edition of the Pirkle book goes into far more detail about reverb algorithms than the 1st edition, discussing Schroeder algorithm, FDNs, Dattorro and Keith Barrstyle allpass loops, and more. The other effects in this book are high quality as well, with highlights including extended chorus and flanger algorithms, as well as explorations of modern virtual analog filters that get around the issues with the delay in the feedback loop.
In the late 2000s, Keith Barr (of MXR and Alesis fame) and Frank Thomson formed a company focused on their new chip design, the FV-1. This chip has a fairly simple architecture but can be programmed to make excellent effects and currently powers a ton of boutique reverb and delay pedals. The Spin Semiconductor website has a wealth of information about using the FV-1, including some “informal notes” that provide one of the best walkthroughs of allpass loop reverbs ever. I would recommend picking up the FV-1 Development Kit and loading up all the example algorithms from the Spin Semiconductor website to see how they work, as these examples greatly expand upon the basic allpass loop concepts.
Puckette has been designing reverbs since the early 80s when the Stautner/Puckette algorithm was published in the Computer Music Journal. His online textbook is an embarrassment of reverb design riches, as well as musical DSP in general. Puckette has an excellent explanation of how feedback delay networks work, as well as going into depth on the use of rotation matrices in reverb design and how rotation matrices correspond to allpass delays. The primary reverb example uses both a feedforward unitary delay network for early reflections and a feedback delay network for late reverb. The Pure Data examples have several more explorations of FDN designs.
Smith has been publishing interesting reverb topologies since 1985, and this online (& physical) book is a great overview of his work. Smith goes into depth about comb and allpass delays, feedback delay networks, waveguide reverbs, and the various equivalences between these methods.
The Digital Audio Effects (DAFX) conference has been held every year since 1998, and the proceedings from the conferences are a treasure trove of modern reverb research. Not all of the links are working on the page, but it is entirely worth tracking down EVERYTHING published at these conferences and giving it a read, or at least a glance (lots of good non-reverb papers).
Normally I wouldn’t want to recommend a source behind a paywall, but there are tens of thousands of amazing papers here, dating back to the 1950s.
Your local university library
OK, that doesn’t seem like an online resource, but hear me out. There are a lot of important reverb articles that have been published in journals like the Journal of the Acoustical Society of America, the IEEE, and the Computer Music Journal. Buying articles from these journals individual is expensive. However, odds are high that your local large research university subscribes to these journals, and has access to these online archives through their library system. For the past 15 years, I’ve walked to the University of Washington with a USB stick, sidled up to one of the public access terminals, plugged in a USB stick, and looked up and downloaded the papers I need. I’d highly recommend looking into the public research facilities in your area!
Digital reverberation algorithms are a relatively young technology. The first published works in this field date to 1961, but it wasn’t until the late 1970s that the first commercial digital reverberators became available and would be heard on popular recordings. There have been a lot of great papers published on the topic of digital reverb, but there are 10 papers that, in my opinion, can be considered the foundations of all algorithmic digital reverbs that followed.
Journal of the Audio Engineering Society, 1961. This paper was the first one (as far as I know) to introduce the idea of digital reverberation, as well as the allpass delay line. Schroeder showed how to use both feedforward and feedback around a digital delay, to create a “colorless” delay block, in that it passed all frequencies at unity gain. These allpass delays could be cascaded, with each one increasing the echo density without adding coloration. The resulting reverberator structure is a bit hard to tune, as both the reverb attack and decay are controlled by the feedforward/feedback allpass coefficient, and is less “general purpose” than the structure discussed in Schoeder’s next paper. However, there are many modern reverbs that extend upon the basic concepts in this paper, by connecting a high number of allpass delays in series, and embracing the weird and wonderful results.
Journal of the Audio Engineering Society, July 1962. In this seminal work, Schroeder extended upon his cascaded allpass delay work from the 1962 paper, and showed how to combine comb delays with short allpass delays. This architecture, which is what is commonly referred to as the “Schroeder reverb” nowadays, uses parallel comb delays of different delay lengths, where the feedback is used to control the overall reverb decay (more feedback = longer delay). The outputs of the parallel comb delays are summed together, and sent through two short allpass delays in series. The short series allpass delays increase the echo density – this is a technique used by reverb developers to this day. Schroeder also shows how to transpose the order of the series allpasses and parallel combs, where the outputs of the parallel combs are combined in a matrix to obtain decorrelated multichannel outputs. Again, this is a useful technique today.
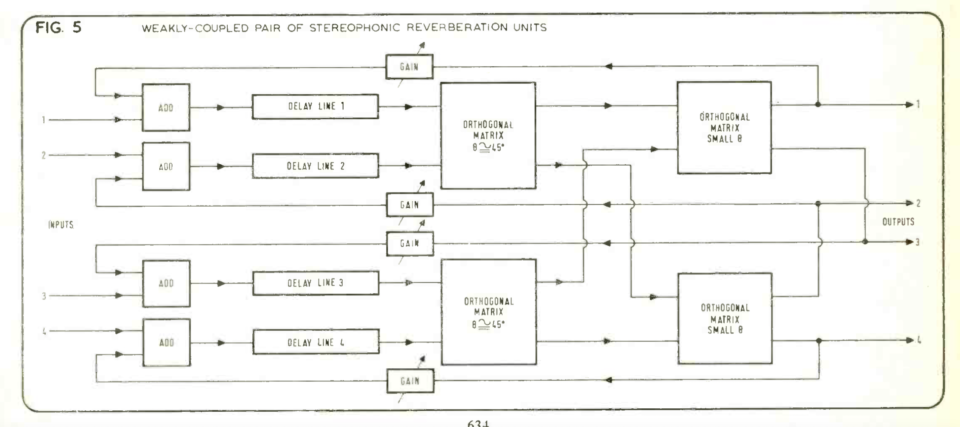
Studio Sound, December 1971, pp. 632-635. This paper was so ahead of its time that it blows my mind. In this paper, Gerzon establishes the concept of feedback delay networks, where several parallel delays are combined with a unitary matrix (orthogonal in Gerzon’s paper), and the outputs of the matrix are sent back into the delay inputs. This creates a stable reverberator, where the echo density grows over time – a characteristic found in a real acoustic space, but not in the Schroeder reverbs. Gerzon shows how to create a higher order unitary matrix out of 2×2 rotation matrices, and how to use the rotation angles to control the spread of reverberation between the left and right channels – a useful trick to this day.
Studio Sound, January 1972, pp. 24-28. I first read this paper 20 years ago, and am still learning new things from it to this day. In this paper, Gerzon takes the concept of feedback delay networks from his previous paper, and extends it to allpass feedback delay networks and cascaded unitary networks. Gerzon also describes how to add filters within these unitary networks to obtain a frequency dependent decay time, as found in a real acoustic space, and even describes how to replace the feedforward & feedback multipliers of an allpass delay with filters in such a way that the output is still allpass. This quote is very simple, but understanding the ramifications of it can fill a lifetime of reverberator design: “By repeated applications of feedback networks and of cascading, a wide variety of unitary networks can be created out of just a few basic unitary circuits.”
Computer Music Journal, June 1979. Moorer’s paper starts with the basic concepts from Schroeder’s work, and extends it in several ways. The 2-multiply allpass delay used by Moorer quickly became adopted as a standard building block, as it is more efficient than the Schroeder 3-multiply allpass. Moorer proposes using lowpass filters within comb filters to more accurately model high frequency damping, and also uses a sparse FIR filter (i.e. a tapped delay line) to directly model early reflections while using the comb/allpass networks for late reverberation.
Computer Music Journal, Spring 1982. The Stautner/Puckette paper is notable for introducing the concept of feedback delay networks to a wider audience. Gerzon had proposed these concepts in 1971, but in a publication (Studio Sound) that was virtually unavailable in the United States, so the Stautner/Puckette paper can be viewed as a case of convergent evolution. I have a soft spot in my heart for this paper, as it was the first reverb algorithm I successfully implemented, using Csound in 1999. The algorithm in the paper comes with Music 11 source code, so it is easy to adapt to other platforms. The Stautner/Puckette paper was the first one I know of to feature slow delay length modulation as a way of improving the sound, although this had been used in commercial reverbs since the EMT-250 in 1976. Low-frequency random signals are used to modulate the delay lengths, and the settings in the paper sound really nice.
Proceedings of the 1985 International Computer Music Conference, Vancouver. 1985, pp. 47–53. Julius’ paper introduces the idea of using waveguides (bi-directional delay lines) to construct reverberators. Lots of cool illustrations in this paper, with amazingly convoluted spaghetti nests used for reverb. Many of the concepts in this paper were later adapted to feedback delay networks, including using a “waveguide junction” as a scattering matrix, as well as some of the modulation techniques suggested by Smith.
Proc. AES 90th Convention, Paris, France, Feb. 1991. In this paper, Jot and Chaigne introduce the concept where every delay line in a feedback delay network has its own damping filter, where the damping is designed so that all the delay lines have the same decay rate for all frequencies. This is intended to reduce metallic resonances in the decay, where some eigenmodes decay at a longer rate than others. Jot has continued to publish useful reverb papers for the past 30 years – his website is a treasure trove of reverb design content.
Presented at the 124th meeting of the Acoustical Society of America, New Orleans, November, 1992. Gardner’s paper serves as the first public introduction of the type of reverb I refer to as an “allpass loop.” These reverb consist of several allpasses in series, embedded within a larger delay loop, where the feedback gain around the loop determines the decay time. Gardner gives specific examples of allpass loops for small, medium and large reverbs, and also discusses using nested allpass delays, which consist of allpass delays embedded within the feedforward/feedback loop of another allpass delay.
Some of these concepts were discussed in Gerzon’s 1972 paper, and Gardner mentions that he first learned many of these ideas while working in the electronic musical instrument industry. However, as far as I know, Gardner’s paper was the first time that these concepts were discussed in public literature. Gardner’s paper is also a useful reference for using a single memory buffer, and reading from and writing to that buffer to create allpass delays, nested allpass delays, and larger feedback loops.
Journal of the Audio Engineering Society, Vol. 45, No. 9, September 1997. Whereas Gardner’s paper alludes to concepts that had been privately circulating within the music technology industry, Dattorro’s paper fully opened the vault doors on the allpass loop reverbs. Dattorro’s introduces a specific allpass loop reverb in great detail, complete with all delay lengths and coefficients, “in the style of [Lexicon’s] Griesigner.” This paper can be viewed as a Rosetta Stone of reverb design, and many plugins and built-in synth reverbs have exactly recreated the “Dattorro” reverb. Dattorro also includes very informative comments from Barry Blesser, the designer of the EMT-250 reverb algorithms, that explain why delay line modulation was originally included in commercial reverberators. A must-read paper.
Over the years, I’ve received many questions from people who want to try their hand at developing reverb algorithms. In many cases, people have qualified their questions with “I’m not an EE, but…” Well, as an Anthropology major, I can attest that you can design reverbs without having to go through an intensive 4-year academic program!
Set up a development environment
In my opinion, all the theory in the world is useless without being able to HEAR the results. So my suggestion is to start your reverb development path by setting up one or more development environments. Ideally, you want a place where you can hear your work in near-real-time, and run the audio of your choice through your algorithms.
Already know how to code? Use Juce!
Great! My recommendation is to download the Juce SDK. Juce is the framework used by many plugin developers to create their plugins. It is used to handle both the audio and visual parts of the plugins, has target for all of the popular plugin formats (AU, VST2, VST3, AAX, Mac, Windows, Linux, iOS, Android), and is free and open-source to get started.
Once you get a plugin you want to release commercially, Juce has several options to pay for using the code for closed-source plugins. I would highly recommend installing the Juce SDK, compiling the example plugins, and modifying the example plugins as the start to your own plugins.
Don’t know how to code? Check out a computer music language.
My suggestion is to work with a computer music language/environment, so you can start learning the fundamentals of digital signal processing and algorithms without having to understand code. When I started programming reverbs in 1998, I was using Csound. This was an old school language even in 1998, but it had all the building blocks I needed to make reverbs:
Delay lines. A “delay line” allows you to read from and write to a memory buffer and increment through that buffer every sample. The distance between your read and write points determines how much the signal is delayed from the input to the output. An algorithmic reverb will have several to several dozen of these, all at different delay lengths.
Filters. A digital filter is used to control the high and/or low-frequency balance of a signal. In a digital reverb, filters are often placed in the feedback path of a delay, where the signal is filtered, scaled by a value, and added back into the input.
Modulators. Many digital reverbs (including all of the Valhalla reverbs) will slowly vary the delay lengths over time. This requires fractional delays that use linear or higher-order interpolation, but that’s a concept beyond this introduction. The important point is that you need some sort of modulator to vary things slowly. These are often low-frequency oscillators or some sort of band-limited noise.
Add/subtract/multiply. These are the building blocks for creating feedback around the delays, as well as feeding a signal around a delay (as found in allpass delays), scaling the outputs of the reverb, and creating matrices for mixing signals together before they are fed back into the inputs, stuff like that.
Today, you have many real-time options to experiment with these fundamental computer music building blocks. Most modern music DSP environments use a visual environment to patch signal processing modules together in a similar way to an analog modular synthesizer.
Pure Data is a free, open-source real-time computer music environment that runs on pretty much everything – Windows, Mac, Linux, embedded hardware, you name it. It isn’t the prettiest language from a visual standpoint, but it is very powerful. For reverb development, you’ll want to use of the Pd-Extended branches, and find something that has an allpass~ unit generator, as this is a CRITICAL building block for algorithmic reverbs.
Max/MSP is a commercial, closed source, prettier version of Pure Data. It has nice delay and allpass ugens built in. More importantly, it has several decades of useful example code.
Max4Live is a fairly recent adaptation of Max/MSP that runs as audio and MIDI effects inside of Ableton Live. It is a VERY powerful environment to get started in, especially if you use Live as part of your musical workflow. I started working with Max4Live in early 2020, to create some examples for lectures at the University of Victoria in Victoria, BC. It took me about a week to get up and running. By the time I gave the lectures, I was able to develop a few algorithms that became the core of ValhallaSupermassive. You can get a LOT done in Max4Live.
Bitwig Studio was recently updated with the Grid environment, which has 170+ DSP blocks that can be patched together in a visual environment. I haven’t tried this yet, but I’ve heard other people having success patching together reverbs with the allpass delays.
Reaktor has had some nice reverb examples for the last few decades, so it is worth downloading the various reverbs in that environment and opening them up to see how they work.
Want to learn how to code? Focus on C++.
Most of my DSP code is in C++, although it is closer to “C with classes” – I tend not to use advanced C++ functionality in my low-level DSP blocks. C++ is used for Juce, and for many other audio SDKs, so learning C++ will be super useful.
Working in a visual DSP language can be much faster than getting up and running versus a text-based DSP language. It is much quicker to prototype a simple reverb in Max/MSP or Max4Live versus creating an entire DSP and GUI code base in C++.
The drawback of a visual language is that a complicated reverb will quickly turn into something that looks like a pile of necklaces that have become knotted together – it is difficult to follow. Text bases languages usually have the benefit of having for() loops or something similar to churn through repetitive actions, which is a lot of what reverbs end up doing. Still, if you are just getting started, I’d highly recommend trying one of the visual languages, and seeing how far it can take you.
What do you do when you love one of your own creative ideas, but that idea is getting in the way of finishing up your creative project? This is something I have run into several times while working on Valhalla plugins. I have an idea that I fall in love with and it becomes the centerpiece of a product in my mind. I put that idea in a plugin, have a few people beta test it, and…it just doesn’t work. Maybe it breaks the “flow” of the plugin. Maybe it breaks the plugin itself, in that it causes hard crashes. Maybe it just doesn’t work for that particular plugin, for whatever reason.
There is a saying in literature: “kill your darlings.” This phrase has been attributed to all sorts of writers famed for their terse prose, but it probably has its origins in the 1914 essay by Sir Arthur Quiller-Couch, “On Style”:
“Whenever you feel an impulse to perpetrate a piece of exceptionally fine writing, obey it—whole-heartedly—and delete it before sending your manuscript to press. Murder your darlings.“
The Origin of Valhalla Delay
ValhallaDelay had an unusually long gestation. I started the initial tape delay algorithm work in 2014. I began working on the plugin in earnest in 2016. By 2018 I had a working version with GUI that was undergoing extensive beta testing. But it was FAILING beta testing. Lots of crash reports. It turns out that all the crash reports could be traced back to the Matrix Style. This was my FAVORITE delay style: 4 delays in parallel, that a variable unitary matrix could mix together, and with the delay lengths adjusted via a Warp control for all sorts of cool sounds.
What was I going to do? I really loved this particular style, but it was CRASHING. Everything else in the plugin worked. In addition, the Matrix Style didn’t really work with the other styles in the plugin – it took it out of “echo/delay” mode, and into some other sort of thing that was cool, but not in keeping with the rest of ValhallaDelay. So, I took a deep breath and Killed My Darling Matrix Style. As soon as I did that, the crashes went away, and the plugin was on its way to being finished.
So, why isn’t this essay called “Kill Your Darlings”? I mean, that’s a catchy name right there. But it only tells part of the story. I kept thinking about the cool sounds of the Matrix style, and thought I might revisit these concepts in the future. And then COVID happened. We were all stuck indoors, I had no idea what would happen to the business, and I needed a PROJECT to keep my mind busy.
The Surprise of Valhalla Supermassive
Right before everything shut down in March 2020, I traveled up to Victoria, British Columbia, to give a few lectures at the University of Victoria (so much fun – I want to return someday!). As part of these lectures, I created a few example reverbs in Max4Live to show the class. One of them had a bunch of allpass delays in series, with the spacing controlled by a Warp control. As soon as the shutdown happened, I started working on a new plugin called ValhallaSupermassive, which allowed me to play with various feedback delay configurations.
It turns out that ValhallaSupermassive was a MUCH better home for the Matrix style ideas than ValhallaDelay would have been! I was able to try the basic “4 delays in parallel with warped delay lengths and variable scattering matrix” in the Supermassive Lyra mode, but was able to expand this to larger numbers of delays in parallel. I extended this to all sorts of series/parallel/nested combinations that allowed me to try out all sorts of Michael Gerzon-influenced structures that didn’t have a home in a “standard” reverb.
The moral of the story? Sometimes an idea isn’t right for a given project, and it is OK to put it down. That idea might find the ideal home in a future project. It’s best to let the project come to shape around the idea, versus trying to shoehorn an idea into a project that wants to be something else. Don’t kill your darlings – rescue them for another day.
Last week, I went tent camping for the first time in four years, on the shores of beautiful Lake Wenatchee. The campsite was nestled among towering Douglas fir and Ponderosa pine trees. Due to the dry conditions on the east side of the Cascade Range, there were no campfires around. This meant that people went to bed early, with no crackling fires, and none of that lovely campfire smell. We were able to fully experience the forest with all senses: the smell of the pine trees, the sound of ravens and ground squirrels, the feel of the sun on our skin, the clear blue of the sky during the day and the bright moonlight at night, and the taste of bacon (I can’t go camping without frying up some bacon in a cast iron skillet on a propane stove).
Shinrin-yoku or Forest Bathing
I recently learned a great word that describes the act of immersing oneself in the woods and soaking up the atmosphere: Shinrin-yoku, which roughly translates as “forest bathing.” Shinrin-yoku takes a very different approach from the more goal-oriented hiking and climbing that I grew up with in the Pacific Northwest. The focus is on leisurely walks, and simply “being” in the forest. Dr. Qing Li has written an excellent book on the subject,”Forest Bathing: How Trees Can Help You Find Health And Happiness.” I’d highly recommend seeking this out at your local bookstore, but you don’t need a guide for this process (which is good, as I misplaced this book in a backpack for this last trip). Just head to the woods, walk around, and let yourself experience the woods with all senses.
The visual, tactile and olfactory aspects of the woods were greatly appreciated during my forest bathing experience (I didn’t taste any trees). But on this trip, nothing compared to the sound of the woods. There was a fair amount of wind blowing off of the lake, and it created the most immersive spatial audio experience of my life. We’d hear the wind starting to pick up from a distance, and then blow over and around us. Radically different washes of noise could be heard at different angles and distances. The tent blocked NONE of the sounds of the wind in the trees. There was none of the typical campground noise – no music, no cracking fires, nothing. Just the wind blowing though pine needles.
Psithurism, the sound of the wind rustling in the leaves
It turns out that there’s a great word to describe the sound of wind in the trees and rustling of leaves: Psithurism. This word comes from the Greek psithuros, meaning “whispering, slanderous.” Each tree will have its own distinctive voice. There was a beautiful poplar in our neighborhood that would catch even the slightest breeze and turn it into a melodic rustling. The pines and Douglas firs at our campsite created less granular sounds, and more of a wash that would vary in pitch and direction. John Muir wrote about how “…the pines seem to me the best interpreters of winds. They are mighty waving goldenrods, ever in tune, singing and writing wind-music all their long century lives.” (A Windstorm In The Forests, 1894)
I love going for long hikes, getting my pulse rate up, climbing ridges and seeing huge expansive views. But there is a lot to be said for just sitting down in the forest, and soaking it all in. When I was in the woods, I wasn’t thinking about the news or allpass delays or changes to Apple OSes or anything like that. For the first time in a long while, I was just able to sit and observe and be. I came back from our camping trip recharged, with a clearer mind than I have had in a long, long time.
One of those strange factoids I’ve picked up over the last few decades of my life is that frogs don’t see things the way we see things. Frogs have excellent color vision and can see colors at night, but the most important distinction (at least for this blog post) is that frogs primarily hunt via the perception of movement.
The frog does not seem to see or, at any rate, is not concerned with the detail of stationary parts of the world around him. He will starve to death surrounded by food if it is not moving. His choice of food is determined only by size and movement. He will leap to capture any object the size of an insect or worm, providing it moves like one.
In other words, when a frog spends hours staring into space, what stands out for them is what changes in their vision.
Testing Reverbs with Tom’s Diner
I have found myself in a similar situation over the last few decades when testing reverbs. When I am listening to a new reverb algorithm, I tend to use the same source material repeatedly. My standard test suite consists of some vocal tracks from Don Gunn, a single sample click, dry piano recordings (to hear the effects of modulation on the signal), dry drum tracks, and the old standby of DSP developers: “Tom’s Diner (A Cappella)” by Suzanne Vega.
The ubiquity of “Tom’s Diner (A Cappella)” as a test signal has become an in-joke among audio DSP developers. In 2001, I heard a composition from a DSP developer at Creative Labs at a Santa Cruz concert, made around manipulations of “Tom’s Diner.” Many of the folks in the audience had a knowing chuckle, as they had heard “Tom’s Diner” playing soooooo many times in their office. Twenty years later, I still turn to “Tom’s Diner” all the time for testing new algorithms.
Why “Tom’s Diner”?
In many ways, it is ideal for all sorts of audio DSP testing. It is a solo female voice, with almost no reverb applied, recorded in a professional environment. This is perfect for testing pitch tracking, PSOLA pitch shifting, reverbs, compression, and so on. However, the most important factor for me is that I have heard “Tom’s Diner” so many times that I no longer hear it. Like frog vision, I no longer notice what remains the same, only what has changed. I don’t hear the song anymore, just the different ways that my DSP algorithms respond to it.
Observing Nuances in Sound through Repetition
I’ve been working on DSP algorithms since 1998. I’ve learned a lot over the past 23 years. Perhaps more importantly, I’ve learned to observe sound to a degree I would never have imagined back in the 90s. By listening to things obsessively, day in and day out, I can hear more and more nuances in my algorithms. These observation skills have led to me (hopefully) producing better algorithms. By using that same dang Suzanne Vega track repeatedly, I can focus my observation on things that have changed between different algorithms or different variants on the same algorithm. The repetition can be maddening at times, but the results are worth it.
Tell us about you as an artist and how you’ve evolved over time.
I’ve always considered myself an introvert who welcomes company. To put it differently, by choosing to be a drummer, I get to be involved in group settings without having to say much. I just listen, lay a foundation and try to be supportive. I’m sure it has a lot to do with being an only child and content with solitude, but I always look forward to working with others when the opportunity arises.
For as long as I can remember, I’ve paid attention to how my bandmates work with the equipment they use, the session musicians I’ve met, the producers, the engineers, and their studios. All because I’m interested in the whole process. That exploration, education, and constant gear talk have helped me contribute more and more to the big picture, not only as a drummer but as a writer and an engineer.
What mediums do you work in? What draws you to them?
When I was a kid, I loved to design and build things. Lego bricks, sticks in the woods, a new instrument, or just a pencil and paper – just the concept of creating something from nothing, or with whatever you had on hand, was inspiring. Even as an adult, I still love to imagine and construct ideas in mental and physical forms, and the more creative the better. Balance, patterns, mechanical reasoning, symmetry, asymmetry, texture, landscape, dynamics – solving the puzzles and patterns of life has always kept me focused and helped me to recognize the importance of personal growth.
When the things you build bring people together, it’s the best feeling in the world. Whether you’re a teacher sharing knowledge with a student, or you’ve assembled an audience at a historic venue to play sounds and songs created with your friends, that’s an incredible gift and will always be a part of my continuing education.
Which of your works best represents your past, present and future selves?
Any of the Death Cab for Cutie albums from “Transatlanticism” (2003) when I joined the band to the present day, Tegan & Sara’s “The Con” or “Sainthood”, Matt Nathanson’s “Some Mad Hope” or “Modern Love”. More recently a trio side project I’m a part of called The Overstory released an EP, and the latest Death Cab releases, The Blue EP and The Georgia EP, the second of which I tracked all the drums for at my home studio. All are good examples of what I do.
Where do you work?
When I’m not on tour with Death Cab, I usually work from my home because all the instruments I own are within reach. If I have a snare sound in mind, I’ll grab one of the 20 or so drums from the shelf, or swap kick drums, cymbals, or even pick up a guitar, a bass, sit at the piano, or whatever I’m inspired to play.
Obviously, I’d always rather be in the same room as whoever I’m working with, but having my own space is really beneficial. Not to mention, I trust 100% of the sounds I’m getting will translate my intentions, whether I’m sending out raw files or mixing drum stems or a full song. It’s also easy enough to jump online in real-time for a pass or two with the other musicians or producer to talk about approach or swap out drums while sending my studio audio for reference. If I need to be in a studio space in Seattle it’s a short drive, while LA and Nashville are easy flights.
What’s your studio like?
I have an elongated 400 sq ft room in the basement of my house. The walls, floor, and ceiling are 50% concrete and stone, 50% floated THX QuietRock, and the surfaces are heavily treated with a combo of diffusion and absorption, making it as flat and even as possible. My desk and outboard gear are in the middle of the room with two kits set up in different places; a bigger kit having 12 mics in a more open section of the room, and a tighter, smaller, drier kit with 3 mics in a narrow section of the space.
I also have a single-mic cocktail kit with percussion around it for overdub ideas. The room provides plenty of low end in the kick and toms, with just enough ceiling height so that the cymbals and snare drums aren’t overbearing. There’s also a door to a concrete utility room at the far end of the studio that makes for a killer natural reverb chamber – you could say it’s my AMS-NonLin-Boiler-Room-Plate-Flavor-Du-Jour! I often re-amp drum sounds through guitar cabinets in that utility room for extra depth.
Every instrument is always mic’d up, patched, with session templates ready to go. My outboard is a combo of tube and solid state, vintage and modern, with just enough knobs to have flavor choices, but not enough to create option anxiety. I leave the rest to plugins and the mix phase. All I have to do is walk in, sit down, open a session, and hit “Record”.
I firmly believe the fewer obstacles one has, the easier it is to capture the purest moments of inspiration and creativity. Workflow is key!!!
What would your dream studio look like?
Maybe a seaside Pacific Ocean perch like Tony Stark’s house? No, seriously, my dream studio wouldn’t be much different in terms of layout, with a single medium-sized tracking/mixing room, but I’d like to have higher ceilings and a little more old wood in the construction and to be tucked away in the trees somewhere. A detached building would be ideal for those days I’m inspired to make noise before the sun rises or my family wakes up! I do have the option to put a building on my property, so someday I might build out, but hopefully, I won’t lose any of the mojo or good vibe I’ve already got!
What are your favorite tools/instruments?
I have a lot of instruments in my studio, but mostly drums and cymbals, ranging in age from the 1920s to modern day, each with their own special “thing”, but to list favorites would be difficult. I can say the things that weren’t my favorite have been sold or traded over the years, but the current collection is all very usable to me.
I had an 8 channel Quad Eight sidecar built from some leftover channel strips that’s pretty special. It has an 8 slot 500 series rack built-in and also a master section, making it a stand-alone 16 channel console if need be. Those Q8 preamps and EQs sound killer, not to mention it’s a really unique piece to have in the studio. Some of my other favorite things are the Overstayer Stereo Modular Channel, a pair of Spectra Sonics c610’s, my JFL Audio MP-F4 (Frank Lacy) tube mic preamps, some rare RESLO ribbons, and a sweet old AKG D-25 micthat I recently picked up.
Is there a tool or instrument you would invent to aid in your work/inspiration?
Maybe a second brain? Hahaha! A studio clock that I can use to travel back in time to give me HOURS of my life back? Or an invisible intern that could magically move every microphone to be perfectly in phase with one another and allow all my faders to be at unity, no matter how light or hard I play? That is possible, right?
Actually, I think that having the right amount of wrong is where inspiration and creativity come from, as well as having limitations and time constraints.
How do you start a project? What happens next?
Death Cab songs usually start with a fairly realized demo from Ben (Gibbard) or just a musical bed from somebody else in the band that we’ll pass around. Even though each of us is capable of engineering and playing all the instruments, we’ve learned to leave room for each other’s ideas. A song might get passed around for a few revisions, but the goal is to get it to a place where we can all be in the same room knowing the arrangement; at that point, it’s about documenting the best sounds and performances.
If I am tracking drums for somebody else, I always start by asking for a few stems, one for music and one for whatever rhythmic component, track, or idea that’s been suggested. Sometimes I will ask for individual audio files or layers to have better control over monitoring and mixing roughs, but as long as I can hear how to best fit into the big picture. Additionally, I’ll request a playlist or production references so I don’t waste my time chasing ideas that aren’t going to work, especially if I’m not in the same room as the client.
Another way I’ve started projects is by creating folders of drum loops, at various tempos, varying in sound design and vibe. These are analogous to building blocks you’d drag and drop to help create a template for writing, or at least use to hang a song or riff on. Obviously, there are a number of content and loop libraries out there that sound great, but this all goes back to my being a kid and being inspired by creating something out of nothing. Sometimes it is an idea that starts at midnight by routing a Korg Volca through the Valhalla Delay LoFi-DirtyLooper preset, which leads to additional programming or opening Kontact, picking up the bass, the acoustic guitar, and sitting at my drums last…finishing at 4 am. Because when there’s a spark, you gotta chase that fire. Don’t second guess yourself!
Do you notice consistent phases in your work process, or is it different every time?
The recording process is pretty much the same whenever I’m working solo, or in the ways I’ve just described. Sometimes I write around a drum hook or search for a creative processing vibe, routing through pedals, amps or plugins, to arrive at something that feels inspired and fresh. Sometimes I work really fast within a set time limit, or if I don’t have a lot on my plate, I may keep a track open for a full week and continue to tweak it each morning with fresh ears until I feel like it’s done.
When it comes to practicing my instrument, that definitely has phases or seasons. I often put my head down and commit several hours a day for weeks at a time, challenging myself with new exercises or studying with somebody who inspires me. But then there are inevitably periods of rest when I’m less concerned with clocking in hours on the drums and instead would rather spend my time doing other things.
What do you do when you need to create something but aren’t feeling creative? How do you get unstuck?
Whenever I’m in a rut or not inspired in the studio, I find a few things always help.
The first thing is to revisit those formative albums that have had a major influence on my playing or production choices. Nostalgia is useful when you’ve lost perspective, so it’s ok to go back, not just to the Beatles, but to the records you first fell in love with and wore out as a kid, even if they sound dated to you today.
The second thing is to reach out to other musicians I haven’t talked to in a while and ask what they’ve been practicing, what they’ve been listening to, or whether they’ve done any recent deep dives as players or engineers. Sometimes they’re just as stuck as you! This can be comforting, to know you’re not the only one, and sometimes you can help each other out of it.
How do you know when something you’re working on is done?
That’s a tough one. The right answer to that question feels like it should be, “listen to your gut”, but I’m very guilty of continuing to hear how things can be presented differently. I’m a repeat offender of black hole expeditions, the sun going coming up and going down before I know it and option anxiety settling in. Honestly, though, I look to my bandmates or other musicians to let me know when things are done.
Any best practices to recommend?
Practice saying “No” to multiple takes and over-editing yourself. People usually want to hear and feel a real human being, not the computer’s idea of a human being. If you truly know a song well enough BEFORE you track, you should have a fairly inspired take in the first 3 tries. And lastly, create a broad style reference playlist for your studio, something you can look to for those times you’re “lost in the woods”
Who or what was your first sonic inspiration?
Led Zeppelin, without a doubt, because John Bohnam left such a massive footprint and impression on me, not to mention the band’s raw energy was incredible too. Closely followed by Talk Talk’s “Laughing Stock”, because of how that record was recorded, how it sounds and feels with regard to minimalism. Thirdly, I owe so much to the sound and vibe of CAN’s “Ege Bamyasi”, a band way ahead of their time in my opinion.
What are your current sonic inspirations?
I love mixing acoustic sounds with electronic production, especially when a solid bed of music is paired with somewhat loose playing or dynamic performance. Thankfully, music is a melting pot of ideas these days, without boundaries or categories. I try to record drier, natural sounds whenever possible and then audition plugins and outboard to create more depth and interesting production, to blur the lines between what the original source was. Vahalla’s VintageVerb, Plate, and Delay are all excellent to use when I need space, air, layers, and imaging to fill out my sounds.
When you’re burned out, how do you get inspired again?
The cure for my feeling burned out is to switch gears and do something else until I find myself inspired again. If you’re lifting weights, on a long bike ride, or on a challenging run and you feel tired, your body is trying to tell you something. It’s the same with your brain and inspiration. It’s the same with my hands, feet, and ears. “Burn Out” translates to “Take a Break” or simply, “Time to Rest”. Recognize diminishing returns and chill out. Whether that’s 5 minutes, 5 hours, 5 days, or as long as you need.
My threshold for long days, weeks, or months of intense work varies so I just try to listen internally to when the best time is to step away and when it’s time to push up my sleeves again. I do realize not everybody has that luxury, so there are times on tour when I need to push through and not judge myself too harshly, but the longer I do this, the more I realize inspiration can come from several places outside of music.
What percentage of your work is inspiration, and what percentage is perspiration?
Everybody has to make an investment in perspiration to get to a place of efficiency, or to maintain the physicality of playing their instrument. I guess there’s also mental perspiration to consider as well, the stress of deadlines, auditions, or the feeling of being in the hot seat. Of course, all that stuff makes you stronger, but after that, it’s about finding a balance and looking for inspiration to carry you onward, to draw from a source that reduces discomfort and stress. Charting your progress after years of repetition and sweating is hard to do, so that’s where the benefits of rest come in.
What inspires you outside of music and sound?
I do love music and living this life, so much so that it’s hard to see it as work, but exercise, being physical in general, travel, spending time in the water, the trees, fly fishing, or really, anything new I can experience with my family and friends to create memories – all those things help me find inspiration and stay positive.
We are happy to announce that all of the Valhalla plugins are officiallycompatible for M1 Macs! There’s a lot of confusing terminology around this, so I’m going to restate this sentence in a bunch of different ways:
The Valhalla DSP plugins have been built to run as both native Intel and ARM (Apple Silicon) plugins.
The Valhalla plugins are all now Universal Binary 2 plugins
The Valhalla plugins no longer need Rosetta2 to run on M1 Macs (with a few caveats noted below)
We’ve had the M1 builds of all plugins in user accounts as beta versions since January. A few weeks back, we decided to make this official, so we got rid of the “beta” designations of the installers in user accounts, and also built new demo versions of the plugins as Universal Binary 2 for Intel and Apple Silicon.
So, what does this mean? For starters, any of the following DAWs can now run as native M1 apps, and can host the Apple Silicon / M1 / ARM / Universal Binary 2 builds of the Valhalla plugins:
Apple Logic
Apple GarageBand
Apple MainStage
Bitwig Studio 4
Reaper
The Valhalla plugins now display “Intel” or “ARM” in their upper right corner, which identifies whether they are running the Intel or ARM build. This is a convenient way of telling whether your DAW is running in Rosetta 2 or as a native Apple Silicon build:
If you are running any other DAW on an M1 Mac, you currently need to run it in Rosetta 2. Additionally, the Valhalla plugin installers require Rosetta 2 in order to install. The plugin builds are UB2, but the installer application itself is a standard Intel installer. It turns out that installers built on Big Sur M1 Macs can only run on the last few Apple OSes, so this choice was made in order to have a single installer work for OS 10.9 through Big Sur.
All of the new Intel / ARM builds work on older Intel Macs as well (that’s the “Universal” part of “Universal Binary 2”). And, of course, all of the plugins work in Windows as well. The M1 updates have just been to the Mac part of the code, so Windows customers aren’t missing out on any cool new features.
On a personal note, I’ve been using an M1 MacBook Air as my main development machine since December 2020. It is blazingly fast, lightweight, and no fan noise. It also makes cross-platform development easy, as all builds on this machine are Intel & ARM by default. If you are looking for a new Mac, I would recommend waiting a few weeks to see what is announced at WWDC, as the next generation Apple Silicon machines may be announced at that time. In any case, I am loving using my M1 MacBook Air right here and now!
We are happy to announce the latest update to ValhallaDelay. The 2.1.0 update adds two new delay modes:
Quartz is a delay mode as transparent as its namesake. The Quartz mode takes the filtering out of the feedback loop, and incorporates a nearly colorless limiter, so your repeats can be as bright and shiny as you want them to be. Perfect for looping, clean echoes, bright flanging, and all sorts of pristine sounds.
PhaserDDL incorporates a digital delay with a 4/6/12 stage phase shifter on the outputs. The phase shifters are in the feedback loops, which results in psychedelic echoes with long delays. Turn the delay time and delay feedback down to zero, and PhaserDDL is a great stand-alone phaser. The Age knob is swapped out for a Res knob, to control the phase resonance.
Single: same modulation for left and right channels
Dual: quadrature modulation (0 degrees in left, 90 degrees in right)
Ratio: antiphase modulation (0 degrees in left, 180 degrees in right)
PingPong: antiphase modulation (0 degrees in left, 180 degrees in right)
Quad: 4 separate phase shifters, each running at a different rate, and each with antiphase modulation (0 degrees in left, 180 degrees in right). Select two or more Taps for a lush combination of phase shifting, or all 4 for a dense phase shifted stew.
In addition, the 2.1.0 update fixes an issue that affected project recall when using the VST3 in Studio One and FL Studio. In certain situations, the delay times would reset to 300 msec when opening a saved project.
The 2.1.0 update of ValhallaDelay is available to demo and purchase today. If you already own ValhallaDelay, the FREE update can be found by logging into your user account. We’re really excited about this new update, and we hope you enjoy it!
Previous/next arrows to quickly scroll through the different Modes. This is a feature we have added to Valhalla Delay, and is featured in Valhalla FutureVerb™.
New reverb/delay mode: Sirius!
Sirius: Crisp And Clean
The Sirius mode excels at short to long reverbs that remain clear throughout their whole decay. The Low Cut and High Cut filters in Sirius are more powerful than in most Supermassive modes, and are useful in obtaining realistic high frequency decays, as well as reverbs where the low frequencies thin out with the decay. The echos from Sirius are more standard echoes than some of the other modes, which makes Sirius useful for modulated delays. We’ve found Sirius to be more of a “workhorse” mode versus super strange, but the long reverbs can get into some super spacey territory. The LATE 2025 presets folder showcases some of the best Sirius applications, and is a great place to start learning how to use this new mode.
From Supermassive to FutureVerb: Taming the Untameable
The original purpose of Valhalla Supermassive was to have a home for reverb algorithms that had cool/novel topologies, but weren’t necessarily “well behaved.” The Supermassive modes were great at huge spacey reverbs, or strange delays, or weird laser echoes, but they weren’t intended to be used as standard room/plate/hall/chamber reverbs. The Supermassive algorithms defied categorization, and wanted to be wild and untamed.
Flash forward to 2024, where after several years of going through all the “standard” reverb topologies in our quest to create realistic and transparent reverbs, we revisited the Supermassive algorithms. We found that a few of the most recent algorithms could be modified, and expanded in order, to create the clear and beautiful reverbs of our dreams. These algorithms became the basis of the Valhalla FutureVerb™ reverbs. We learned how to tame them!
Sirius: A Reverb From An Alternate Future
The Sirius mode was originally designed as a reverb topology for Valhalla FutureVerb, but Supermassive was used as the original testing ground for that topology (and several other ones). We eventually decided to hold off on putting any Sirius type algorithms into FutureVerb, so we decided to release Sirius as an update to Supermassive.
Supermassive 5.0.0: A FREE update to our FREE plugin!
As always, the Supermassive 5.0.0 update is FREE! Just head on over to the Supermassive page, download the installer, and enjoy! Thanks to all of you for your support!
The COLOR mode is used to switch between several equalization and high frequency decay profiles. It is a high level control for quickly changing the overall tonality of the reverb and echo sounds. Use the BRIGHT or NEUTRAL modes for featuring the reverb in your mix, or the DARK or STUDIO modes for reverbs that add glue to the mix without calling attention to themselves. The COLOR mode also changes the colors of the GUI, because that’s how we roll.
To change the color mode, click the name of the active color mode in the COLOR: menu.
This will bring up a list of the four color options:
Choosing a new color mode will also change the color palette of the GUI, as a useful visual cue to the active Color mode.
Bright
The brightest Color mode in FutureVerb. The high frequency decay is controlled by the High Freq EQ, with very high frequency settings allowing for reverbs with almost no attenuation of high frequencies. Perfect for synth reverbs where the synth filters control the overall tonality, or for any situation where brightness is desired.
Neutral
The most natural Color mode. The high frequency decay of all the reverb modes is limited to that found in real world acoustic spaces (i.e. 1 to 1.5 seconds max RT60 for high frequencies). Ideal for realistic rooms / halls / cathedrals, and any time you want the reverb to blend into the mix.
Dark
A natural high frequency decay, that is then filtered by a steep 8 kHz lowpass filter. Useful for a more “vintage” reverb sound, or any situation where you want unobtrusive reverbs.
Studio
A classic processing trick used in recording studios of the 1960s and 1970s. A steep high cut filter at 10 kHz is combined with a steep 600 Hz low cut filter. The resulting sound is strangely dull and thin, until you listen to it in the mix, where it blends in without any mud.
We are happy to announce the release of our latest plugin, ValhallaFutureVerb™.
8 Natural Reverb Modes
VallhallaFutureVerb is the product of 8 years of research and development. Our goal was to create reverb algorithms that have a natural, transparent sound, without the metallic artifacts of prior digital algorithmic designs. We wanted reverbs that were realistic at ALL decay settings, from super short rooms to giant halls and cathedrals. The reverbs should sound good without any modulation, and still sound epic and lush when modulated. The results of all this hard work: 8 natural, clear sounding Reverb Modes, covering the staples (Room, Chamber, Plate, Hall, Cathedral) as well as the weird and wonderful (Space, Frozen, Nonlin).
12 Powerful Echo Modes
ValhallaFutureVerb has the cleanest reverb algorithms we’ve ever heard. Maybe TOO clean. So we’ve added the option to add texture and coloration with a simple yet powerful echo section! The 12 Echo Modes range from clean predelays (Modern), through character-filled echoes (Tape, Digital, Analog, LoFi), and onwards to lush detuned and pitch shifted delays and reverse delays. Tempo sync is available, as well as feedback and adjustable drive. The new Spread control morphs the simple stereo echos into complex 4 or 8-delay feedback delay networks, where the delay taps are spread out in time. This can be used to create multitap sounds, or richly textured reverbs with the addition of feedback.
Echo->Reverb or Reverb->Echo, Your Choice
The Routing button can be used to control the order of the delay and reverb. Combined with the independent level controls for echo and reverb, the results range from standard reverbs with predelay, through 60s style tape-delayed plate and chamber reverbs, all the way to lush space reverbs with adjustable amounts of pitch shifting shimmer.
New Sonic Colors
The Color control is a high level setting for the basic tonality, as found in ValhallaVintageVerb.Bright is useful for bright reverbs, Neutral keeps the reverb high frequencies in a physically realistic range, Dark adds a steep 8 kHz high cut filter, and Studio features a steep low cut at 600 Hz and a steep high cut at 10 kHz. The Color control also changes the GUI colors for instant visual feedback that corresponds to the sonic changes.
Simple GUI: Less Is More
The Echo and Reverb sections share some basic yet powerful controls: Mix (overall wet/dry mix, with a handy mix lock button) and Width, Mod Rate and Depth, and Low and High EQ. These controls are very interactive, and have been designed for maximum sonic control with minimal complexity.
We’ve expanded the usability of FutureVerb with previous/next arrows for reverb mode, delay mode, color, and presets. This makes it very easy to navigate through the various options without clicking on a pull down menu (the pull down menu is still available for those who celebrate).
As always, our GUIs are self documenting. Move your mouse over a control, and the tooltip will appear in the bottom of the GUI.
We’re happiest about the controls we’ve left out! The goal of ValhallaFutureVerb was to have as few parameters as possible, and make those parameters powerful. The result is a simple interface that is easy to navigate, so you can dial in your sounds quickly and get back to making music.
ValhallaFutureVerb: Available NOW!
We’ve been working on this plugin for 8 years, and the future is FINALLY here! Head on over to the ValhallaFutureVerb page to listen to sound examples, download a demo and purchase the product. Check out our blog posts on FutureVerb to learn more about the controls and the unique reverb and echo modes. And as always, thank you for your support!
The Reverb Mode control in Valhalla FutureVerb™ switches between 8 unique reverberation algorithms. The FutureVerb reverbs have been designed for maximum transparency and realism, with none of the coloration that is traditionally associated with algorithmic reverbs. The modes are sorted by size, with the first 5 algorithms focused on real-world acoustic spaces, and the last 3 designed for huge ambient spaces and tight nonlinear reverbs.
All of the FutureVerb algorithms have been designed to sound good without any modulation being used. That being said, these are still VALHALLA reverbs, with the lushest modulation ever found in any of our reverbs.
The Reverb modes are selected by the REVERB MODE: button under the REVERB section:
Clicking on the name of the active reverb mode (Chamber in the above example) will open up the Reverb Mode menu:
The < and > arrows to the right of the active reverb mode name can be used to cycle through the reverb modes without using the popup reverb menu.
Room: Your basic room reverb, but with a clarity and realism that needs to be heard to be believed. Great for short drum rooms and vocal ambiences, as well as bigger rooms.
Chamber: Our take on the classic reverb “echo chamber.” More low end decay than the Room algorithm, denser early reflections. Lush modulation on tap, but turn the mod depth to 0 for a realistic 1960s studio chamber.
Plate: A cross between a physical plate and a clearer sounding digital plate. Not as boomy as real plate reverbs, none of the artifacts of digital plate reverbs.
Hall: A lush, spacious concert hall. Medium fast to slow attack, controlled by the Early/Late control – turn this up to move the listener further back into the hall. Turn up the modulation for epic ballad vocals, or turn the modulation off for realistic orchestral reverbs.
Cathedral: A huge open reverb, modeled after medieval cathedrals. Slowish attack, huge low frequency decay (controlled by the Low Freq EQ setting), and a vast transparent sound. Perfect for epic ballad vocals, giant synth spaces, and anywhere where a big, “expensive sounding” reverb is needed. Keep the modulation depth low for a realistic rolling decay as heard in the cathedrals of the Old World.
Space: Valhalla ambient reverb in the house! Space uses totally different techniques than previous Valhalla ambient verbs. Still lush and huge, but with far more control over the attack and decay, and a much more open sound. Perfect for ambient synths, ambient guitars, ambient…you get the idea.
Frozen: A unique reverb algorithm to FutureVerb™. Frozen is like a freeze reverb that eventually stops – your input signal just hangs out in a sonic cloud for a good long time. Turn up the Size control to create reverbs that sustain for several seconds, or several tens of seconds. Use the Attack control to have the sound hit instantly, or fade the reverb in over time. Lush modulation on tap to make things that much more epic.
Nonlin: Inspired by classic nonlinear reverbs, but using new processing techniques for more echo density and realism, while avoiding metallic coloration. The Attack control allows you to push the Nonlin sound up front in the mix, or turn up the Attack to have the Nonlin sound melt into your mix. The “gate” time ranges from several tens of milliseconds up to 1 second.
ValhallaFutureVerb™ was originally designed around very clean & transparent reverb algorithms. During the early testing of these modes, we found ourselves missing the dirt and character of the other Valhalla reverb plugins. So we turned the simple predelay control into a full fledged Echo section, that can add clean predelays, but also warm and warbling tape delays, lush detuned echoes, reversed and pitch shifted delays, and all sorts of colorful and complex echos to the input or output of the reverb.
The Echo modes are selected by the ECHO MODE button under the ECHO section:
Clicking on the name of the active echo mode (Tape in the above example) will open up the Echo Mode menu:
The < and > arrows to the right of the active echo mode name can be used to cycle through the echo modes without using the popup echo menu.
There are 12 unique echo modes available in ValhallaFutureVerb:
Modern: A clean echo mode, perfect for standard predelay duties. Smooth spatially balanced sinusoidal modulation, that can transform into four voices of 0/90/180/270 degree modulation as the Spread control is turned up. Drive is used to control a clean feedforward/feedback compressor, that can increase the volume without adding notable artifacts.
Tape: The opposite of Modern. Tape saturation (controlled by Drive) combined with chaotic wow & flutter modulation. Use this as a predelay into Chamber or Plate for epic 1960s reverbs, or turn up the delay/feedback/spread controls for my favorite synth effects.
Digital: A digital delay model, based around a companded 12-bit delay (8-bits in the Dark and Studio modes). A clean-ish delay, but with plenty of crunchy distortion and quantization noise on tap with the Drive control. 0/90/180/270 degree modulation for maximum spatial width and lush chorusing. Digital also incorporates steep high cut filtering, to simulate the lower sampling rate of early digital delays.
Analog: Darker than Digital, but brighter than real-world BBD pedals. It’s the analog delay for people that think they like analog delays, but don’t want things that dark. Companding results in a nice squishy sound, and the Drive allows things to get gritty. The modulation is very “off center record” – route the echo after the reverb for perfect lofi reverbs.
Detune: Two crystal clear detuned delays, with up/down detuning between the left and right channels. Turn up the Spread control to add two more detuned delays, for lush detuned echoes and richly textured reverbs. Perfect for that “expensive” late 80s sound.
Reverse: Detuned reversed granular delays. The longer the delay time, the bigger the reversed grains. Use the Spread control to crossfade between two and eight(!) delays in parallel. Turn up the feedback for truly mysterious delays and reverbs.
ReverseUp: Same as Reverse, but with 4 of the delays shifted up an octave (turn up Spread to control the pitch shifting intensity). With higher Spread and Feedback settings, you can create some amazing shimmer effects. Route the reverb into the echo and control the shimmer intensity with the Echo Level control.
ReverseDown: 4 reverse delays shifted down an octave, 4 detuned. Ideal for dark and descending shimmer verbs, or for adding mysterious overtones to any sound.
ReverseUpDown: 4 detuned reverse delays, 2 shifted up an octave, 2 shifted down an octave. Epic. Want a huge shimmer reverb? ReverseOctUpDown is perfect for this.
Sparkle: A new type of pitch shifting. Use the Spread control to fade between two and eight detuned granular delays, with VERY long grain durations, and four of the delays shifted up an octave. Ideal for stunningly clear and transparent shimmer reverbs, with none of the modulation noise of the Reverse modes.
Swarm: The dark side of the Sparkle algorithm. Eight detuned and pitch shifted granular delays, tuned for maximum dissonance. Turn up the Spread control, and slowly turn up the Detune knob to create tonal clusters that transform into rich octaves and fifths. Wanna make a horror soundtrack? Love late 20th century composition? The Swarm mode is here for you.
LoFi: A tape algorithm that has been used and abused without proper maintenance. We start with our Tape algorithm, and add more overdrive, low frequency drift, and chaotic high frequency flutter. The results are warm, noisy and mysterious. Perfect for adding a tape predelay to a reverb, for sparse chaotic reverbs (turn up the Spread control), or for truly vintage tape echoes.
ValhallaFutureVerb™ was designed from the ground up to have a minimal yet powerful control set, and a simple and easy to use interface.
MIX/WIDTH
MIX: Controls the balance between the dry input, and the effected (“wet”) signal from the echo and reverb sections. 0% is fully dry, 50% is an equal mix between wet and dry, and 100% is wet only.
MIX LOCK: Click the Mix label button above the Mix knob to lock the mix at its current value. This is very useful when browsing through presets, or for setting the mix to 100% on a send.
WIDTH: Controls the stereo width of the output signal. 100% is fully stereo, 0% is mono, -100% reverses the left and right outputs (useful for creating a wider stereo image when mixed with the input signal).
ECHO
Delay: Controls the echo time, in milliseconds. Ranges from 0 msec to 2000 msec, with the knob biased towards the shorter delay lengths. Changes to the delay time will be smoothed out in an “analog” manner.
Delay Sync: Clicking the “Msec” below the Delay knob brings up the Delay Sync menu:
This is used to switch the Delay control between milliseconds, and various tempo synced options (eighth/quarter/half/etc. Note, Dotted notes, Triplet).
Feedback: Adjusts the amount of feedback, from 0% to 100%. High levels of feedback will result in repeat echos that take a long time to decay away, without reaching self-oscillation. Set Feedback to 0% for a more conventional pre-delay.
Level: Controls the output level of the echo section in the mix. A level of 0% means that none of the echo will be heard directly in the mix, while higher levels bring up the echo volume. The Mix control acts as a scaler on the Echo and Reverb Levels, i.e. if Mix is at 0%, no Echo or Reverb will be heard regardless of their respective levels. The Level control does not affect how much of the echo is sent into the Reverb section – this is the purpose of the Routing button (see below).
Drive: The gain sent into the drive section of the Echo algorithm, in decibels. Different Echo modes have different drive types (Modern uses compression, Tape has saturation, etc.). In general, lower Drive levels result in a “cleaner” sound.
Detune: This parameter appears in place of the Drive parameter in the granular delay modes (Detune, Reverse, ReverseUp, ReverseDown, ReverseUpDown, Sparkle, Swarm). Detune controls the pitch shift of the left and right channels, in cents (1/100th of a semitone). Positive Detune values result in the left channel being shifted up by the specified number of cents, while the right is shifted downwards. Negative Detune values result in the left channel being shifted down by the specified number of cents, while the right is shifted upwards.
Spread: A unique feature of ValhallaFutureVerb. Spread transforms the basic stereo echo into a 4 or 8 voice feedback delay network, with the output taps spread out in time and the stereo space. When Spread is at 0%, the sound is a simple stereo echo, with the same delay in the left and right channels. As Spread is turned up, the other delay voices are faded in and spread out in time, and the feedback is mixed between all of the voices. Low settings of Spread are useful for lusher echos, while higher Spread values will create complicated echo patterns. Turn up Spread and Feedback to create lush “echo only” reverbs that start out sparse and fill out over time.
ECHO MODE: used to select the active echo mode. Check out the Echo Mode blog post for an explanation of the 12 different modes.
REVERB
Decay: Controls the decay time of the reverb, in seconds. Follows the standard RT60 measurement: how long it takes for the reverb to decay to 1/1000th of the initial amplitude (i.e. -60 decibels). Ranges from 0.2 seconds to 70 seconds, with the knob biased towards the shorter decays.
Most of the FutureVerb reverb algorithms (Room, Chamber, Plate, Hall, Cathedral, Space) will have decays that closely track the Decay setting, so all of these algorithms can achieve very short reverbs as well as huge spaces. Frozen and Nonlin are different, in that they both have a fairly “flat” decay, with the duration controlled by the Size parameter.
Size: Adjusts the size of the reverb networks, as a percentage ranging from 0% to 100%. This isn’t based in any physical units, but rather in the perception of attack time and modal density. Larger sizes will have slower inherent attacks, and a more “open” sound.
Level: Controls the output level of the reverb section in the mix. A level of 0% means that none of the reverb will be heard directly in the mix, while higher levels bring up the reverb volume. The Mix control acts as a scaler on the Echo and Reverb Levels, i.e. if Mix is at 0%, no Echo or Reverb will be heard regardless of their respective levels. The Level control does not affect how the reverb interacts with the echo section – this is the purpose of the Routing button.
Routing: Determines whether the echo feeds into the reverb, or the reverb feeds into the echo.
Echo->Rev: The input is first processed by the echo, and the output of the echo is sent into the input of the reverb. The Echo Level doesn’t affect the amount of echo sent into the reverb, just the amount of echo heard in the wet/dry output mix.
Rev->Echo: The input is first processed by the reverb, and the output of the reverb is then sent to the input of the echo. The Reverb Level doesn’t affect the amount of reverb sent into the echo, just the amount of reverb heard in the wet/dry mix.
Early/Late: Controls the amount of early reflections in the signal. Low values of Early/Late have more early reflections, which produces the sonic impression of being closer to the sound source in the reverberant space. As Early/Late is turned up, the position of the listener is placed farther away from the sound source, resulting in less early reflections and a somewhat slower attack to the reverb.
Attack: An alternate control for Early/Late, found in the Space, Frozen and Nonlin modes. Attack adjusts the “fade in” time for the reverb. Low values of Attack result in an almost instantaneous build of reverb energy, while larger values result in the reverb slowly fading in after the input. At high values and large Size settings, the Attack control can produce a sound similar to reverse reverb.
Density: Used to adjust the initial echo density of the reverb. The Density parameter works in a different way than the diffusion controls found in older reverbs, as there is no metallic coloration associated with increased Density settings. Low Density settings result in a sparser onset of the reverb, while high Density settings can be used for a perfectly smooth reverb.
REVERB MODE: used to select the active reverb mode. Check out the Reverb Mode blog post for an explanation of the 8 different modes in FutureVerb.
MOD
Mod Rate: Controls the rate of the echo and reverb delay length modulation, in Hertz. The Mod Rate setting directly sets the modulation frequency for the Modern, Analog and Digital echo modes, and sets the average “wow” rate for the Tape and LoFi echo modes. The reverb algorithms are modulated by several dozen random LFOs, where the modulation rate is roughly centered around the Mod Rate setting. Higher Mod Rate settings will result in a more chorused reverb and echo sound.
Mod Depth: The depth of the echo and reverb delay length modulation, as a percentage ranging from 0% to 100%. Higher mod depths will result in a more chorused or “wetter” sound. Turn the Mod Depth down to 0% for a more realistic reverb as heard in a physical space.
EQ
EQ High Cut: Controls the frequency above which high frequencies are cut out by -6 dB/oct lowpass filters, found in both the Echo and Reverb sections. Lower HighCut frequencies result in a darker sound. The EQ HighCut parameter also controls the high frequency damping of the reverb.
EQ Low Cut: Controls the frequency below which the low frequencies are attenuated. Higher frequencies of Low Cut will result in a thinner reverb and echo sound. EQ Low Cut directly adjusts the cutoff frequency of -6 dB/oct highpass filters in the Echo section, affecting both the input and feedback of those delays. EQ Low Cut also controls the low frequency damping of the reverb, and can act as a low frequency damping boost at lower settings, for big dark halls and cathedrals.
COLOR
The COLOR mode is selected by clicking on the name of the active color (Neutral in the above example), and acts as an overall EQ adjustment. See the ValhallaFutureVerb Colorblog post for an explanation of the 4 different color modes.
PRESETS:
When the name of the active preset is clicked, the Preset menu comes up. This allows you to select, copy, and save presets. To access the presets, simply click the name of the active preset, in the button at the top center of the GUI:
The Preset Menu will display when the current preset name is clicked:
To select a preset, simply mouse over the given preset name, and release the mouse button. Mouse over a given preset folder name (the ones with the triangle to the right) to view and select presets within that folder.
To save a preset, simply select “Save as…” from the menu. This will allow you to name your preset, and choose the folder to save the preset to, or to create a new folder for your preset.
If you wish to copy a preset from a forum or blog post, simply select the text with your mouse (including the < and > closing tags), and copy the text (Command+C on Mac, CTRL+C on Windows). Then, select the “Paste from Clipboard” option from the preset menu.
If you want to share a preset with someone, select the “Copy To Clipboard” option, then simply paste the text (Command+V on Mac, CTRL+V on Windows) into the document/email/forum where you want the preset to be.
TOOLTIPS:
The Valhalla plugins are self-documenting. Move your mouse cursor over a control, and the bottom of the GUI will display text describing what that control does.
We’re happy to announce the release of the ValhallaDelay 3.0.0 update. The big changes: two new delay modes, Chrome Tape and Analog!
Analog: More Real Than Real
Analog is a bucket brigade echo model, but with some modern twists. It uses a companding BBD model like the original ValhallaDelay BBD mode, but with 2X the frequency bandwidth, 1/2 the noise, and a new saturation model that sounds closer to thicker BBD units. Analog is far brighter than a real BBD device, but less bright than a digital delay. This ends up being a PERFECT frequency balance for delays, choruses, and reverbs. Dark enough to have character and cut away the obnoxious high frequencies, but bright enough to avoid the murk. We’ve been using Analog nonstop in house for our own musical work. It might be our favorite mode in ValhallaDelay.
Chrome Tape: More Reel Than Reel
Chrome Tape is very close to the original Tape mode in ValhallaDelay, but with the feedback noise greatly reduced and the tape splice artifacts eliminated (the tape splice artifacts will be removed in version 3.0.1). This makes Chrome Tape a less accurate model of old school tape delays than the original Tape mode, but also is a response to users that like the sound of Tape but want less artifacts. Seems like it would be boring, but turns out Chrome Tape is incredibly useful in the mix.
Analog Meets Analog
Here’s a quick demo of the new Analog mode in action. 3 tracks of the Sequential Take 5, running through a single send of Analog for echo, and a second Analog instance on the master bus to add distortion and pitch warble.
ValhallaDelay 3.0.0 is a FREE update for ValhallaDelay Owners!
If you already own ValhallaDelay, the update is in your user account, so log in and grab the latest installer. If you don’t own ValhallaDelay, feel free to grab the demo from the Demo and Downloads page, and check out Chrome Tape, Analog, and the other 15 delay algorithms that are unique to ValhallaDelay. We hope you enjoy the ValhallaDelay update, and thanks for your support!
We’ve just released ValhallaSupermassive 4.0.0, featuring the new Pleiades reverb/echo mode. We’re really excited about this new mode, so let’s get straight to it!
Pleiades: The BEST Reverb In Supermassive
Pleiades isn’t one of the “weirdo” Supermassive modes. Instead, it is designed to make the smoothest, most natural reverbs yet found in Supermassive. Pleiades has a very fast attack, and a filtered exponential decay. The reverb structure is inherently dense without coloration, and the echo density can be increased by turning DENSITY up to 100% without sounding metallic. The goal of Pleiades is to create transparent, open sounding reverbs, but it also excels at modulation effects and chorused delays.
Pleiades can be used to create realistic small room sounds with shorter delays and lower feedback values
Turn up the feedback, and you get a lush reverb with a natural high frequency decay (depending on the EQ settings).
The modulation is rich and balanced, which makes Pleiades ideal for huge modulated reverbs, as well as chorus/flangers and chorused synced echoes.
Plenty O’ Pleiades Presets
Check out the LATE 2024 presets for some good examples of what Pleiades can do. The presets range from lush choruses and metallic flangers, to smooth chorused echoes, to grainy huge reverbs, and finally to beautiful modulated reverbs with high echo density and a natural open decay.
Listen to Pleiades in action
Here’s a quick demo of the Pleiades mode, used on guitar and bass. The rhythm guitar is running through a Pleiades reverb preset, the lead guitar is sent through the Pleiades Run Like Heck preset, and the bass is using the Pleiades 4 voice chorus preset:
Why is the Pleiades mode free?
ValhallaSupermassive started out as a collection of weird algorithms, that were interesting from a technical perspective, but not necessarily useful as standard reverbs. To be perfectly honest, the early Supermassive algorithms seemed promising, but we weren’t sure how to “tame” them, so we let the results be as unruly as they wanted to be. Over the past few years, we’ve released several Supermassive updates that add more and more “musical” algorithms. The Scorpio, Libra and Leo algorithms stand up with anything we’ve released in our paid plugins. The Pleiades algorithm steps up the game even more, in terms of transparency, natural decay, and musicality. We’ve asked ourselves: Should this be in a free plugin?
The answer, of course, is YES. Supermassive has proven to be massively inspirational, not just as a product on its own, but in the development of new algorithm topologies that will be useful for future Valhalla products. There are certain internal limitations placed on the Supermassive algorithms: no more than 16 delay lines, a single quadrature oscillator, fixed lowpass/highpass filters shared by all delays, and so on. The limitations are useful for encouraging experimentation: how many ways can we snap together this limited set of Legos? We find these limitations inspiring, and look forward to upcoming Valhalla plugins where these limitations are removed!
Supermassive 4.0.0: Still FREE!
As always, Valhalla Supermassive is a FREE plugin, available for both Windows and Intel/M1/M2/M3/M4 Macs. Just head on over to the Supermassive page, or go over to our Demos & Downloads page and grab all of our free plugins, as well as demos for the commercial ones.
We hope you enjoy the ValhallaSupermassive 4.0.0 update and thanks for your support!
People have been asking if the Valhalla plugins are ready for macOS Sequoia. The answer is yes. People have been running our plugins in Sequoia for a few months with no issues. We didn’t have to make any changes to our installers our plugins. The hardest part of the transition on our end is learning how to spell “Sequoia.”
The Valhalla Plugins are also compatible with the latest M4 Macs. As far as we can tell, M1, M2, M3 and M4 processors are the same architecture (Apple Silicon, based on ARM cores), just with different speeds, numbers of cores, etc.
We use cookies to ensure that we give you the best experience on our website. If you continue to use this site we will assume that you are alright with it.